Homebrew Question How to make a simple SDL2 program in Switch using devkit pro

stark2022

New Member
OP
Newbie
Joined
Jul 21, 2021
Messages
4
Trophies
0
Age
23
XP
38
Country
India
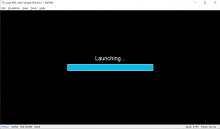
Hello everyone I'm new to switch Homebrew development. I'm starting with SDL2 for Switch Homebrew.I have downloaded and installed devout pro. And opened graphics sdl2-simple example c++ program and compiled it. It compiles successfully and generates a .nro file. Then I dropped it in Yuzu emulator it works fine as expected along with joy con inputs. But now I need to make that program much simpler so that when joy con A is pressed it should change the window background colour to red. I modified the example code by removing unnecessary methods(an user defined method which draws rectangle in particular pattern) as it is not needed for my code. Then I compiled it it compiles successfully and generates a .nro file.And also I used same Make file from original sdl2-simple example because I don't know how to create MakeFile. But when I drag and drop it in yuzu emulator it is stuck at launching progress bar. How to modify my code so that it changes window colour when joy con A is pressed. Here is my code.

Code:
#include <stdlib.h>
#include <stdio.h>
#include <SDL.h>

int main(int argc, char *argv[])
{
    SDL_Event event;
    SDL_Window *window;
    SDL_Renderer *renderer;
    int done = 0;

   
    if (SDL_Init(SDL_INIT_VIDEO | SDL_INIT_JOYSTICK) < 0) {
        SDL_Log("SDL_Init: %s\n", SDL_GetError());
        return -1;
    }

    window = SDL_CreateWindow("sdl2_gles2", 0, 0, 1920, 1080, 0);
    if (!window) {
        SDL_Log("SDL_CreateWindow: %s\n", SDL_GetError());
        SDL_Quit();
        return -1;
    }

    // create a renderer (OpenGL ES2)
   
    renderer = SDL_CreateRenderer(window, 0, SDL_RENDERER_ACCELERATED | SDL_RENDERER_PRESENTVSYNC);
    if (!renderer) {
        SDL_Log("SDL_CreateRenderer: %s\n", SDL_GetError());
        SDL_Quit();
        return -1;
    }

 
    for (int i = 0; i < 2; i++) {
        if (SDL_JoystickOpen(i) == NULL) {
            SDL_Log("SDL_JoystickOpen: %s\n", SDL_GetError());
            SDL_Quit();
            return -1;
        }
    }

    while (!done) {
        while (SDL_PollEvent(&event)) {
            switch (event.type) {
               

                case SDL_JOYBUTTONDOWN:
                {
                    SDL_Log("Joystick %d button %d down\n",
                            event.jbutton.which, event.jbutton.button);
                   
                    if (event.jbutton.which == 0) {
                        if (event.jbutton.button == 0) {
                           
                            SDL_SetRenderDrawColor(renderer, 255, 0, 0, 255);
                             SDL_RenderClear(renderer);
                            SDL_RenderPresent(renderer);
                            done = 1;
                           
                        }
                    }
                    break;
                }

                default:
                {
                    break;
                }
            }
        }
 }

    SDL_DestroyRenderer(renderer);
    SDL_DestroyWindow(window);
    SDL_Quit();

    return 0;
}
 

masagrator

The patches guy
Developer
Joined
Oct 14, 2018
Messages
6,257
Trophies
3
XP
12,006
Country
Poland
First of all don't put rendering frame under button if statement, otherwise your tool looks like stuck until you press A. And done = 1 does absolutely nothing. It's hard to see anything else on mobile except that you are using too many brackets. :P

Rethink your code again.
 
Last edited by masagrator,
  • Like
Reactions: stark2022

stark2022

New Member
OP
Newbie
Joined
Jul 21, 2021
Messages
4
Trophies
0
Age
23
XP
38
Country
India
First of all don't put rendering frame under button if statement, otherwise your tool looks like stuck until you press A. And done = 1 does absolutely nothing. It's hard to see anything else on mobile except that you are using too many brackets. :P

Rethink your code again.

Hello thanks for your reply now I have changed the code and made it much simpler so that when launched it should set the window color to white. Here is my code.It compiles success fully and generates .nro file. But when I drop it in Yuzu it is stuck at launching progress bar screen :( I don't know where I'm going wrong. Does it have anything to do with make file because I'm using same make file which came with example program. And example program code compiles and runs successfully but when I write my own code with same make file it compiles successfully but does not run in Yuzu. How can I solve this problem.

Here is my code

Code:
#include <stdlib.h>
#include <stdio.h>
#include<iostream>
#include <SDL.h>
#include<SDL2/SDL.h>

int main(int argc, char *argv[])
{
   
    SDL_Init(SDL_INIT_EVERYTHING);

    SDL_Window* Window = NULL;

    Window = SDL_CreateWindow("demo",SDL_WINDOWPOS_CENTERED,SDL_WINDOWPOS_CENTERED,800,450,SDL_WINDOW_SHOWN | SDL_WINDOW_OPENGL);

    if(Window == NULL)
    {
        std::cout<<"Error in window initialization\n"<<SDL_GetError()<<"\n";
        return -1;
    }

    for (int i = 0; i < 2; i++) {
        if (SDL_JoystickOpen(i) == NULL) {
            SDL_Log("SDL_JoystickOpen: %s\n", SDL_GetError());
            SDL_Quit();
            return -1;
        }
    }
 
   SDL_Surface* Screen = SDL_GetWindowSurface(Window);
   
    bool running = true;
    SDL_Event event;
   Uint32 white = SDL_MapRGB(Screen->format,255,255,255);
   
   SDL_FillRect(Screen,NULL,white);

   SDL_UpdateWindowSurface(Window);

    while (running)
    {
        while (SDL_PollEvent(&event))
        {
            if(event.type == SDL_QUIT)
            {
                running = false;
                break;
            }
       
        }
    }
   
    SDL_DestroyWindow(Window);
    SDL_Quit();

    return 0;
}
Compilation

upload_2021-7-22_8-33-38.png


Stuck.....
upload_2021-7-22_8-33-59.png
 

Attachments

  • upload_2021-7-22_8-33-4.png
    upload_2021-7-22_8-33-4.png
    12.9 KB · Views: 59

Site & Scene News

Popular threads in this forum

General chit-chat
Help Users
    K3Nv2 @ K3Nv2: Here we go