Grand Theft Auto IV - The Complete Edition (2010) PC version modding

HI all,

Having previously modded the 2009 PC version of the Grand Theft Auto Trilogy, I have now obtained a copy of Grand Theft Auto IV - The Complete Edition, which includes 'The Lost and Damned' and 'The Ballad of Gay Tony' expansion packs, and will try to upgrade the game in a similar fashion as before (https://gbatemp.net/threads/grand-theft-auto-trilogy-2009-pc-version-modding.616784/). I want to share my experience on this forum for anyone else to reference in the future, with guides on how to tweak the settings to match PC performance and also demonstrate the tools & techniques that can be used to modify the game itself:


My PC set up consists of:
  • Lenovo Thinkcentre M93P SFF desktop computer
  • Windows 10 Pro (64 bit)
  • Intel i5 4570 (quad core 3.2GHz)
  • 24GB RAM (DDR3)
  • NVIDIA GeForce GTX 1650 LP graphics card (4GB GDDR5)

Stay tuned ;)

Grand Theft Auto IV The Complete Edition - PC.jpg
 

hooky1992

Well-Known Member
OP
Member
Joined
Jan 13, 2021
Messages
119
Trophies
0
Age
32
XP
720
Country
United States
I bought Grand Theft Auto IV on the Xbox 360 as soon as it came out in 2008 & played it to death on a 22 inch CRT television. I recently played the same disk again on my Xbox One S and I was shocked how bad it looked on a 55 inch 4K HD flatscreen. From the middle distance onward there was alot of fuzziness to the graphics, almost like the the 'noise' you can see when watching an old movie on Blu Ray DVD. It was very distracting when driving at high speeds, and even if i zoomed in at a building with a sniper rifle it would go from fuzzy to clear (so its not a motion related issue). No matter how many configurations I tried in the TV settings I could not get rid of it, so I was keen to get my hands on the PC version to see if it was any improvement.

Side Note: DO NOT install the game in Program Files as I have below. Files in this part of the C drive need Admin permission to create / edit, and since various mods generate new files or modify existing this will cause crashes due to 'access denied' (I learned this the hard way !). I eventually cut & paste my existing game folder to another hard drive with no issues to solve the problem, but save yourself the effort by not doing it in the first place ;)

The first thing i noticed on loading the games was my USB clone Xbox 360 controller didnt work. Searching on Google, it seems the game only works with official equipment, so I paired my Xbox One S controller via bluetooth to my PC and it worked straight away with no further configuration (see attached guide: https://support.xbox.com/en-IE/help...roller/connect-xbox-wireless-controller-to-pc). It even worked straight away with my Xenia emulator for Xbox 360 too ! Please note if you have any issues, update your controller via Settings on the Xbox One console and try again. Also if you are using a Blue Tooth dongle try plugging it into a different USB port. Another option would be to use Xpadder controller emulator (https://www.moddb.com/downloads/hitman-contracts-controller-support), which I use for a couple of other games already, to map specific keybaoard keys to joypad buttons.

Starting up the game itself I could see a nice increase in default visual detail and graphics quality, and the dreaded fuzzy distant visuals were gone at last (apart from leaves on the trees). The CPU / GUP seemed to be stable around the mid 60% too:

cpu gpu default settings.png


Backing out of the game and looking at the Graphics settings, there is an option to 'Benchmark', that when clicked simulates a few NPCs having a gunfight around Star Junction in Algonquin on motorbikes at night time.

bench test.png


After about a minute the sequence ends and the results are displayed on screen, while also being saved to a text file on the local file system, which is a nice feature for trying out a few different graphics configurations:

bench mark default settings.PNG


Although I want to introduce a few graphics mods, I first want to get the base game as optimized as possible using just the currently available Graphics Settings, so as to have a yardstick to compare any improvements I might add and also to help decide if any performance issues the mods potentially introduce are worth the hassle compared to a smooth running game with no mods. I have found the following helpful guide for setting up the base game:


I will not activate every feature in the guide just yet, as I must first research how they may effect any texture mods I might wish to use in future (e.g.) installing DXVK (https://www.pcgamingwiki.com/wiki/DXVK) will allow me to build up a cache of textures so they dont have to load constantly as I navigate the game world, but will i cause issues with custom car models I later introduce ?

Regarding Graphics Settings, for a good article explaining what each one does (according to RockStar Games) please read this: https://gamefaqs.gamespot.com/boards/952150-grand-theft-auto-iv/46927565

For a good article explaining the impact of each setting on performance, please read this: https://steamcommunity.com/sharedfiles/filedetails/?id=1253309779

For now I will only tweak:
  • Water Quality to 'Low'
  • Shadow Quality to 'Medium'
  • Night Shadows to 'OFF'
  • View Distance to 40
  • Detail Distance to 40
  • Vehicle Density to 51
  • VSync to OFF

tweak settings graphics.png


After saving my new settings & restarting the game, the water now looked terrible but the rest of the graphics looked pretty good, and a Benchmark test showed the increased strain on the CPU/GPU was almost nothing:

bench mark tweak settings.PNG


Also, I was also going to increase the limits in pc/stream.ini file but it is already set to 8GB of RAM so I left it alone for now....

I think I now have a good solid base on which to build the rest of my customizations, there seems to be a few mods for increasing draw distances / available RAM so I can always circle back If I am having issues in the future.
 
Last edited by hooky1992,

hooky1992

Well-Known Member
OP
Member
Joined
Jan 13, 2021
Messages
119
Trophies
0
Age
32
XP
720
Country
United States
GTA 4 allows users to modify a file in the root game folder named commandline.txt , which that passes arguments pre-game launch (e.g.) to control how much video RAM to use. I also found an article with some more tweaks (https://steamlists.com/grand-theft-...ine-arguments-for-quality-improvements-guide/) and ended up with the following:

-rglLanguage=en-US
-norestrictions
-nomemrestrict
-percentvidmem 100
-novblank
-noprecache
-forcehighqualitymirrors
-reservedApp 0
-fullspecaudio


I cant say I noticed a huge improvement in visuals, though CPU was now averaging 70% and GPU steady at 45% . At least I can always revisit in future to tweak, as soon as I discover a full run down of the commands I will do a post !

For alot of mods to work i need to downgrade my installation of the game. There is some debate online as to exactly what version you should pick, but I settled for 1.0.7.0 as thats the version thats name checked to most for modding. Luckily there is a great tool online (https://gtaforums.com/topic/976691-gta-iv-downgrader/) that uses a simple wizard to walk the user through the down grade step by step, and also installs alot of fixes and optional tools at the same time !

GTA downgrader.PNG


Fixes installed during the downgrade include:

- FusionFix
- Graphical Bug Fixes v1.2
- EFLC PC Quality Texture Update v0.1
- IV Fixes & Improvements v3.0
- Responsive Plus
- Improved Animations Pack Update 2
- Extend Vid Mem
- Rancher Collision Model Fix
- Karin Sultan Trunk Fix
- Fixed Combat Shotgun Icon Fix
- Plane Flight Path Improvements
- optimized stream.ini, mirror-fix, more visible rain-drop-textures

Please note you must use the 'PlayGTAIV' SecuROM Launcher in the root game folder & Run as Admin to launch your newly downgrade game.

1070 launcher.PNG


Nico was also invisible at first, but loading up the last Saved Game fixed this, it seems to be a known bug. The CPU usage stats were now pretty much 100% non stop (although no graphics glitches or stuttering occurs) so I took advantage of the Fusion Fix (https://github.com/ThirteenAG/GTAIV.EFLC.FusionFix) frame limiter by opening GTAIV.EFLC.FusionFix.ini with Notepad and changing the following settings:

FpsLimit = 50
CutsceneFpsLimit = 50


This reduced the CPU usage stats to about 95% on average, so I will need to figure out some more methods to reduce it further, perhaps by caching shaders with DXVK ?

An awesome mod that I installed while downgrading is ZMenu IV (https://zolika1351.pages.dev/mods/ivmenu) which is alot like Cheat Menu for the previous GTA trilogy. It allows the user to spawn vehicles, teleport to anywhere on the map, listen to the radio outside of a car, etc ...

In game press F7 on the keyboard to toggle the menu ON/OFF, then:
- Numpad 4 & 6 to fast scroll bigger menus and to change options with < >
- Numpad 8 & 2 to scroll
- Numpad 5 to enter a menu or select an option
- Numpad 0 to back out of a menu

and here is a video of it in action:


Post automatically merged:

Looking a bit closer at my root directory to see if anything had been auto installed thats causing my CPU to suddenly max out, I spotted the following .ini files:
  • GTAIV.EFLC.FusionFix
  • ZMenuIV
  • SimpleTrafficLoader
  • ZolikaPatch

GTAIV.EFLC.FusionFix.ini was used to lower FPS already, while ZMenuIV.ini just contained the default values for the cheat menu, so contained nothing that would affect performance.

SimpleTrafficLoader.ini (https://www.gtainside.com/gta4/mods/157022-simple-traffic-loader/) is a mod that allows users to force car models listed within it to appear in the game world, with the ability to designate certain models to specific areas if the player wishes:

simple traffic loader.png


Thinking this might be causing the extra load on the game, and also not wanting to cause potential issues with other car models I plan to introduce, I removed it and SimpleTrafficLoader.asi from my root folder & loaded the game. Exiting Roman's apartment, there was about half the amount of vehicles driving about as before (I can increase Vehicle Density from 50% to 75% in the Options for a 1% CPU increase to revert this) and the CPU / GPU stats were still quite high. I changed the time of day to 22:22 to get the lights & shadows generating, and the CPU settled around 88% with the GPU at 45%, so a minor improvement straight away by removing this mod.

The ZolikaPatch.ini (https://zolika1351.pages.dev/mods/ivpatch) contained an enormous list of options, some of which related to unnecessary shadow related graphics improvements (e.g.) lamppost spotlight shadows for detached car parts:

zolika.png


I believe GTA 4 loads the entire game world in one go, so all these little items could potentially snowball into a massive load on the CPU, and I still want to introduce some additional game wide graphics overhauls of my own. Therefore I decided to turn OFF the following (by changing value from '1' to '0'):

; tunnel, lamppost and heli spotlight shadows for cars (disables headlight shadows)
CarDynamicShadowFix=1
; tunnel, lamppost and heli spotlight shadows for detached car parts
CarPartsShadowFix=1
; make all objects cast shadows (e.g. bollards, Hove Beach train tracks)
ForceShadowsOnObjects=1
; remove the draw distance from static vehicle shadows
InfiniteCarBottomDistance=1
; reduces the threshold velocity below which physics objects can "go to sleep" at, this means vehicles stop in a more realistic way but it might be a performance hit
NoPhysicsSleep=1


The effect of turning all these OFF was virtually nothing during the day, however a night the CPU use was about 85% with the GPU at 40% . I then revisited GTAIV.EFLC.FusionFix.ini to set the FPS to 30, and reloaded the game. Now daylight usage was CPU 80% / GPU 35%, and night time usage was about CPU 75% / GPU 35%. Shadows are obviously fuzzy and degraded but the rest of the game world didnt look too bad:

day 30 FPS.png


night 30 FPS.png


day 30 FPS ii.png


night 30 FPS ii.png


I also saw a few potentially useful items in ZolikaPatch.ini that were disabled by default. Not knowing the effect each one would have on performance, I decided to turn each item ON one at a time (by changing value from '0' to '1'):

; remove static shadow textures under cars
RemoveStaticCarShadows=0
; remove static shadow textures under cars in cutscenes
RemoveStaticCutsceneCarShadows=0


These removed shadows under cars at night, it looked weird and had no positive impact on performance so I turned them both back OFF again.


; reimplements memory allocation, possibly increasing performance, reducing loading times and memory usage and completely eliminating SMPA* errors
NewMemorySystem=0


Completely trashed the graphics and had zero positive impact on performance so I turned it back OFF again ! :

NewMemorySystem.png


; increase the amount of objects that can be spawned at one time
IncreaseObjectLimit=0


Didnt seem to spawn any more objetcs however there was no negative impact on performance so I left it turned ON for now

Thats about it as far as fine tuning goes, next up will be delving into game wide graphics over halls, and if I havent bricked my PC by then we can start introducing some custom car models / new buildings / a few other surprises .....
 
Last edited by hooky1992,

hooky1992

Well-Known Member
OP
Member
Joined
Jan 13, 2021
Messages
119
Trophies
0
Age
32
XP
720
Country
United States
Regarding modding the game world graphics, I decided on iCEnhancer (https://icelaglace.com/), which works by altering the game engine's post-processing effects, specifically the lighting effects are enhanced. More importantly, no textures are replaced with higher resolution ones, but rather the sharpening filters are exchanged and the contrast is increased, with reflections on the vehicle bodies also getting a nice boost. This is exactly what I am looking for, as it will allow me to improve visuals without effecting other mods I later install (I previously had visual issues with modding GTA San Andreas after applying the Rosa Reborn texture swap). Below is a good preview of what the game looks like with iCEnhancer in effect:


After downloading the file I just drag drop the unzipped iCEnhancer files into the various game folders, after first taking a back up of any files that will be replaced. When I loaded the game a new logo appeared to tell me the install had been successful:

ICE load screen.png


and the in game graphics themselves now looked alot brighter and pleasing to the eye:

ICE i.png


ICE ii.png


ICE iii.png


ICE iv.png


Surprisingly the strain on the system was now alot lower, with average of CPU 65% / GPU 45% at any time of the day or night. It seems to suppress some / all settings in the Zoilka patch (although JizzyJims light seems to work OK still), however I did spot some wired snowy effect in the night sky and some lights from the bridge seem to repeat off into the distance, both in the air above and on the water underneath :

ICE v.png


I shut down the game, raised FPS to 60 in GTAIV.EFLC.FusionFix.ini and started it up again, this time usage stats shot up to CPU 85% / GPU 75%, which is still acceptable to me (although lets see how it performs when I introduce dozens of HD car models !).

Briefly looking at the new .ini files installed in the root folder, there are still a few effects switched OFF by default that I must try out (High Dynamic Range being the obvious one) so I could be reverting to 30 FPS in future depending on the system load. I also noticed that tweaking the Graphics settings from the in game Options menu didnt seem to do anything, therefore I must figure out how these are now being over ridden and perhaps tweak them up / down as required


SweetFX settings.PNG
 

hooky1992

Well-Known Member
OP
Member
Joined
Jan 13, 2021
Messages
119
Trophies
0
Age
32
XP
720
Country
United States
After first dropping FPS to 30 in GTAIV.EFLC.FusionFix.ini , I then set HDR = 1 in the SweetFX_settings.txt file, and when I launched the game usage stats were now CPU 85% / GPU 45%. The visuals now looked more vibrant due to the deeping of colours, as the following comparisons show:

normal settings
-------------------------
no HDR 1.png


with HDR active
--------------------------
HDR 1.png


normal settings
-------------------------
no HDR 2.png


with HDR active
--------------------------
HDR 2.png


one complaint I have is the night is far too dark with HDR active:

normal settings
-------------------------
no HDR night.png


with HDR active
--------------------------

HDR night.png


I found a potential fix on a GTA 5 blog post (https://forums.gta5-mods.com/topic/26357/why-every-graphic-mod-make-night-too-dark) where the <postfx_exposure> value, which controls the overall darkness / brightness of the game according to the time of day. Thus by increasing the 1st value (defines midnight to 5:00am) & 13th value (defines 10:00pm to midnight) by +0.5000 it will leave visibility closer to daytime.

I could not find anything similar in the GTA 4 timecyc files, so will need to research a bit more for a proper fix. In the meantime I will change the time via cheat menu as a work around, as the screenshots below show how much HDR improves the visuals:

HDR 3.png


HDR 4.png


HDR 5.png


HDR 6.png


Moving on from graphics tweaks, for modifying individual items within the GTA game world, which often involves injecting certain files into .img disk images, an excellent program to use is Open IV (https://www.gtaall.com/gta-4/programs/39373-openiv-16.html), which also has support for other Rockstar games such as Red Dead Redemption, Max Payne, etc .... Its a great tool for simply having a look at various 3D models within the game too:


Another cool feature is the ability to view any freshly downloaded / locally stored new files (such as vehicle models) before you add them to the game. Simply right click and select Open With on the vehicles WFT file, search for Open IV, then do the same for the WTD file:

open iv select Open with.png


the icon beside each file should then change to the Open IV logo, and when you click on them Open VI will launch and load it into the viewer, where you can then view the model in full 3D, remove parts via check boxes, preview its textures, etc ...:

open iv view heli.PNG


This will come in handy for adding new cars in future, but for now i will just install some HD texture roads and sidewalks (https://www.gtaall.com/gta-4/mods/44076-new-roads-textures-hd.html). Drilling down to pc/data/cdimages/gtxd.img via Open IV showed the following:

gtxd.PNG


and clicking on an item opened a preview of each file it contained:

bk new rds.PNG


doing the same steps on the mod file I downloaded to my USB stick showed the following:

bk new rds modded.PNG


A nice improvement, however I took a backup of the original gtxd.img file incase i ever wanted to switch back to the old look and feel. After that, I drilled down to the correct folder, switched Open IV into 'Edit mode', then right clicked the current file and clicked to 'Replace' it with the modded gtx.img file, and when I loaded up the game the roads now looked like this:


HD roads 1.png


HD roads 2.png

Post automatically merged:

After second thoughts , I have decided I dont like the side walks but want to keep the black tar HD roads, pedestrian crossings, etc ... , so I will create a hybrid gtx.img file with a mixture of original textures for side walks and new HD textures for all else.

First off I took a copy of the new HD pack gtx.img, as I will be adding in original side walk texture files to it and using that as the hybrid file. Then I opened original gtx.img file with Open IV, viewed the first item in list (brook_new_roads.wtd), then clicked Export all Textures as DirectDraw Surface (.dds) to another local folder. Its a quicker method than extracting each side walk one at a time because I can just delete all the locally extracted road files in one go.

export all dds.PNG


I then opened the hybrid gtx.img , put in Edit Mode, then right clicked brook_new_roads.wtd and clicked Edit. Then choose a pic, click Replace, and select the original file I will swap in via pop up, and so on until all are swapped, then click Save.

edit new hybrid.PNG


I did the same for brook_roads.wtd, then replaced gtx.img in game folder with new hybrid version and launched the game:

hybrid road pavment.png


hybrid road pavment 2.png


The game loaded OK, road around safe house looked cool apart from some crossing points, which is how it looked before anyway ... so thats 2 ,wtd files down and 17 more to go !

However .... when driving around I noticed some weird stretches of road where only some spots where in HD and the rest were in the old style:

hybrid road pavment 3.png


Thinking i messed up the files somehow, I swapped back in the full HD gtx.img but when I visited the same place on the map I had the exact the same issue . Doing some research online, it seems not all road textures are contained in gtx.img, and drilling down into (e.g.) pc\data\maps\east there were a few more .img files

maps east.PNG


Looking at brook_n.img there was over 100 texture dictionaries, clicking one named brookn_roads.wtd I could see it had a few random looking road textures too:

random road texture.PNG


This means I will either have to look for a more complete mod that does every road texture in the game, or else manually go through every texture dictionary and swap out the vanilla texture with a HD version 🙈

side note ..... some more HD road textures that are not in gtx.img can be downloaded from these URLs:

https://www.gtainside.com/en/gta4/mods/52797-duke-complete-roads-1-2/
https://www.gtainside.com/en/gta4/mods/52810-duke-complete-roads-2-2/
https://www.gtainside.com/en/gta4/mods/52716-complete-broker-roads-1-4/
https://www.gtainside.com/en/gta4/mods/52718-complete-broker-roads-2-4/
https://www.gtainside.com/en/gta4/mods/52719-complete-broker-roads-3-4/
https://www.gtainside.com/en/gta4/mods/52744-complete-broker-roads-4-4/
 

Attachments

  • gtxd.PNG
    gtxd.PNG
    59.5 KB · Views: 58
Last edited by hooky1992,

hooky1992

Well-Known Member
OP
Member
Joined
Jan 13, 2021
Messages
119
Trophies
0
Age
32
XP
720
Country
United States
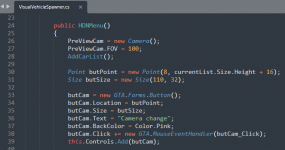
Before I get started on importing car models I wanted to add a speedometer (https://www.gtainside.com/en/gta4/mods/141845-speedometeriv-280-km-h/) around the map, so as to judge the acceleration of each car when I get round to tweaking any hard coded settings. Installing was easy, just unzip downloaded files & drag drop into the root folder of the game, then when I booted up:

speedo.png


Learning from experience, I wanted to spawn every vehicle in game to check all models where there, as I had Vice City crashing before due to missing models. so I teleported to the airport, spawned every vehicle listed in the cheat menu, this time round all spawned OK. I then took copy of pc\models\cdimages\vehicles.img and saved on my desktop incase I needed to revert later. A quick search of the internet produced a site with a wide selection of replacement models:

car selection.png


Please note that just because a vehicle has a high number of models I found that it is often a replacement with the exact same car but with maybe 50 different paint jobs / decals ! Best to order by number of Downloads to get the choice picks first, that way you might only have to nav through to the fifth page of results before finding something you like....

So taking the first model on the list, which is a common model in game, I went for a average car model to swap out:

Audi A6.png


I then downloaded the zip (didnt use Auto Installer for security reasons), extracted wtf and wtd files, and had a look via OpenIV:

Audi A6 - viewed in Open IV.PNG


Looked fine to me, so I drilled down into vehicles.img via OpenIV in edit mode and drag dropped across the two files, and when I spawned it in game it looked great:

Audi A6- in game.png


Thinking best method of choosing models, it would be best to keep the exotic cars exotic, as in if I swapped out a common car for a super car they would appear all over the place & would thus lose their appeal. As I have a cheat menu to spawn cars I can create anything in a few clicks anyway. Therefore, I have decided the following guidelines for picking a model:
  • dont bother changing buses, trucks, etc ... as I would never drive one anyway
  • if any good novelty models, add in a couple
  • common cars will have a nice looking model but not a super car
  • fast cars will have the top range super cars models
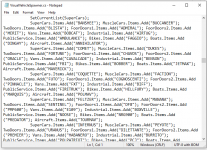
I entered the refined list into an Excel, sorted by the lowest number of replacements (as less choice would be quicker to choose & could pick some exotic models from these) and started reviewing my options. This was the list of swaps I ended up with:

Admiral => Audi A6 2012
Annihilator => Ka-50 Black shark
Banshee => Ferrari F12 SR
Benson => Scania R580 Tandem
Blista Compact => DeLorean DMC-12
Bobcat => UNSC M12 Warthog
Buccaneer => BMW Z4 SP
Cavalcade => Rolls-Royce Cullinan
Chavos => Audi R8 V10 Coupe 2
Cognoscenti => Mitsubishi Lancer VIII
Comet => Porsche Boxster GTS
E109 => BF Injection
Coquette => Porsche 911 GT
DF8-90 => Lamborghini Gallardo
Dilettante => Volkswagen Golf GTI
Dinghy => Seashark Jet Ski
Dukes => Toyota MR2
Emperor => Cadillac De Ville
Emperor (rusty) => Mercedes Benz S65 AMG
Esperanto => Mercedes Benz W124
Faction => BMW M3 E46 ST-R
Feltzer => Audi 80 Cabrio
Feroci => Audi 80 Quattro
Feroci FlyUS => Nissan Skyline GT-R
Fortune => Acura NSX
Futo => Mercedes Benz SLS AMG GT
Habanero => Audi Q7
Hakumai => Maserati GranTurismo
Helitours Maverick => Blimp
Huntley Sport => BMW X7
Infernus => Ferrari F40
Ingot => Reliant Supervan III
Intruder => Mercedes Benz 190E W201
Landstalker => Lexus Lx 570
Laundromat => GMC Vandura Van
Manana => Cadillac Eldorado
Marbelle => Mercedes Benz S350 VIP
Merit => BMW 540i E34
Moonbeam => Range Rover Sport
Oracle => Audi A8
Peyote => BMW M6 Convertible
Pinnacle => Mercedes Benz E63 W213 AMG
PMP 600 => BMW 7-er
Premier => Audi S4
Presidente => Mercedes Benz C32 AMG
Primo => BMW 750iL E38
Rebla => BMW X5
Ruiner => Audi RS5
Sabre => Lamborghini Diablo
Sabre (rusty) => Ford Falcon XB GT351 Coupe
Sabre GT => Ford Shelby Mustang GT500 Eleanor
Schafter => Mercedes Benz C-Class W205 AMG
Sentinel => BMW M3 Cabrio convertible
Stalion => Pontiac GTO
Stratum => Audi RS4 GST
Sultan => BMW M3 E30
Sultan RS => Subaru Impreza WRX
Super GT => Ferrari Testarossa Spider
Taxi Declasse => Ford Fairmont 1978 Taxi
Tug => Container ship
Turismo => Ferrari F50
Uranus => Dodge Charger RT
Vigero => Audi TT FSI
Vincent => Mitsubishi Galant8
Virgo => Lincoln Continental Mark IV
Voodoo => Chevrolet Impala 63
Washington => Mercedes Benz 560SEL W126
Willard => BMW L7

Again, I downloaded the files, then extracted wtf and wtd files for each vehicle, drilled down into vehicles.img via OpenIV in edit mode and drag dropped across all my new models:

add new cars to img.PNG


I then teleported to the airport and spawned each in turn to make sure all changes took effect and Im very happy with the results:

new cars.png


However ..... when I then teleported to the city to see my new cars in the wild, I noticed there was a lot of taxis around ...

only taxis.png


It seems there is a known bug (https://steamcommunity.com/app/12210/discussions/0/3123786356702994941/) where if any vehicle model has a model size over 10 MB, the game runs out of RAM and starts spawning only taxis and police cars, because they're the smallest size vehicle in terms of file size. Luckily there is a fix (https://gtaforums.com/topic/744584-reliv-rilbudgeted-population-budget-adjustertaxi-bug-fix/) that increases the allocated memory for cars.

Simply download the file, unzip, and add the two RIL.Budgeted files to root folder. Then drill down to pc\models\cdimages, right click vehicles.img and take note of the size (451,360,768 in my case):

vehicles size.PNG


Then open RIL.Budgeted.config in the root folder and update the 'VehicleBudget' with the new size, removing any commas:

new budget.PNG


Then when I opened the game a wide selections of models were now being spawned automatically by the game engine:

car spawn new models.png


Regarding the actual driving characteristics of the new models, I noticed the Admiral rolled over soon as i drove off ! Looking at the text file that came with the download, there are a few tweaks needed in the handling files:

A6 read me.PNG


Stay tuned for the tools and methods to get each modified model driving correctly and with its proper name ;)
 
Last edited by hooky1992,
  • Like
Reactions: roamin

hooky1992

Well-Known Member
OP
Member
Joined
Jan 13, 2021
Messages
119
Trophies
0
Age
32
XP
720
Country
United States
I found a great website with list of mods for all the GTA series (https://gtamods.com/wiki/Category:GTA_4), one that caught my eye was IV Needle (https://gtamods.com/wiki/IV_Needle) which had quite a few editors included in one package, thus negating having to download a separate weapon editor, handling editor, etc .... I needed to downgrade my .NET version to 3.5 first to get this program to work (https://learn.microsoft.com/en-us/dotnet/framework/install/dotnet-35-windows).

needle.PNG


To tweak a car, open IV Needle , choose Handling Editor, navigate to \common\data\handeling.dat , then select which vehicle to edit via the dropdown:

needle car handel.PNG


I also noticed an Import / Export option, that I could copy paste the data from the text file that came with car model, click Save .... and when I drove the car in game all was good:

import export.PNG


Alot of factors go into each vehicles handling characteristics, bit trial and error but here is an excellent explanation of each item: https://www.grandtheftwiki.com/Handling.cfg/GTAIV.
GTA 4 developers tried to introduce more realistic handling for cars. It seems rather than a simple 'acceleration' value like in previous games it is a calculation based on Top Speed and Mass and Drag Multiplier:

drive train settings explained.PNG


Comparing the default stats for the Admiral to a Banshee, the values were very much the same, except for 'Mass' and 'Drive Force':

compaire stats.png


As an experiment I teleported to the airport , spawned each car, then put my foot down on the accelerator from one end of the runway to another. The speedometer mod came in handy, as could monitor gear changes as well as acceleration (each gear change made needle drop a few notches down before climbing again). Accel was a little bit better on the Banshee however both seemed to top out at about 100 on the speedo before the end. I tweaked the Admiral 'Force' to 0.40 and repeated, this time it took off like a rocket in low gears and topped out at about 120 before end, so seems the extra gear is stopping it from reaching max speed, however when I tweaked it to 2 gears and tried again, the difference was negligible so reverted back to its original values.

One thing that was missing was a GTX editor to change in game text (e.g.) the vehicle names, so I downloaded one separate (http://download.gta-expert.it/gta-4/strumenti/8244-x-gxt-editor-iv-v21.html) It is simple to use, drill down to the GXT file, search for Items Text to change, modify and Save:

GXT editor.PNG


Now, when I spawn an Admiral, the car was now renamed on screen but I noticed that spawn list still had 'admiral' instead of Audi A6:

new name.png


Bit of letdown but not a massive issue. The cheat menu was bugging me anyway, as its just a long alphabetical list of over 100 models, so in an upcoming post I will be demonstrating an another spawner (https://libertycity.net/files/gta-4/84940-visual-vehicle-spawner.html) which is a bit more user friendly:


As an added bonus, I will detail full instructions on how to modify the underlying code of this mod to tweak the actual functionality, so stay tuned for that !
 

hooky1992

Well-Known Member
OP
Member
Joined
Jan 13, 2021
Messages
119
Trophies
0
Age
32
XP
720
Country
United States
Regarding spawning vehicles, the cheat menu (ZMenu IV from Zolika) was bugging me anyway, as it contained just a long alphabetical list of over 100 models, so I decided to try another Visual Vehicle spawner (https://libertycity.net/files/gta-4/84940-visual-vehicle-spawner.html) which is a bit more user friendly:

visual spawner.png


Please refer to the following instructions to get this mod working: http://hdnshare.blogspot.com/2013/10/gta4-script-mod-instruction.html

The car names still were not changed in this either to reflect the updated values in GXT, which is a bit of a let down, however the grouping of vehicles by type will make it quicker & easier to find my favs and I found the mouse click UI more user friendly too. I tried editing the Item Name in GXT editor too but the spawner lists remained the same & ingame the new value name didnt appear, so I reverted. Seeing as the spawner had vehicles listed in groups, I thought I might be able to modify it to my own specifications. Looking at the code via Notepad, I see vehicle names beside group names:

spawner code.PNG


After copy paste the values into an online sorting tool, then into Excel, gives a more user friendly view:

spawner code values.PNG


Of course, since I made my swap outs of various vehicle modes the list doesn't make sense anymore, as vehicles are missing completely or are in the wrong category. For example 'Dukes' is now a Toyota MR2, which is defo not a muscle car, and its a matter of opinion if its now a 2 door or a super car ! I decided to put it in the 2 door list for now, so not knowing how the code worked I simply edited the text in the file from MuscleCars.Items.Add("DUKES") to TwoDoors.Items.Add("DUKES"), saved it and launched the game, and 'Dukes' was now moved from MuscleCars to TwoDoors list.

I had a think about how to modify it further, such as a cull of any unwanted vehicles & the ordering of any remaining I introduced new models for. I'm thinking of having the nice models I might drive but wont tweak the handeling for (such as Premier => Audi S4) in the FoorDoors1 list, luxury fast cars I will defo tweak in SuperCars / TwoDoors, then all other cars I will modify the performance for (Cognoscenti => Mitsubishi Lancer VIII) in the MuscleCars. My final list looked like this:

new SPAWNER LISTS.PNG


But instead of using NotePad for editing the code I used the excellent Sublime Text (https://www.sublimetext.com/) instead, which can be used for all sorts of file types (.cs, .html, etc ....) for ease of use. Here is how the code looked after I had modified the lists:

sublime text spawner modified vehicles list.png


Looking at the default buttons on the spawner, the vast majority are pretty useless to me, so I decided to do some modifications of my own. For example I cant think of when the ability to open all doors will come in handy, however if I had a button to quickly spawn a favourite car instead of searching through the lists it would be a much more useful.

First off, I modified the button text and its background color for ease of use:

sublime text modify button.png


Then I modified the actual code block the button calls when clicked:

sublime text modify button BMW M3.png


So what I have done with this is deleted the ToggleDoors code and copy paste in the car spawner code itself, but instead of having the VehModel equal to whatever list item is active, I have hard coded the model for a BMW M3, which in my case is the "SENTINEL".

Separately, I found the default camera zoom level to be too far away, so I changed the value of PreViewCam.FOV on line 27 to '66'. After saving the VisualVehicleSpawner.cs file (in the correct scripts folder within the game root folder) when I launched the spawner in-game via CTRL+SHIFT+F1 the lists were reordered, the camera angle was much better and when I clicked the red button a BMW M3 spawned:

new button BMW M3.png


I also found the Radio buttons pretty useless, so I decided to modify them with some code that was not already in the .cs file. I was hoping to import routines (such as Disable Mobile Phone) from the actual ZMenu IV (https://zolika1351.pages.dev/games/gtaiv) cheat menu, but I cannot seem to find any info about the underlying code online. There are some forums regarding script writing online (https://gtaforums.com/topic/499172-iv-coding-directory/ , https://gtaforums.com/forum/317-coding/) however these were written many years ago and most of the links are now returning 404. If I ever get to decompile the ZMenu IV code, or find a definitive directory of the various functions online, I will do a follow up post explaining what is available and how to use in your own custom scripts.


As the custom spawner runs on Scripthook, I did some research that led me to it GitHub page (https://github.com/HazardX/gta4_scripthookdotnet) After downloading the zip, I examined the .cs files in the folder \scripts\for Developers\TestScriptCS\Scripts , which had a few routines I could copy paste into my existing VisualVehicleSpawner.cs file for modification, namely:
  • reset Wanted Stars to zero
  • give all top class weapons with large amount of ammo
  • give enormous health and armour (God mode)
  • add huge amount of money to balance
As before, I modified the button text and color (blue this time) and then tweak the code blocks they pointed to. This is what I ended up with:

sublime text modify buttons code cheats.PNG


I took quite a bit of trial and error to get working, as some of the naming conventions were different to what were in the test scripts (I had to use GTA.Game.LocalPlayer. for pointing to specific player values) and also the only way to test was to launch the game, try to trigger the spawn menu, if it didnt appear look at the code to figure out what was wrong, etc .... A good method would be to comment out everything within the curly brackets, then uncomment each PrintMes line one at a time and click each button in game to check at least that much works (text appears on screen). Then uncomment the code in each block one at a time to check which one works and which is causing an issue.

Finally got all working, and when I launch the game I have some nice cheats at my finger tips without having to search for them:

mucho dollars.png


As the code uses "+=" this will add a million dollars with each click

mucho weapons.png


It seems 9999 is the maximum amount of ammo allowed by the underlying code, this resets it to that value with each click as well as giving the weapon set listed

mucho GOD.png


Instead of a proper God Mode, where damage is not recorded against a player, this sets health and armour to 5 million each instead of 100, so the player will still take damage but health / armour bars will not visibly decrease and the player will not die (not sure why health bar is only half full, maybe I took damage before I activated the cheat ?)


mucho zero stars.png


Clicking the 'No Cops' button resets wanted stars to zero, so you will get chased again as soon as you do something illegal in front of them. Would prefer a Never Wanted routine, so as could travel to other islands before unlock without being hassled ....
 

Attachments

  • sublime text spawner init camera.PNG
    sublime text spawner init camera.PNG
    22.4 KB · Views: 39
  • spawner code.PNG
    spawner code.PNG
    54.3 KB · Views: 46
Last edited by hooky1992,

hooky1992

Well-Known Member
OP
Member
Joined
Jan 13, 2021
Messages
119
Trophies
0
Age
32
XP
720
Country
United States
TJGM has released another video regarding improving GTA4 (below), however he has added a few updates to the comments since it was posted, which I will try to summarize ....


So the very simple fix involves adding a DLL file to the main GTA4 folder to install DXVK (https://github.com/doitsujin/dxvk/releases), which is a Vulkan-based translation layer for Direct3D 9/10/11 that allows older games to run smoothly on modern hardware. Can be used on many other games also, check the STEAM forum for more info: https://steamcommunity.com/discussions/forum/11/2149848024140726141/

I have not tried this out myself, as it will clash with the iCEnhancer graphics mod previously installed, but from the video above it does seem to prevent alot of the stuttering the usually occurs at 60fps. If a workaround becomes available I will do a follow up post.

Please be aware of the following updates added to comments in the video:
  • First make sure that your graphics card is new enough to support Vulkan (https://developer.nvidia.com/vulkan-driver) (https://www.amd.com/en/technologies/vulkan).
  • DXVK won't work for all GPUs unfortunately, typically older models won't work. It's possible other versions of DXVK work with them, but you'd have to test on your system.
  • You only need to install d3d9.dll from the DXVK archive for this to work, you don't need the other .dll files included.
  • For those of you unable to change your resolution after installing DXVK, add " -width 1920" and "-height 1080" to your commandline.txt. Edit the values there to the select resolution you want, as that's only for 1920x1080.
  • The "-noprecache" line in commandline.txt isn't needed, remove it
  • If playing at a high frame rate (over 60 frames per second), you should use FusionFix, which locks the games cutscenes to 60 frames per second to stop them from bugging out.
  • Nvidia graphics card manager (GeForce Experience) has a fps limiter that can be used as an alternative to RivaTuner if you prefer
  • The game may stutter a bit after installing DXVK due to shader compilation. This is normal and it should reduce significantly after a few minutes of play.
  • To build up the graphics cache, first run the in-game benchmark a few times, then walk around the city for a while.
 

hooky1992

Well-Known Member
OP
Member
Joined
Jan 13, 2021
Messages
119
Trophies
0
Age
32
XP
720
Country
United States
there is a method to chainload files with a similar name, that allows me to use ICEnhancer and DXVK simultaneously, check this blog for more info: https://ant-sh.blogspot.com/2021/05/enb-with-dxvk-for-gta-iv.html

I also had to refer to this to tweak the SweetFX settings file correctly: https://steamcommunity.com/sharedfiles/filedetails/id=2461019058

DXVK itself got updated 5 days ago to version 2.3, and apparently the video memory issue is fixed, so make sure you download the most current file: https://github.com/doitsujin/dxvk/releases

so first off I need to rename the .dll to d3d9_dxvk.dll , then drop it into the main GTA folder

then in the SweetFX_settings.txt file I added the following block of text to the bottom:

/*-----------------------------------------------------------.
/ Misc settings /
'-----------------------------------------------------------*/

// external_d3d9_wrapper = d3d9_dxvk.dll


I also removed the "-noprecache" line in commandline.txt and raised FPS to 60 in GTAIV.EFLC.FusionFix.ini

First off, the loading screen graphics were a weird tye dye style & when the game opened the CPU was a constant 100%, so I closed it and cut FPS down to 30 again. This time there were no weird graphics glitches and the CPU was down around 85%

Although it seemed the DVXK mod was working, as no crashes occurred, the only difference I could see was background buildings suddenly popping into view, even ones quite close to Nico. Then when i turned my character to face the opposite way and then back, same buildings popped into view again.

I could see no other improvements, and of course the buildings popping into view was infact a downgrade on what I had previously, so I reversed everything back to how it was before. Bit disappointing but I wanted to share how it went for me incase anyone else wanted to try it out for themselves. Again, if I find a work around I will do a follow up post.

TJGM has also created an updated version of the previous DXVK install video, which sets out the correct steps in better detail, so check that out too:


hooky1992

Well-Known Member
OP
Member
Joined
Jan 13, 2021
Messages
119
Trophies
0
Age
32
XP
720
Country
United States
hi all, looks like GTA4 has a secret mod loader (or at least mod loader type functionality) via an method know as Fusion Overloader, early days yet but it seems modders could have the ability to apply mods without making changes to the actual game files themselves, which would be very handy for trying new items without committing to risking your entire set up !

Early days yet, will circle back with a post when better info becomes widely available, below is a teaser video in the meantime from the always excellent TJGM ;)


hooky1992

Well-Known Member
OP
Member
Joined
Jan 13, 2021
Messages
119
Trophies
0
Age
32
XP
720
Country
United States
regarding Fusion OverLoader .... I never got round to trying this out, as there are quite a few caveats to get it working and my GTA4 set up is so convoluted I haven't the patience to dive back into it just yet !

Fortunately TJGM has created a step by step guide on getting it working (video below), so those who are starting from scratch on a fresh install should defo try it out, as it gives the user so much freedom to try out many different mods.

Please read the video description & comments carefully, as they are being updated all the time with feedback from modders trail & erroring various work arounds. To summarise the main points:
  • GTA IV has an .IMG file limit of 255, the game uses about 200, so that leaves the user with around 50 that can be added
  • FusionFix supports the Complete Edition of GTA IV, as well as versions 1.0.7.0 and 1.0.8.0.
  • some versions require renaming the Ultimate ASI Loader .dll file from "dinput8.dll" to "xlive.dll"
  • some versions require the install of xLivelessAddon
  • Fusion OverLoader doesn't work with ZolikaPatch by default, and the user must disable options in ZolikaPatch that interfere with Fusion Fix
  • so the user must disable anything in ZolikaPatch's .ini file that has the exact functionality that FusionFix also uses, such as (e.g.) BorderlessWindowed, etc.....


hooky1992

Well-Known Member
OP
Member
Joined
Jan 13, 2021
Messages
119
Trophies
0
Age
32
XP
720
Country
United States
Just as a heads up, TJGM recently posted on his Discord server (https://discord.com/invite/AsRsXzqT6s) that along with launching his own Twitch channel he has some new YouTube videos planned for the coming year, please see screenshot below:

1709657417050.png


Make sure to give him a follow on Twitch !

()
 

Site & Scene News

Popular threads in this forum

General chit-chat
Help Users
    Psionic Roshambo @ Psionic Roshambo: 24,000 hmmmm lol