00 is usually done by pressing the 0 key x2 times
tho not in the part where all sorts of strange signs live (decoded text), but in the part where there are rows and columns of 0-9 digits and A-F letters
so:
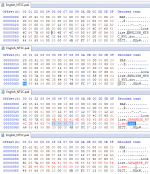
"Open your file with a hex editor and replace the file name starting at 0x45 (for example "ENGLISH_NTSC_RVL.dct") with "JAPANESE_RVL.dct" and then make sure to add or take 00 bytes so DICT starts at 0x60, meaning you add 4 for ENGLISH_NTSC, but take 2 for GERMAN."
see pic:
1st - row 00000040 and column 05 it's our 0x45 for starting
2nd - row 00000060 and column 00 it's our 0x60 for where DICT starts. After all changes, it should stay there.
3rd - replace (overwrite, not add) file name text in right part (where decoded text is).
You see that there is leftovers from old file name - .dct. it's 4 bytes.
You need to overwrite (not delete) it
4th - you do it by entering 00 in left part.
At least I understand it so.
That picture explains it all, thank you very very much! I got the Japanese_rvl.dct replaced and can now play the game in English. I am going to try to patch up the rest now. Thanks for helping me to understand!
EDIT: Now I am at :
"-Voice Acting-
Go to Partition1/Movies and extract "fmv_attract.bik".
Open VGMToolbox and go to Misc. Tools > Stream Tools > Video Demultiplexer. Select "BIK (Bink Video Container)" in Format and check "Split Audio Tracks". Now pull your "fmv_attract.bik" file in and it'll produce some files.
"fmv_attract_0000FFFF.video.bik" is the video, "fmv_attract_00000000.audio.split.bik" is the English audio track, and "fmv_attract_00000006.audio.split.bik" is the Japanese audio track. Now swap the filenames.
OPTIONAL: take "fmv_attract.bik" from the English version and extract that. The numbers go from 0 to 9 (excluding 6, which is the Japanese voice acting). Rename them to 00000006 to have your preferred voice acting in the video."
I have extracted both the fmv_attact.bik from both the Japanese and the English versions of the game. I got the files the tutorial told me I would get, though since I want english audio in my video I decided I wanted to mess with the USA version of the file. That said the tutorial says at the end to "Rename them to 00000006 to have your preferred voice acting in the video."
The problem is that there are 9 audio files that came from the USA fmv_attact.bik, so which of of "THEM" should I rename to 00000006?!?
EDIT: I just used the Japanese file in the mean time since the tutorial is more clear on that part.
So far, all seems well. Title screen is still Japanese, but all else is there in English I believe.
As for the Wii Channel Icon, I don't understand what is being said here...
"If you want to go all out and edit the Wii Channel to English, take "opening.bnr" from Partition 1.
In ShowMiiWads, go to Tools>Unpack U8 Archive. After that, select Tools>Lz77 Decompress and inside opening_bnr_OUT/meta select "banner.bin". etc. etc. etc."
The problem is that when you goto Tools>Unpack U8 Archive, it is looking for a file. What file do I load here?
Other than a few details missing, this ain't a bad tutorial, thankx again for the help!


 @
BigOnYa:
Anybody here have a Xbox series S and a series X, is the performance difference noticeable? Not worried about 4k. I have a series X but not a series S and was curious. (Reason- I was thinking of buying a series S for a second tv, for when grandkids come over, to keep them off my X)
@
BigOnYa:
Anybody here have a Xbox series S and a series X, is the performance difference noticeable? Not worried about 4k. I have a series X but not a series S and was curious. (Reason- I was thinking of buying a series S for a second tv, for when grandkids come over, to keep them off my X)