

 Retroflag GPi Case (Hardware)
Official GBAtemp Review
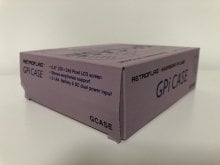
Product Information:
- Official Store: http://www.retroflag.com/GPi-CASE.html
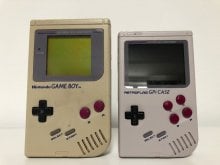
I have always been a fan of the '80s vision of the future. Nintendo blew our socks off in 1989 with the Game Boy: a portable games playing device that took cartridges and lasted an astonishing 15hrs on just two AA Batteries! The grey aesthetic always resonated with me; it was sleek, efficient, and technological-looking. The red buttons and black directional pad were synonymous with the era, packing NES-style tech into one pocket-sized bundle of fun that you could take anywhere and enjoy anytime. When Retroflag announced their GPi Case way back in early 2019 my interest was obviously peaked, as I am an avid Raspberry Pi user and retro gaming enthusiast. Now almost a year later I hold in my hands the greatest creation I could have wished for: a Game Boy-inspired, Raspberry Pi-powered portable that ticks all my boxes!
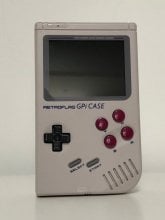
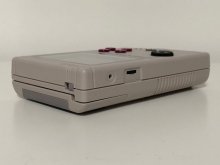
My initial thoughts on the unit were full of glee and wonder. It weighs so little at just 183g and it's so much thinner and less bulky than the original Game Boy DMG-01, at just 135*81*32mm. The unit feels familiar yet modern, new yet old. It's an odd mixture of true retro looks and feel infused with modern features, such as a 2.8" full-colour LCD screen, and adds buttons front and back to facilitate newer games such as Nintendo Super Nintendo Entertainment System (SNES) and even PlayStation One. The result is a hybrid system with six face buttons in total and two cunningly concealed shoulder buttons on the rear. I couldn't wait to get stuck in, and I had a Raspberry Pi Zero W handy to test it out and an old yellowed Game Boy to compare it to!
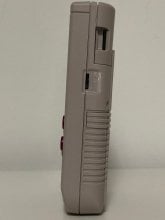
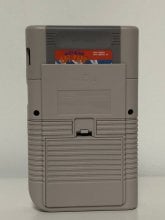
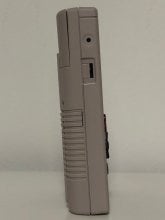
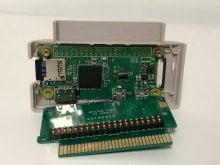
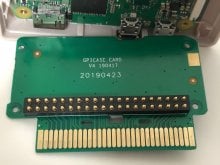
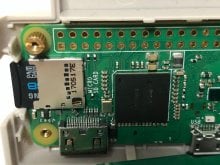
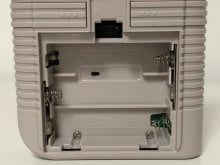
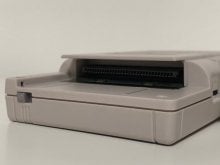
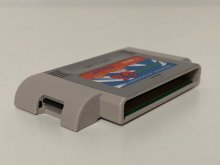
Assembling the GPi case is a cinch, and doesn't involve anything technical whatsoever. You quite literally only have to know basics about how to install an RPi to get this thing up and running. You don't even have to open the main chassis to get this little thing ready to go: all the magic happens in the cartridge casing at the very top rear of the case. The cartridge case mimics that of a Game Boy in aesthetic alone, but opening it up reveals the secret components that make this product sing. Thanks to the handy use of pogo pins, you just have to seat your Pi directly onto the GPIO, connect the two, seat it down, and you're good to go. This means there's no need for any HDMI to LCD cabling--in fact just one small ribbon handles the inputs. Four of column spacers hold your Pi in position and four teeny tiny screws bolt it all in place bringing the pogo pins into the GPIO with an exacting amount of pressure. For my testing, I decided to omit the use of the SD card dust flap. From experience, I knew I would be chopping and changing a lot to get this to my liking, so I wanted unhindered access to the SD card to make it less of a fuss. I would recommend once you have your setup rolling, that you re-attach this flap to prevent dust and fluff ingress in future, especially when travelling with the device, just to keep it nicer for longer. The battery bay is a faithful recreation of the Game Boy's but with a third slot for an additional battery and the safe shutdown switch concealed within. How on earth did the original Game Boy last up to 15 hrs on just two batteries!? The mind boggles!

I began by dutifully following the instructions, installing safe shutdown scripts and getting a GPi case patches to ensure compatibility, but I quickly realised that I could just install my favourite images straight off the bat. For years I have used Recal Box as my go-to distribution, and that is because it just works. I have also dabbled with Retropie and Lakka with less effectiveness, so I opted to try Recalbox for my primary tests. Because all of them use Emulation Station as a front end, each installation is easy to navigate and simple to adjust to your liking. To begin with, everything went swimmingly, I could control it easily and get into the settings ready to tweak it. With the GPi screen and audio drivers built into Recalbox 6.1 beta, along with the safe shutdown scripts, I began to set up the console to be as familiar as it could be to my main set-up over on my RPi 3B+. Astonishingly I found a few issues with running Recalbox for GPi purely in the wifi department, that caused me to rethink this installation on this occasion.
Removing the SD card between tests and configuration was a bit of a chore. I have pretty standard "man hands" and simply could not extract the SD card without resorting to using tweezers. if the SD card had an eject mechanism this process would have been simpler, but then, you can always customise the system via wifi or on the system itself, if you can navigate the software properly. Without being able to easily set up wifi and with a bizarre requirement to have a keyboard in use during most of the back end adjustment, I decided to take a departure from making my own image as it was just too strenuous to go through and try to get everything working. Tinkering is part of the fun of getting your own set up personalised and at the time I just couldn't get the damned thing to work as fluidly as I was used to. The "beta" tag should have been a giveaway, and I probably should have poured more hours into it, but I just wanted to have fun with it, not get headaches over the software being too janky.
I should mention that the software is not preinstalled on this unit, nor are any ROMs or anything else. It's basically left up to you to get the software working, and it is no fault of the GPi that this software is partially compatible in areas. Instead, I entered into the world of prebuilt images. I felt dirty, I felt out of my depth, and I felt like a failure: however, the first GPi compatible image I flashed to my 16gb card booted up and crashed. I formatted the card, verified the hash, and reflashed. This time I had a partial success. The screen lit up, it loaded, played a jazzy boot animation, and go to the initial set up screen. From here I simply couldn't control it, as nothing I pressed did anything. I did some research into the matter and I figured it out. There are two modes for D-Pad input: Hat mode, and Axis mode. Switching between the two is as simple as holding 'Select' and either 'Left' or 'Down' on the D-Pad for a couple of seconds. This forces the mode to swap, and the power light handily blinks purple to verify the change has occurred. Once this was done I was in business!

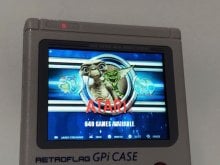
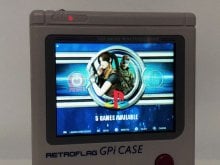
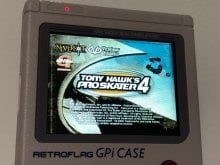
With games from multiple systems spanning many many generations of hardware, I wanted to get a general gist as to which consoles worked more favourably on the Pi Zero. As you know the Pi Zero is a relatively cheap and undoubtedly underpowered device in comparison to its bigger more beefy brethren. The Pi 4 currently clocks in at $75 but boasts up to 8gb of ram and a Cortex-A72 (ARM v8) 64-bit processor, as opposed to the Zero's puny 512mb ram and ARM1176JZF-S processor. For just £10 for the Zero, you can run a plethora of systems from 8 to 16-bit with very little slowdown, but the more complexed 32-to-64-bit 3D emulators will definitely choke under load on such low spec hardware. You honestly couldn't fit the Pi 4 into this form factor, so this is the best, and the only option for now!
- Atari 2600
- Atari 7200
- Atari Lynx
- MSX
- Nec Super-Grafx
- Nec TurboGrafx-16
- Nintendo NES
- Nintendo NES Hacks
- Nintendo Game And Watch
- Nintendo Game Boy
- Nintendo Game Boy Hacks
- Nintendo Game Boy Advance
- Nintendo Game Boy Advance Hacks
- Nintendo Game Boy colour
- Nintendo Super Nintendo
- Nintendo Super Nintendo Hack
- Sega Game Gear
- Sega Game Gear Hacks
- Sega Megadrive
- Sega Megadrive Hacks
- Sega SG-1000
- SNK NeoGeo
- SNK NeoGeo Pocket Color
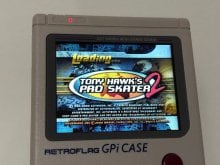
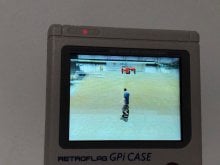
- Sony Playstation
- Wonderswan Color
Note that the Nintendo 64 and Sega Saturn do not feature on this list. The reason being they are extremely intensive to emulate and would not run admirably in a million years on the Zero. You may also note that the PSX is mentioned there, and so it was this one I wanted to investigate most thoroughly. I read that to get the best, most playable framerates you needed to overlock the Pi Zero ever so slightly, and apply a heatsink. The latter I could not do, so I opted for minimal overclock and no heatsink. Thankfully the Pi is simple to overclock and after a little research, and with a sprinkle of trial and error, I discovered that a roughly 10% overclock was reasonable to get slightly more playable framerates and maintain the stability of the hardware without random shutdowns or stuttering. Once clocked you have to expect faster power drain and excess heat, and unfortunately, the GPi casing doesn't have plentiful room for a decent heatsink in the compartment it's in. It also doesn't have any sort of ventilation, so perhaps this could be addressed in future revisions of the hardware to help modders push to extremes.

The prebuilt image I used also gave me access to easy scripts for overclocking and more, so I applied the sanest overclock I could to the device for stress testing. It should be noted that I initially tested the battery life without any overclocking applied and got a semi-reasonable 3 hours out of it with sound and brightness at a reasonable level. The second time around I managed a slightly better 3.5 hrs with the brightness at the lowest I could tolerate. After overclocking to enable more demanding emulators to run better, I got a less than reasonable 50 minutes out of the device on low brightness, and even worse than that: I managed a criminal 15 minutes with brightness at a high level and full sound. I highly suspect my Kodak Batteries were to blame for this more than the actual Pi eating the power so fast. The GPi is touted as having a strong 3-5 hour battery life, however, I could not eke out more than the lower-end estimate 3.5 hours out of it at best. I did some Googling around and discovered that a Qi charging kit does exist for this, but after some actual real-life consideration of the $90 price tag; I felt it just wasn't worth the outlay when, in comparison, I could invest in a set of three rechargeable batteries and a wall charger for just £15.
Through my journey with this lovely little device, I also discovered that the USB port on the back can be used as a USB drive connector via an OTG (on the go) cable. This would facilitate faster transfer of files onto your memory card copying off the USB, but wouldn't allow you to use a USB device as actual physical storage. Using WIFI to send ROMs via a file manager seemed to be the default way to increase your virtual collection, however, pre-built images mean you have the ability to get a flying start, and then customise and curate your collection from there. The overall setup and use of the Retroflag GPi Case is extremely easy, and the casing oozes style, class and simply cannot be faulted for its design and build quality. The screen is sharp and the sound level is more than adequate, but the only gripe is that of power/battery life. The supplied cable also didn't work very well unless held at a weird angle and the battery life of 5 hrs seems optimistic at best for games younger than 30 years of age. There is clearly room for improvement, but as it stands for a sub £60 retro handheld set-up it's a solid choice and easy to recommend!
Verdict
- Very easy to install and set up
- Sharp 320 x 240 screen is great for retro gaming
- Plenty of buttons to get to grips with
- Perfect pocketable size
- No eject mechanism for the SD card
- Battery life is shockingly short
- The power cable is hit and miss

Reviews
Sand Land
Based on Akira Toriyama’s manga of the same name, Sand Land is an action RPG that takes you into a fantasy open world to search for a legendary spring. Should you join this adventure?
Withings ScanWatch 2
Looking to upgrade your wrist-worn timepiece without sacrificing the look of analogue watches? The Withings ScanWatch 2 hybrid smartwatch might be for you. Let’s see what it has to offer in this...
MelGeek CYBER01 Magnetic Switch Rapid Trigger Gaming Keyboard
Today for review, we’ll be taking a look at the latest gaming keyboard from Meltek, the CYBER01 magnetic switch offering!
GEEKOM XT12 Pro Mini PC
Claimed to be the world's most cost-effecient i9 Mini PC, we check out the latest from Geekom.
Kospet Tank T3 Ultra
Tough enough to navigate and conquer the rugged wilderness.
Site & Scene News
New Hot Discussed
New static recompiler tool N64Recomp aims to seamlessly modernize N64 games
Review Sand Land
Anbernic reveals the RG35XXSP, a GBA SP-inspired retro handheld
Launch date for 'Gundam Breaker 4' announced
Asus reveals the ROG Ally X, with better battery life and more "repair-friendly" design
Review Withings ScanWatch 2
"Nintendo World Championships: NES Edition", a new NES Remix-like game, launching July 18th
'V Rising' gets launch trailer
Name the Switch successor: what should Nintendo call its new console?
Microsoft is closing down several gaming studios, including Tango Gameworks and Arkane Austin
Nintendo Switch firmware update 18.0.1 has been released
The first retro emulator hits Apple's App Store, but you should probably avoid it
Delta emulator now available on the App Store for iOS
TheFloW releases new PPPwn kernel exploit for PS4, works on firmware 11.00
Nintendo takes down Gmod content from Steam's Workshop
Nintendo officially confirms Switch successor console, announces Nintendo Direct for next month
A prototype of the original "The Legend of Zelda" for NES has been found and preserved
Anbernic reveals specs details of pocket-sized RG28XX retro handheld
Name the Switch successor: what should Nintendo call its new console?
Nintendo Switch Online adds two more Nintendo 64 titles to its classic library
Name the Switch successor: what should Nintendo call its new console?
Nintendo officially confirms Switch successor console, announces Nintendo Direct for next month
Nintendo takes down Gmod content from Steam's Workshop
The first retro emulator hits Apple's App Store, but you should probably avoid it
Delta emulator now available on the App Store for iOS
Nintendo Switch firmware update 18.0.1 has been released
TheFloW releases new PPPwn kernel exploit for PS4, works on firmware 11.00
New static recompiler tool N64Recomp aims to seamlessly modernize N64 games
"Nintendo World Championships: NES Edition", a new NES Remix-like game, launching July 18th
DOOM has been ported to the retro game console in Persona 5 Royal
Options
View top chatters