Hello! I'm currently in a situation where I cannot use one of my laptops because the charger port is busted. I ordered a replacement part, however, it is not the part I was expecting (although it is what I ordered... I should've looked for assistance from someone fluent in Deutsch, I digress).
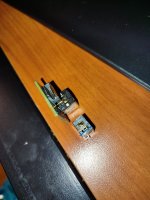
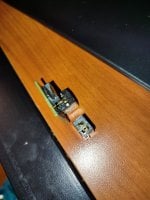
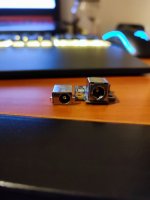
So for starters, I am not even sure if the part I have will be compatible. It is made for the same type of voltage/charger as the other charger jack, but the back of it appears to potentially have another prong on the replacement part. I can mod my laptop case to accommodate the size difference if it's otherwise compatible, but I do not know enough about electronics/motherboards to fully make that call; advice would be appreciated.
I also have a very crummy soldering iron; it was once used for plumbing and the tip is thoroughly corroded. I imagine that's part of the struggle I've been experiencing. If anyone could recommend a soldering iron, I would appreciate it, but I can ultimately reference Amazon reviews. I just trust this place more.
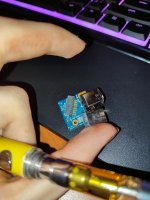
Lastly, if I have a competent soldering iron, it should be pretty easy to remove the solder/apply new solder to this project, correct? I see six points and one plastic piece holding everything together, and I imagine the plastic piece will be a lot easier to remove when the solder has been scraped away.
Or, I may be misguided on how I should go about this entirely.
I feel this is a lot to ask, but, I do wish to learn to solder and I would love if I could turn this into a first soldering experience; I wouldn't dare ask similar for a complex project, but as far as I can see, it should be a pretty easy job?
Any input on anything would be appreciated; I feel a bit lost with the tools a friend provided me for this.
So for starters, I am not even sure if the part I have will be compatible. It is made for the same type of voltage/charger as the other charger jack, but the back of it appears to potentially have another prong on the replacement part. I can mod my laptop case to accommodate the size difference if it's otherwise compatible, but I do not know enough about electronics/motherboards to fully make that call; advice would be appreciated.
I also have a very crummy soldering iron; it was once used for plumbing and the tip is thoroughly corroded. I imagine that's part of the struggle I've been experiencing. If anyone could recommend a soldering iron, I would appreciate it, but I can ultimately reference Amazon reviews. I just trust this place more.
Lastly, if I have a competent soldering iron, it should be pretty easy to remove the solder/apply new solder to this project, correct? I see six points and one plastic piece holding everything together, and I imagine the plastic piece will be a lot easier to remove when the solder has been scraped away.
Or, I may be misguided on how I should go about this entirely.
I feel this is a lot to ask, but, I do wish to learn to solder and I would love if I could turn this into a first soldering experience; I wouldn't dare ask similar for a complex project, but as far as I can see, it should be a pretty easy job?
Any input on anything would be appreciated; I feel a bit lost with the tools a friend provided me for this.