

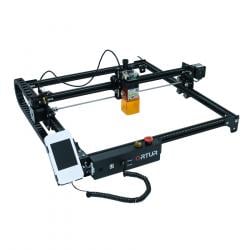
 Ortur Laser Master 2 Pro and rotating stand (Hardware)
Official GBAtemp Review
Product Information:
- Official Store: https://ortur.tech/olm2pro/
Ortur Laser Master 2 Pro and rotating stand
Ortur sent GBAtemp a Laser Master 2 PRO to review.
$449.99 for basic package
$67.99 for roller addon.
Introduction
The laser master 2 pro is the latest in Ortur’s line of laser cutters/engravers. For those unfamiliar then a laser cutter/engraver works much like a CNC or 3d printer in that it moves around a workpiece with a tool, in this case using a laser to cut into/mark/burn things. Consumer versions thereof tending to be much more towards engraver than anything you might expect to reliably/accurately cut any kind of serious thickness metal or plastic. As with most such things your imagination is the limit, though most use them to engrave intricate detail in a variety of materials or outline things like custom gaskets and double sided tape for all those devices that no longer use screws. More powerful things can cut thin layers of metal and thus open up things in sheet goods, custom circuit boards and more. As both artistic uses and precision engineering will be things considered by the likely audience of this then both will be addressed as part of this. It will also hopefully serve as a basic introduction to the world of CNC.
Safety warning
I am by no means a fan of health and safety, and they are most certainly not a fan of me. With a 3d filament printer if you touch it you might burn yourself, if using a drill press your drill might snap and metal forming tools of all types have a tendency to leave sharp edges you can cut yourself on. Things might hurt a bit, you might even get a scar, but for the most part it is things you walk away from and usually your own fault for doing something very silly, and with minimal precautions and protective gear it gets considerably safer still.
Lasers however are several steps above that in danger, and something I implore everybody to consider the dangers of, especially lasers literally designed to cut and burn things and with low levels of inherent protection (no case for the thing after all). Your eyes tending to be the main concern but as such things are also noted in hair and tattoo removal then skin is not much better.
Always use proper eye protection, mainly as your eyes don’t grow back and lasers coming off nice shiny reflective metal at any angle move at the speed of light which is considerably faster than you can blink (not that shutting your eyes will do that much good at these sorts of powers). If you have an open window then the light can also bounce, go through that and being a laser then does not drop off in power very quickly so bothers those in the surrounding areas. Proper eye protection is expensive as well, and needs to be sourced according to the light being used. Basically treat lasers like they are extremely dangerous, because they are. In all things you are the one responsible for your safety but lasers do not take a lot to go awry and cause lifelong ramifications. You can however use them safely and to wonderful effect so we continue on.
In the case of this particular device then safety is not as much as the more traditional laser engravers which have a case around them to try to contain things. If using such a device you might even consider adapting an existing case or box for use with this.
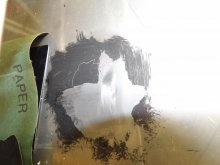
Nominally they claim to have a jog sensor so if the device detects some motion it does not expect it turns off. It also claims to have a fire sensor in case you set something on fire that does not extinguish itself, though takes pains to note it is merely a convenience rather than something to sue them over if it goes wrong. The fire sensor was managed to get set off during an attempt at etching a photo into some wood, and some false positives whenever the halogen or sodium lights were turned on (sadly this means the accompanying video might be a bit dark at points). There is also a “stop everything” physical safety switch which worked here. You will probably want this if you misalign or misplace an item relative to the code being run as stopping a program can take a few seconds both to confirm and stop commands.
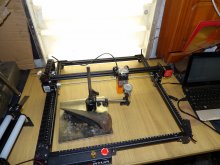
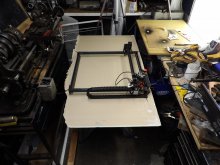
The device
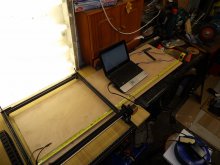
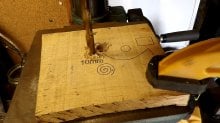
As with most things in the hobby device building space it arrived in kit form with some considerable assembly required. The included instructions were in pretty good English and just about suitable for the task, the online ones being far better, though more on that shortly. Difficulty was not out of line with any normal assembly project of more complicated furniture or build kits they sell as toys. It was several hours from package on the dining room table to first seeing the computer control options burning a hole in said table, and calibration will likely take a bit longer. Should be a comfortable afternoon or evening project though. While the rest of this review will showcase some measurement tools you might not normally encounter then testing for square can be done with a sheet of a4 paper, indeed the machinists that otherwise use some of the measurement tools will also be using said sheet of paper along with a light to test things for square and flatness.
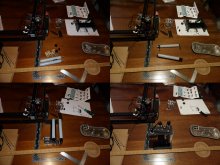
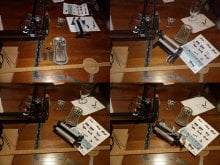
Any multi shots are in order
12
34
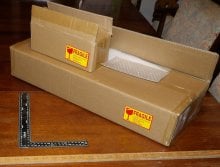
The boxes it all came in.
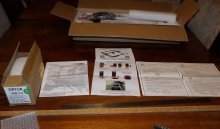
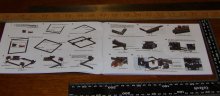
Various bits of paper included.
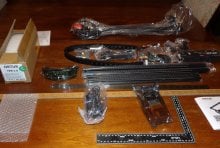
All bagged parts.
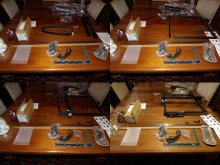
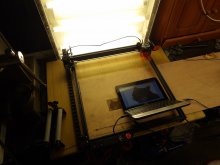
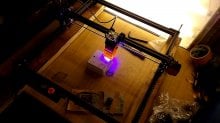
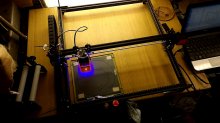
It begins and is on the way Looking more like a laser cutter
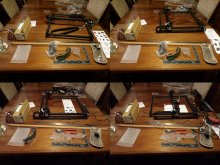
Wiring and first goes with software.
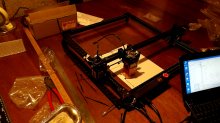
First programs. Better to not fire the laser in a wooden house so it is acting as a plotting device instead.
Assembly
Other than a simple philips screwdriver the kit comes with all you will need to build the device. To see if it could be done it was opted to use the included manual to assemble the device, which was a bit of a silly idea. It got it done but it required some interpretation of ideas, careful study of some unclear pictures and benefited from having and understanding of what was the ultimate goal, though did see having to break things down at one point. Reading through the online manual (which was only seen after getting to the point of applying power and installing the control software) would have been far easier, made certain steps a lot more clear and also yielded further understanding of design intentions, indeed many things I noted as a kind of “in case you are doing it yourself” series of tips for this were included in the online manual. There appear to have been a few changes to the limit switch setup (location and type/numbering) compared to the manuals and the version reviewed but, as noted in the online manual, they operate in a “normally open” configuration (connection is only made when the switch is pressed) and thus could be belled out with a multimeter easily enough.
Zip ties/cable ties are used not only as a kind of strain relief and cable containment but also to direct the wire the powers the laser up into the air, if you do not do this then you risk the wire either preventing the limit switch from working or even getting trapped by the work.
The power supply it comes with is rated at 24V to deliver up to 2A, however the one sent was not in UK plug style and instead European two prong with no adapter plate. For the purposes of the review an adapter was found but for UK use then you might wish to find a replacement or at least a suitable adapter. 24V@2A is a less common voltage and power level to find in the classic box of power supplies most people considering this sort of device will doubtless have (old printer and some laptops maybe), though any number of electronics suppliers will have one.
Calibration
Where you might be able to just have things fall into place for furniture this is not usually an option for mechanical devices that are aimed at being both cheap and precise. Thus calibration to get the machine into line with what it expects and what it is, as well as for the laser itself. The frame has no provisions for any kind of levelling, though the corner brackets have little allen head grub screws in you are told to tighten during assembly. These will push against the inside of the frame and keep everything tighter and more aligned than the basic screws pushing against the rest of the frame might be. Testing with a machinist’s square though everything was quite acceptable with no need to shim anything or try to take some slack out. The machine has no height setting abilities of its own (they sell a screw driven manual focus adjustment tool as an extra) so you are given a “precision block” to set it with, in this case a cylinder of aluminium measuring 50.01mm long according to the micrometer. The wheels of the X axis assembly that also holds the laser are another thing the manual notes as needing attention. In this case it came out of the box suited for it. As it is a complete assembly you do also want to do a token check of any screws fitted at the factory in case something shook loose in transport or was not done properly then. The laser assembly itself in the basic form rides on a dovetail and is held in place by screws on the side, with provisions for adjustments to get it that little bit more in line if off “diagonally”.
Features
The resolution of the stepper motors and lasers is marketing speak. The real measure of any tool like this is repeatability. This is to say if you go off and do a bunch of movements and return to what it thinks is the original location then how far out is this. Seen as the thing is only dragging around a small laser module rather than trying to send a spinning milling cutter through hard steel this should be less of an issue than it often is with CNC mills where you often get missed steps, slips and similar. Similarly for this sort of money nobody really expects active feedback position sensing. Never the less it is something to consider in this.
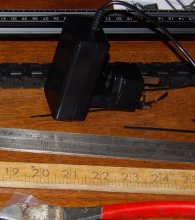
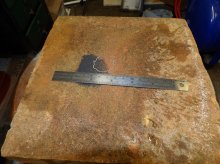
The way we will be measuring it here is same as with most things. Finding a starting point the dial indicator fixed in place and reading taken. The machine is sent off across a path of travel that should end up with it back at the starting point. The difference then being the repeatability. Height differences across travel is also something to contemplate here as thin metal bars tend to sag a bit in the middle and as you have to calibrate the laser to work with this then you want that to be minimal. The structure of the tubes should mitigate a lot of that though.
Backlash might also be a thing to consider in this but more on that later. For those unfamiliar then take any device you have with gears on it. To have them work basically at all then there will be a little bit of “play”/“slop”, a period during which the gears will move but what is being driven will not (no movement tending to mean it is bound up and will not move which is not ideal for things defined as moving parts). Anyway this period of play starts to make a real difference when you are measuring things in a fraction of a millimetre.
Here single steps were issued after a direction change to see the difference between first step and subsequent steps. Some considerable time was spend playing with a dial gauge setup in an effort to assess repeatability and backlash.
For the unfamiliar then dial gauges are a common sight where precise measurements need to be taken. Here a device that measures up to 5mm at precisions of 0.01m (if not more if you squint and estimate distances between markings like you might with a more normal ruler) was set up and used to test both the X and Y directions against the body of the laser module, and the various move (jog if you want to CNC machinist parlance) commands we used to change location to see both how much what should be the same command saw it move and later backlash when it reversed direction and started coming back. This was done at both 0.1 steps and various speeds, and higher amounts of steps and speeds.
It should also be noted that leaning on the table (a fairly thick slab of kitchen worktop, with the laser itself being on a free sitting piece of wooden chip board) could influence the measurements on the reader.
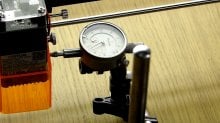
Dial gauge measurement setup.
Repeated for X and Y directions. Stepper motors and belt drives are not usually as accurate as ball screws seen in other “making stuff” devices but here precisions of about 0.1mm were obtained in most jumps. Full table of tests to below, hopefully obvious enough what goes. Backlash varied from almost a missed step at one point to hundredths of a mm for most, and usually being within a few hundredths of a mm of the same step in the other direction. In motion there were some oddities as things almost relaxed into position after movement. We can not rule out being sent “binned” components that might have been otherwise tested but you can see the numbers and whether it is for you.

Horizontal direction (the travelling gantry section/parallel to the main board section) came from the factory pre tightened. The vertical was installed during assembly and believed to be tightened sufficiently, certainly none of the normal skips and smearing associated with such things were seen during the tests, but the "human error" factor of that might be reflected in the results.
Dimensions
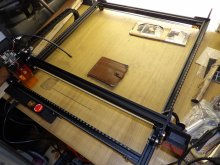
The eschewing of a cabinet here means you can theoretically do very large work pieces if you set up and change location (general advice there is learn what fidicuals are). This could be a real perk for some doing large pieces, wanting something theoretically a bit portable, or pieces already installed on something like a wall or floor. Nominally though you can have your laser travel a distance of 400mm in the X axis and 400mm in the Y axis (nearly 15.75 inches), which compared to most hobby tools like 3d printers and CNC router/mill world is a considerable distance, though commercial laser cabinets are larger (one commercial firm having a max part size of 3000x2000mm, though more conventional offerings in the consumer space might be more like 200mmx300mm). As a more real world reference A3 paper is 420 x 297 mm (16.5 x 11.7 inches) while A4 (which you can see in a picture later) is 297 x 210 mm (11.7 x 8.3 inches). The footprint of the device is 600mm x 570mm (23.62 x 22.44 inches) and should not have any wires outside it beyond the power and USB that both go out the “front” and the shield for the stepper motor as well as the motor itself. This would be in range of the average kitchen worktop that so many of us have for workbenches. Might be a consideration for storage though as disassembly to the point of being small again is non trivial (many screws, wires, belt tensions and more than is ideal). To that end you would probably want to consider it a semi permanent fixture or have a dedicated shelf. Similarly it falling under both precision optical and mechanical device ought to be considered as well if a dusty or dirty workshop is to be its home. Included in the box are some angle brackets, presumably intended to go through holes in the bottom of the feet and be screwed or bolted down. While the rigidity is probably not necessary for this then the ability to hold a fixed location relative to the underneath parts can could be (many will bolt it to a sacrificial piece of wood or other suitable material and have it mark the corners, certain key points and alignment marks, maybe also have some work hold down locations).
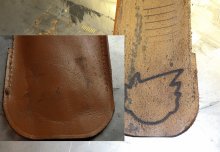
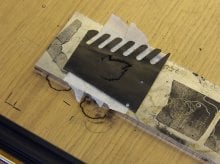
Ramp test
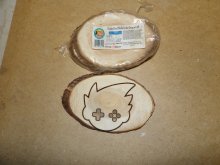
A common test for laser cutter/engraver setups. Here a strip of plywood was cut and the same pattern/program repeated with one of the times having seen the wood raised up at one end (creating a ramp). In the image you can then see the line vary in thickness, and the incomplete nature of some of the pattern. Amusingly a thinner line (which comes from a smaller dot) actually indicates better focus in some scenarios, though here is likely the laser power was too much/speed chosen was lower than might be ideal (would have been 3000mm/m where newer firmwares allow for up to 10000mm/m). The main point though is it shows how key focus distance is and why you want things flat relative to the laser and set properly. If you want another test then try cutting across a curved surface.
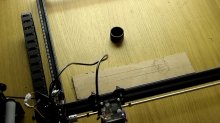
Top part flat, bottom one is the ramp test. The black object being placed under one end to create a ramp.
Replacement parts
Ortur’s website includes selling options for a replacement motherboard ($45.99), and a replacement laser module ($150). How easy it might be to mount another laser module from another vendor and have it speak to the existing motherboard is unknown here.
Workholding, jigs, fixtures
The basic setup of the device is aimed at flat goods. If engraving real world items that are not flat then this can be harder. If doing many of something you might make what is known as a jig or a fixture (there is a difference, jigs guide a tool, fixtures merely locate a work), however for more one off you might want something extra to aid you in getting things flat relative to the laser. If the work is not too heavy then detachable universal camera mounts could be a good choice. Beyond that you might look into, universal vice, an engraver’s vice, or a ball mount vice. Workholding in general is also going to be an issue, though you are spared the considerable forces of more conventional machining. If something is flat and heavy then that is one thing, but some sheet goods tend to want to rise up by themselves. Double sided tape is popular in all manner of workshop activities and served very well here in many of the tests to come (do be careful about the plastic it is made from, or be sure to keep it away from cutting area). More conventional “hold downs” might take some more thought as you have a limited height under the frame and the laser assembly to consider.

There are also more exotic types like vacuum hold downs but that will be left as an exercise for the reader.
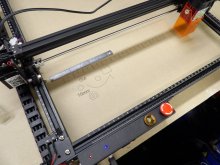
For more simple alignment purposes then you have a “physician heal thyself” type notion of make a grid and have the laser engrave it into whatever base you want. Indeed it also served rather nicely to replace the measurement that was lost on a workbench when one of the wood pieces was replaced.

The website vector ruler being rather handy in this, you will want to do "object to path" on the text sections in inkscape to use with the laser. Other similar SVG images for things like protractors are also available.
The software
The main standard for all forms of CNC machine, which this a type of, is called “g-code”.
Introduction to g-code
https://www.simplify3d.com/support/articles/3d-printing-gcode-tutorial/
A more complete reference
http://www.helmancnc.com/g-code/
A basic g-code simulator
https://nraynaud.github.io/webgcode/
Many times cheaper devices will do all they can to not give you access to this option and instead try to tie you into their own ecosystem (the sorts of things you see in craft stores being absolutely notorious for this and make microtransactions in games become as nothing, and usually quite literally for cosmetics).
At the same time you may not be interested in having to figure out a CAM (computer aided manufacturing) package to interface with your CAD (computer aided design) tool and device. To that end we figure testing the baseline software is worth doing, as is figuring out how easy it might be to feed the device more conventional image formats or have it speak to other tools. Unlike many 3d printers and CNC machines in the hobbyist space this has no options for onboard programming, though they do offer an “offline control box” that allows wireless support and has SD card support. $76.99 at time of writing and not reviewed here.
Instead the trusty workhorse netbook was designated as the management device for it. Model making might be a CPU killer at times but sending commands over a serial port was old news back in the 90s (the fact g-codes are numbers rather than nice readable commands like most modern programming telling you how far back this all goes) and unlikely to trouble anything here. Whether you could use something like a raspberry pi might be an interesting avenue for exploration, and being GBRL based (an incredibly popular open source standard for controlling CNC and such machines) then there is a distinct possibility.
Bundled software
Ortur’s website includes a link to the driver, basically a virtual serial port (STMicroelectronics being the company responsible, Windows XP through 10 being presently supported, XP being tested here. OSX and Linux support is available but drivers are likely taken care of by the operating system itself), the firmware for the device and a further link to the pieces of software vetted for use by them. Others should be supported but you will have to define work areas and acceleration parameters (indeed for the laser manual focus the site notes you will potentially have to adjust parameters in the supported software to account for the extra weight). The USB-serial drivers, as with most custom installs of USB serials I have ever encountered (from cheap devices to semi pro to pro to “costs more than your house” machines), required a bit of hand holding to get installed but was one of the less frustrating. In this case run the installer, and then when new hardware says it needs some drivers you want to manually point it at the relevant folder in the whatever the equivalent of program files is for your computer.
LaserGBRL software
Used in the vast majority of this review and tests conducted on things. Designed for the hobbyist space this piece of GPL3 open source software describes itself as a gcode streamer, which happily puts to rest concerns about being locked into vendor software. It has support for the Laser Master 2 pro built in it seems as it detected it and set relevant parameters as well. Internally it also features the ability to import images of various formats and turn them into gcode (line by line, into a vector aka follow the outline and some dithering options to get some gradients more easily under certain circumstances) and while deemed experimental can also import SVG images.
Format support
BMP
JPG
PNG
The program has the ability to import these formats, and some other more conventional formats, and attempt to turn them into something the laser can engrave. Lasers are nominally black and white devices (you burn it or you don’t) but with some efforts you can do so called dithering (popularised in computer graphics of the 80s and early 90s, it is where a bunch of dots are made to create the illusion of a gradient transition or more colours than were available) or use differences in power/dwell time to maybe burn things a bit less. As pixels are not “move here to here”, and full colour images even less so, you are left with some choices to make. If you are more familiar with outline tools, black and white conversions, difference of brightness outline options or similar from the likes of GIMP and Photoshop then you will be left wanting, but it has a reasonable collection of methods that could serve many here.
https://lasergrbl.com/usage/raster-image-import/line-to-line-tool/
https://lasergrbl.com/usage/raster-image-import/dithering-tool/
https://lasergrbl.com/usage/raster-image-import/vectorization-tool/
SVG This is one of the main “vector” formats of images (scaleable vector graphics being the long form of SVG). The ones before now are “bitmap” which is to say they are a glorified line of specific pixels. Vectors on the other hand are basically a list of mathematical equations describing the contents of the image such that you can scale it to any size without it causing the sorts of issues you have when you try to make more conventional images larger. The primary tool for open source creation and editing of such things is Inkscape ( https://inkscape.org/ ), and will be what most with a more artistic bent will be using, and the program that the creators of LaserGBRL claim to be aiming to support the output of over the other takes. While artistic uses are its main consideration it is capable enough as a more precision tool if you adjust some settings. If you are locked into the Adobe world then Adobe Illustrator is their offering in this but we will not be testing .ai files in this.
Naturally you can load up your own custom gcode program as well into this.
LaserGBRL’s image editing options
The included image tweak options are on the more basic side but crops, rotates, flips (if you are cutting through the back of something then you want this) basic contrast and the expected things are there, as is the option to change size and resolution (which as far as this is concerned is almost the same thing). Other than entering gcode steps yourself (which is an option) there are no design features at all within the program, so no quickly being able to dash off some boring text in a given location without using other programs.
SVG is likely deemed experimental as there are all sorts of quirks that can arise, and odd parts of the standard. If you export SVG as paths, or indeed from a program that aims to work with CNC type devices (librecad is considered elsewhere in this, though short version is it works) then life will likely get a bit easier. Being a laser engraver you are typically not going to be doing things like a CNC mill where crashing the tool into an existing feature, hold down or similar is a common concern. That said you would be doing the inside of a pocket for something so it would also be something to account for if you are doing that, and it is not as easily defined as programs aimed at those sorts of tools.
It similarly does not keep track of locations as well as some higher end tools aimed at things like plasma cutters (the idea being you can use one large sheet of material to cut many small items) but that is not particularly important for most likely uses of this, and you can always set a new zero. Warping due to heat (when your finished product has a tolerance of a fraction of a millimetre then heat expansion becomes a problem) is less of a problem than it is likely to be for something like plasma cutting or even conventional machining, however order of operations is important for speed, for internal features (you might not want little breakaway tabs to remain, or you might want to wait for internal features to be done to start working on external). Custom buttons
https://lasergrbl.com/usage/custom-buttons/
These could be a thing to properly explore if you have a given task you want to repeat a lot. In this case the existing “framing” command was used extensively to align items and make sure the resulting work would fit in the location it wanted to be in/was the expected size.
This program was the primary test program for all this review. SVG export from Inkscape was used extensively and performed admirably, including with the ability to change “page” size to be more useful to the area afforded by things or set the location of the item.
The bitmap image import was also tested. This is a bit more of a system grinder (the resulting list of movements, power on laser at, turn off laser at, and so forth commands being north of 100000 commands) so the little netbook chugged a bit and used a lot of memory but ultimately it still got it done. Features wise the preview to reality window actually saw the preview do it a disservice compared to the final result. Said 100000 and more commands, which happened after several other runs hopefully then speaking to the length of time the whole system can run for. Other times following errors (jog sensor, fire sensor, emergency stop…) and general messing around it was easier to close the program and power cycle the laser cutter but it was all very quick (I have taken longer to change drill bits at times).
Lightburn.
https://lightburnsoftware.com/
This is a paid software offering ($40 for two computers, presumably office and the one powering the laser/ 30 day full feature demo being available) and more of an all in one program that you could do more basic work in. Also the suggested option for OSX and Linux, Linux version being tested here, for Windows a 32 bit version is available but needs Windows 7 at a minimum.
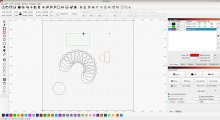
Shapes including a reasonable polygon editor, text (any font on your computer), QR codes, corner rounding, the ability to duplicate items into an array, border options (as in 5mm away from the image in all directions draw a line), the ability to rotate items around a point to create a circular repeating feature (reasonable selection of options for it as well), grouping, mirror (including mirror about a line), boolean operations (union, difference and intersection), svg import (though also troubles with text, will need to externally convert to paths), image tracing is “good for a laser cutter program” but if you are more familiar with Inkscape’s efforts then stick with that, and a nice preview option for the path it is going to take.
It has measurements clearly visible and the option to snap to lines or points but it is an artistic or maybe production interface at its heart, though something one could happily use for most jobs and reserve the proper programs for when it gets serious...
Multiple layers, memory of layer settings for new programs, passes, easy rate settings.
CAD.
As mentioned this is short for computer aided design. If you need precise measurements for engineering type projects this is what you will likely be using. If you need some more considerable customisation in your shapes then this, if you need to design things that might change as needs go on then this, and so on and so on. Classically CAD evolved from engineering drawing but more modern stuff, especially more artistic focused 3d modelling programs, might start in 3d and go from there.
As a laser cutter/engraver is primarily a 2d device, even with the rotary option covered later, then you will probably want to look more towards the 2d approaches to CAD to make them work for you. 2d/sheet goods approaches are also not often taught any more with 3d printing, injection moulding, CNC and more having taken over decades ago; plasma cutting, water cutting and electodischarge machining (EDM) being the main things to keep vaguely alive. Similarly there is more to design than simply putting down shapes where you want them with parameters (parametric modelling) and relationships/restrictions being useful concepts that tend to be immediately introduced when CAD is taught. For instance you might want some holes in a plate, if you scale up the plate you might want the holes in the same location and at the same size where a basic scale will change both the location of the holes and the location on the plate.
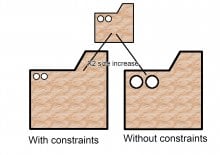
Diagram of scaling and why constraints and relationships are necessary in CAD.
In this case you are making an attachment plate to something. The two holes are where the bolts will go. If you constrain size and location of the holes relative to an edge then when you scale the plate up 2 times you can see the difference that can make.
Many CAD programs will come with CAM (computer aided manufacturing) addons and functionality to turn models into gcode instructions but not all will. In the home user to semi pro world then a piece of freemium software called mach3 tends to be the go to piece of kit, however there are several other choices. It is not tested here as the suggested pieces of software are geared nicely towards laser cutters.
Elsewhere in this https://librecad.org/ was used to make an image for the cutter. It worked just fine without any need to go through another program.
Materials
The materials a tool can deal with forms one of the main things people consider in their usage. Laser cutting tools then having one of the wider ranges of anything out there. Lasers typically being used to
1) Engrave a design upon an item.
2) Cut through an item in a given pattern
3) Heat up an item, usually a metal so the surrounding metal sucks out the heat rapidly. This then being the basis of “laser hardening”. Decorative heating is a thing though and the colour banding and changes associated with heating metals can be desirable for some.
4) Remove surface contaminants, usually dirt from ceramics. In effect cleaning things.
5) Welding things together. Not going to happen here, though you might get some plastics to weld if you were exceptionally bored and somehow had something against adhesives or the more conventional ultrasonic methods; some plastics did melt under the laser rather than cutting and that means welding is potentially possible.
Most will have something of an intuitive idea of what a simple setup like this will be able to handle. But generally weaker materials that are not as reflective will be more able to be cut, whereas materials considered stronger (not an engineering term but suffices for this discussion) will typically find themselves more in the engraving side of things where a nice pattern is made. Some also like to coat an item with a suitable paint and have the engraver doodle a pattern on it (cut here, bend here, drill here… or actually a decorative pattern), and others will coat things to have the laser achieve better “coupling” or maybe protect another area. For something like a PCB you might coat the copper layer in a type of paint, burn the paint off in the areas you don’t ultimately want copper and have the remaining paint act as a barrier while chemicals are dissolving the exposed areas.
Coatings can then be a discussion in and of itself, and the materials list does mention heat transfer coatings. Do be extra sure ventilate your device and area when doing this, smoke from many materials here is both not great for you and also has a nasty habit of messing up optics when it goes up (which is where your laser tends to be, though it has an always on when the laser is fan to help try to blow things out the back) and sticks to something.
Speeds and feeds.
Speeds and feeds is probably the first phrase the neophyte machinist has drilled into them. It is much the same here, however rather than distance you move the tool in you have laser power and speeds is speeds, the longer you take moving then the tool the longer the laser has to do its job (or indeed too much of it maybe) and the longer the job will take. You may also hear the term “dwell time” which refers to how long a, in this case laser, spends somewhere and is somewhat independent of both power and speed in the eyes of various programs. Responses to laser power is also not necessarily linear either, and a small percentage difference can change things quite considerably. Similarly multiple passes (you have a precise robot governing things after all) to cut things can be done, and in some cases ought to be done to prevent overheating of the material being cut. This would also be a test of repeatability. More generally when building things it is often something that has to be noted to newcomers that if you don’t have to make it through in one pass then don’t and life tends to get a bit easier.
Ortur do provide a “materials reference” and several of the management programs will as well. mm per minute tending to be the measure used for this sort of laser diode, things like CO2 lasers might use other means. For testing a simple line pattern was developed consisting of a range of powers, and at a constant movement speed. Many more tests were done with the GBAtemp mascot being made into a shape. The power range on this model is also noted as being more granular than older models and some of its competition. For those more familiar with laser gcode and setups here then M3, M4 (a more adaptive mode, useful for images of varying brightness) and naturally M5 modes/commands are supported. The power range in most programs is given as value of 0 for 0% and 1000 for 100% power. Most things will be using full power but sometimes less is more. This would hopefully then allow us to determine what straight burns, what cuts, what edges are like, what engraves, what melts and so forth for the various materials detailed in the following section of this review.
Wood
Pyrography as it is known to many is the act of using flame, or sometimes electricity, to burn wood in a pattern and one of the more common uses of lasers here. With such things you can make batches of keyrings or similar items, or take larger sections of wood and have a decorative design made upon the surface. Indeed such trinkets have been known to fund such devices for many in the past, and the results are more “could have got that in a shop” than any 3d printer you would have met in the consumer world. What role water plays in this will have to be determined on a case by case basis. For electricity, particularly making Lichtenberg images, it is often used. Here it might serve as something of a self quench action whilst not necessarily impeding the laser that much but you will have to discover that. Different woods will also behave differently; there is a reason your bbq might use hickory to smoke things while others are noted as being more fire resistant. The remains of an old hickory hammer handle were set before the laser.
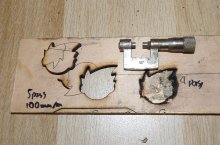
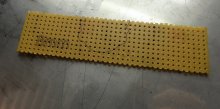
Plywood
This was the main thing used in this, and in some scenarios it might even find itself able to be cut which could be interesting for model making. In the box were some 1.6mm thick samples about the size of a credit card. For plywood that is incredibly thin; by contrast the cheap backing and such all your favourite ikea furniture, that also right now is filling the workshop’s material stores and would have had more but for the lack of space in the van last trip, tends to start around 3mm. It quite readily took marks, though the cutting suggestions (2 passes, full power, 500mm/m) from the materials list were inadequate and you probably want another pass or even two. A large section of some thin ply wood, but one example of the sorts of sizes you could deal with. Picture modes also being tested here. Cutting ply is mentioned as an option. The 5.5mm ply from other shots returned and was attempted. The initial 3 pass at 100mm/m from the materials list was tested and came up short. 4 passes was almost starting to break through. 5 passes got it done. Edges were a bit burned for some purposes but acceptable for many. Above. 5 passes made in 5.5mm ply. Below is the other side where it was broken out from.
Testing picture creation mode on a massive sheet.
Thin cork mats were also tested.
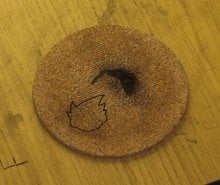
Ignore the large burn mark; it did not appreciate the 100mm/m full power cut. 3000mm/m for the nice mark.
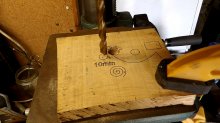
A more general piece of wood was also found for this. Some considerable removal of material was found to be possible (same also for the dining room table but the less said about that the better). Here though you would probably be better off marking out a cut line for a band saw, drill points and whatever else rather than having to mess around with paper and glue or other marking up methods. If you are making prefabricated wood products for later assembly then markings might also benefit in this, be it as simple match the guide or more for cut lines, assembly positions and such. Where cutting is tricky then for some this might be suitable for infill methods, be it from another piece of wood, epoxy or similar. Whether you would want to use it for laminate repair would depend upon how well the burn could be controlled.
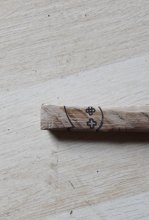
A slice of cedar (end grain if it matters) was used to engrave an image for a club wanting a table mat.

See also the rolling pin in the roller attachment section.
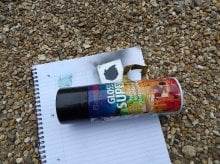
Paper
As mentioned in the opening on uses then gaskets, thin layers of typically special paper (though some of the softer metals and specialist plastics are also popular in this) used to deal gaps between less than gas tight metal parts, Similarly many modern devices (phones, screens, even full blown computers) no longer use mechanical fasteners and instead opt to hold things together with double sided tape. Which works wonderfully until you disassemble the device and need to stick it back together. While you can often get by with lines of thin tape then a proper repair, or indeed just a quick one, will want a nice pre cut set of perfectly sized tape sections to peel off, place on and reassemble quickly.
Greaseproof paper, long the choice of the cowboy mechanic needing a quick gasket, was also looked at. 300mm/m worked wondefully.
For giggles some workshop blue paper was set before there. Short version there is you can mark it without cutting it or setting things on fire. Paper is also a popular, if basic, stand in for human eyeballs when testing laser marking potential, and fairly rapid movements at very low power left a mark, which means your retinas will similarly be marked by short exposures to fairly low power.
More conventional A4 paper was able to be cut as well with fairly low powers and high speeds, marking it is possible too but takes some fiddling.
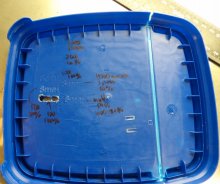
Double sided tape.
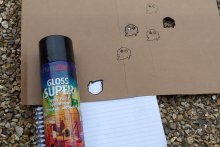
A variety of powers then got tested. In the end then a setup was arrived at that cut through the tape and backing very precisely with no great indications of burning. Double sided tape being put on paper and then dusted with some paint. Bonus is the outline also makes for a nice traditional mask for spraypaint.
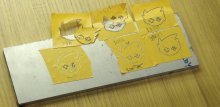
Numbers (above) are mm/m (full power on laser) for each of the results.
Below. Dusting with paint and air dusting it off, and then using the negative image from the tape as a mask for spray paint.
Speaking of masks then the traditional mask, aka an old cereal box, was set before the laser. Worked wonderfully, give or take my subsequent inability to use a rattle can well.
Traditional masking tape was also tried to impressive results.
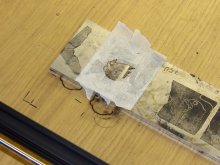
Gasket paper.
Gaskets are layers of material designed to make things air/water/fluid tight where casting or machining tolerances might not be quite there (or be expensive to achieve/maintain). They can be any shape and are common to break/are generally considered consumable; some might even say if you are removing the item sandwiching a gasket you need to replace the gasket. Many times you can still source a replacement, but sometimes you won’t and sometimes it will be expensive or something you could ideally do with in short order while everything is apart.
It just so happened that a job came up.
Gasket paper is there as a possibility but making it can be harder than you might care for (take a rubbing or measurements, trace out, cut with scalpel or similar, punch holes assuming you have suitable punches, hope you don’t slip at one of the later/more critical steps), and if you want 10 of the things then even worse.
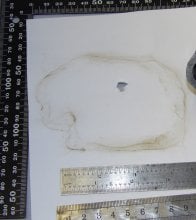
Rubbing with a greasy finger and then cutting... one of the traditional methods. Better you than me.
Being primarily a 2d affair then enter the laser cutter. You may wish to design with kerf width in mind, this being the material removed; you are burning material away, not slicing atoms apart, and cut thickness here is usefully measured in millimetres.
Nothing like jumping in at the deep end (no straight edges, lots of precise holes, warped reference sample), also a good test of interfacing with a CAD program. In this case keeping with the more open source theme Librecad was the method opted for. Measurements, matching a photo (preferably directly above it so you don’t have any perspective errors), and hoping some nice kind supply shop put up a set of detailed measurements/engineering diagram (3d printer types often make use of machine supplies catalogues) you can casually recreate are all valid options. If you can though try to get a new condition item; the gasket here was slightly warped in the middle which made recreating the inner bit not as easy as might have been ideal even after after a go in the press. Do also note you are playing to the mating surfaces and not necessarily the gasket which could have warped, surfaces could have worn, be having extras added or subtracted and more. This is not an engineering drawing or CAD tutorial though so skipping more or less to the good bit. Both a basic Librecad and Inkscape version was made for this to test with. Inkscape has fewer options more seen in CAD approaches when it comes to joining items, though can have some done and can work to distances rather than pixels, print PPI or otherwise.
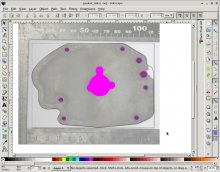
Inkscape version.

Crude librecad version.
Librecad simple SVG export worked fine, the order of cuts is the same as those you put down in the image, including where some straight lines were swapped for more curved ones at a later step in that which might need to be changed if you are doing a larger run.
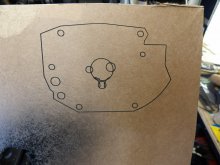
Librecad test on cardboard
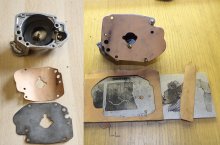
Replacement gasket made and fitted.
Recall but a few lines back “and if you want 10 of the things then even worse” This is nice for rubberised material of the original is thicker than paper and an extra two were needed to make up the difference. Your gasket paper is likely going to be different to this one, however three runs of full power 1000mm/m was enough to cut everything out.
Plasterboard
On the matter of paper then a piece of plasterboard/sheet rock was found and put before it. How useful such a thing might be on a building site vs simply using a more traditional tape measure, level and pen to mark things out will depend upon the job but marking pipes, wiring, attachment points, sections to cut out and more is within reason.
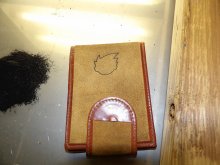
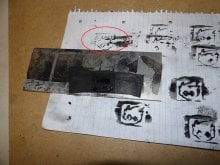
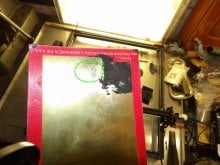
Leather
Intricate patterns on leather is a thing many do, and lasers can happily take chunks out of skin. Thus we get to test leather both as a marking item in its own right and as a guide for complicated patterns you might use as a guide for removal, stitching, cutting and such. Here the laser performed admirably with a sample of leather, shiny side and rough. Markings on the surface ranging from barely able to be felt with a fingernail (actually a really quite sensitive method) to quite deep. Cutting was just beyond the capabilities of this for the fairly thick sample but more than enough to guide some scissors/scalpel or indeed make it the weak point (the removed sections being torn when handling somewhat roughly), and with further refinement might be able to cut things acceptably; more advanced laser cutting techniques involve setting the laser to focus just below the surface so the subsequent cuts are less (see ramp test earlier on). Interestingly the less than full thickness cuts on the reverse side could be made to show up on the other side as a slight bulge which is an effect some explore.
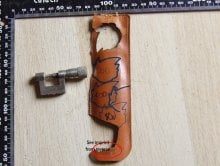
Various powers used on leather. Also tried on "rough" other side, leading to the imprint effect circled in red and further below (lines on rough side are the 3000mm/m 100,80,60,40,20 test sequence)
Miserlou intensifies
Not quite leather but a faux sheepskin type thing.
Denim.
Ever annoying to cut into patterns and dulls your scissors like mad, also something people do like to decorate with various paints, marks and more. Work holding might be tricky if doing it on a pair of jeans or something but that is up to you (a flat block and something to hold tension probably being what you want here). In the image for this you can see the results of several attempts at different speeds, which means time on target. Some go from light marking to fully cutting but also slightly burning, and the result of several passes. The more burned sections also tending to be the tips of the hair spikes for the mascot character. Said burning being concentrated there also speaks to a problem that a better software package or path design might help lessen. In a straight line then the immediate area is free to cool off in short order, in the spikes, which in more general engineering design would sometimes be referred to as a knife edge, the laser effectively spends more time over the target and imparts/creates more heat. A better laser path might then move to another section and return later but that would be down to the programmer. The cut sections also sometimes still had a few fibres that needed to be cut with a knife, though some might consider that a perk; when cutting things on almost any then many times you will a little “tab” (which the Lightburn software has a feature to manage) to break away after the fact. Others may be more familiar with the concept from stencils; if you want internal features surrounded by a complete shape then need to leave something and fill it in later, or rework the design/use multiple stencils and align things, which laser engraving/marking can help dodge as it is not bound by the same rules. Others still may look at the side of a PCB on an item and see at points which offer some support a slightly rougher edge from where it was broken away from the larger PCB.
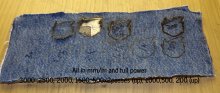
Various speeds on denim, cut section is 3 passes of 500mm/m
Plastics.
There are many types of plastics with any number of classification methods. Primarily though most will start with thermoset and thermoplastic. Thermoset defined as after becoming plastic then they will burn before they melt. Thermoplastic being plastics that will melt and reform upon sufficient heating. The laser being a burning tool then makes one of the primary considerations in this. For a site like this then many will be interested in whether they can use this sort of device to make a pattern on top of a console case, controller or similar rather than using vinyls or paints. Different consoles use different plastics, blends of plastics, outer colourings that might change something, and testing them all would be tricky, and if including things in cars so you can have custom inside trim the list only grows. Polyethylene/polythene (usually seen with PE on the plastic somewhere, Low Density aka LDPE and High Density aka HDPE flavours are available and have their own quirks), Polypropylene (PP), Polystyrene (PS), Acrylonitrile butadiene styrene (ABS) that you might have met as one of the more common 3d printer filament choices, Polyvinyl chloride (PVC), Polycarbonate (PC), PolyAcrylate (PA aka perspex) and for vehicles then polymethylmethacrylate (PMMA) represent most things here. Identifying plastics can be tricky; the obvious thing to look for is any writing on the surface (all those two to four letter names being what you will see, can also be blended PC+ABS being what you will find in some tools and more rugged consoles, GF or GB tending to be stand for glass fibre or glass ball and is usually found in tools or things designed to survive impact). Others if they have precise temperature control (such as a soldering station) will melt the plastic against a known sample or known temperature list. Some can also tell by sight/touch but that is a hard thing and surface finish alone can be altered in many ways. The online manual mentions a list of materials that are ill suited to this. Most notable is PVC as it evolves chlorine when burned, which is toxic, corrosive and accordingly rusts anything iron it goes near (ever seen the results of a burned wire inside a computer?). Industrial laser cutters and engravers will not go near the stuff, and even in general plastics manufacture then as it rusts everything it touches you will tend to be made to pay extra to account for it. However it is also the material used in electrical tape, which many use as a mask when doing various activities like painting or other coating you want selectively applied. Ortur also note that cutting this will void your warranty. Steer well clear here. Others on the list include thick polycarbonate/lexan, ABS (melts rather than burns), HDPE, Polystyrene foam (different to polystyrene) only has a limited capacity, fiberglass (combination of glass and epoxy resin, which would also mean epoxy resin effects might be harder), polypropylene (cellotape/sellotape among many other things), coated carbon fibre. Melting rather than burning however is how a lot of things get marked by industrial laser processes work; foaming (bubbles get captured in the solidifying plastic), carbonising and colour change (usually more of a pulse controlled affair) being the big three beyond it simply vaporising a small layer. Light or dark colours then depending upon the plastic, colour of it and the like. A note on plastics. Casting/moulding plastics in 90 degree angles is hard so most plastic item makers avoid it wherever they can. Just a few degrees of so called draught (draught angle being the term) makes all the difference when it comes to cheap mass production, more angle making it easier still. To that end if you are going to doodle on the top of an ostensibly flat console you will want to make sure it is in line with the flatness the laser expects and that might take more setup than chucking your handheld into the laser path, lining it up on a mat and going from there.
Those of you doing custom keyboard the popular PBT plastic for them is fairly amenable to lasers in general so you could do all custom markings to suit your games, languages, macros or personal font preference.
Plastics being invisble to the laser is not always a bad thing either. Sticking with the subject of fancy keyboards my beloved mechanical keyboard died by the transparent film sheets with conductive tracks on corroding inside. Lasers could then ignore the plastic but get rid of some conductive goop spread around, or indeed make an entirely custom wiring setup with such a thing to suit another controller or replace someone else's.
Never the less from the pile of repair items and done parts.
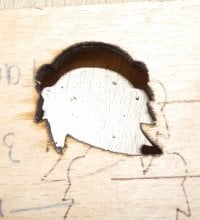
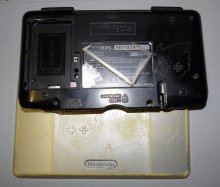
DS shell
A DS shell was in the pile of interesting bits. ABS plastic, and quite inclined to burn if you were not careful. Black bottom layer was easier to mark than silvered top, some burning bits could be taken care of by rubbing with a piece of denim (a very mild abrasive) but others needed some fine sandpaper which also took more of the remaining silver finish.
Black was 3000mm/m for all, 350 (35%) in M4 mode for the mascot outline on the left, whole mascot then 600 (60%), 400 (40%) for the others, the lower partial one was 4000mm/m
NES controller
A NES pad was found to be put before the laser. On the right of the image the mascot outline is 1000mm/m, m4 laser mode, 400 (40%) power. Was quite hard to mark compared to some others, however was equally less inclined to burn.
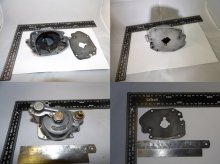
Gamecube face plate
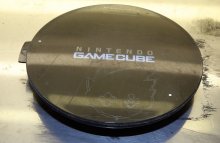
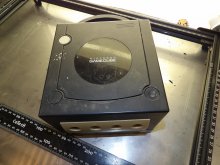
Note it is actually the black section below the clear that is marked. The lines at the top are a test gcode sequence at 3000mm/m 100,80,60,40,20 percent power.
Xbox 360 face plate
A blend of polycarbonate and ABS plastic
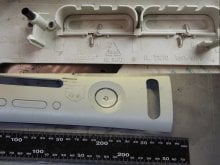
The lines are multiple passes of the 3000mm/m descending power test program.
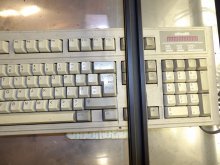
Keyboard
While no PBT caps were available at time of review an old keyboard decided to have the return key note it is indeed return, with a fairly fancy font, the idea being you might want to restore worn keys or otherwise note things.
The lower section is 2 passes of 400 power (40%) at 2500mm/m, higher powers and slower speeds for the outlines above saw some minor burning.
Polycarbonate CD case black
Burned section (they were not lying when saying is a hard one) and mascot at 1000mm/m M4 laser mode 400 (40%)
Clear polystyrene
Painted with acrylic to get it to couple, melted and burned to almost unusable.
Polypropylene
Markings as shown using the "8mm" test pattern and a few others. The white effect at the melted points might be able to be achieved in a more controllable manner with some more experimentation. Some green translucent was also tested at 3000mm/m,600 (aka 60%) power and made a fairly nice mark, opaque yellow at same settings was also good but slightly more melty so it pays to experiment even on nominally the same material.
Acrylic
Acrylic is the main plastic that laser cutting tends to be associated with. All manner of specialist types are available here and the cuts can be very clean. Specialised versions include thin layers of one colour such that you remove the top layer and are left with a contrasting colour, ones designed to fade, ones designed to darken, and things you can cut more easily (see cast vs extruded). Acrylic paint (black if you can get it) is also very cheap and quite useful in forming a surface for the laser to couple to if it is otherwise the wrong colour.
Probably not going to cut your replacement greenhouse windows but can make nice patterns on them if using paint first, which would include a guide for the friction disc cutting.
Half image as image was postioned half over paint, half without to showcase difference.
Plug face/light switch.
For the UK then one of the more commonly encountered setups here and similarly something you might want to mark with more than a sticky label or permanent marker that rubs off after so long. While metal and other plastics are used the otherwise default hard and brittle white plastic is probably urea formaldehyde. Here an old fused spur was sourced and put before the laser.
Cutting into an old fused spur, same material used for the majority of light switches and plugs in the UK.
Wax.
Not terribly useful as an operation by itself, however as part of a process of creating a mould (say for plaster, or silicone then some wax was made into a block and set before the laser for a pattern. Was able to be marked quite nicely actually, though melting is always going to be an issue.
POM.
A rarely encountered type of plastic for many but one of the other main types used for laser cutters. Here some was available thanks to some gears from an unbuilt laser printer fished out of a skip. Some of the cut faces and qualities achieved were very impressive.
Cutting thin sheet plastics for stencils. Whether for artistic purposes, or for electronics repair purposes (probably more solder paste spreading for surface mount than BGA rework where aluminium sheet is more common), you might like to cut some thin sheet plastic.
Following the various plastic experiments above we returned to double sided tape to see what could be done
Such a thing could well be the footprint of a small chip. Truly small chips and such are probably going to be out of range of this.
Max thickness.
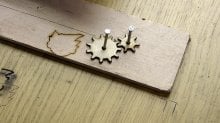
Otherwise known as “can you build small gears?”. This is something of a function of time and precision needed; you can eventually make it through a lot but how much beside it would have melted or burned in the meantime is a different matter. Anyway small plastic gears are the bane of many doing things in the electronics fixing world so it makes sense to ask whether you can cut such things out to use as a replacement when something is lost, stripped or otherwise broken. Design and nomenclature associated with gears would be getting a bit off topic (nice introduction for the curious) so instead some gear images were generated using Woodgears.ca
Similar sizes and tooth profiles to what you might find inside the optical drive of various game consoles is probably going to be beyond this unless you are inclined to stack things (fibre gears from layers of glue and material have long been a thing, used as sacrificial gears to shear in preference to valuable ones and to reduce noise). That said the sorts of gears the youtube channel associated with the gear generator above makes are well within the realm of possibility. The gears were cut using the 1.6mm thick ply that came with the kit, and they meshed and ran, albeit with a fair bit of backlash probably owing to the setup used more than the laser. How much hand work you care for to finish things up is your own thing. Elsewhere slightly thicker ply is cut acceptably well with similar feature sizes.
Thin sheet elastomers.
Elastomers are, much as the name implies, things that feel like elastic. Rubber, o-ring material (Butadiene rubber), inner tubes, elastic and so forth. The ability to cut custom gaskets and similar items out of such materials is valuable to some so tried here. The piece of old inner tube was unable to be cut effectively, and was burning considerably on later passes and higher powers. Markings though were wonderful and could achieve enough depth to usefully guide a scalpel before burning set in. Several passes on a lower power also made what might be an acceptable stamp, and certainly enough to have definition while you hollow out the rest via more conventional means. An o-ring fared much the same as rubber.
Red circled stamp is last one attempted using the acrylic paint and many passes at a lower power.

A o-ring that saw several passes.
Ceramics
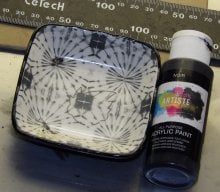
Porcelain.
A mostly white bowl was painted black with acrylic paint. Where the paint was improperly applied it was not as deep, though something, but where the paint was happened to be formed quite nice marks.
Brick block.
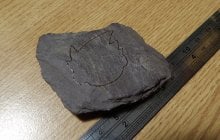
A wall topping standard clay effort like any brick has a nice mascot outline cut in it now. No real need for acrylic coating either. Similar effects achieved in a heat brick from an old storage heater (and popular with blacksmiths these days as well).
A more inspired use might see a real life question block favoured a certain plumber.
Slate.
Worked incredibly well actually at 100mm/m and full power, no coating. Thick raised black mark which did not readily scrape off with a knife. While the days of being served steak on a piece of slate in a restaurant are hopefully over the days of people wanting a custom slate sign show no signs of slowing.
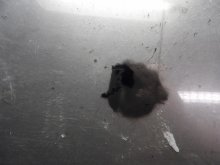
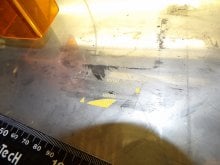
Glass.
Usually more of a decorative act, however a popular one.
Mixed results here. In and of itself it is not a glass marking laser (some lasers can). If you clean it first then you probably won’t get anything other than whatever the backing it shoots right through provides you. Dirt from several years in the shed however probably turns to plasma which in turn leaves a mark on glass. Seeing the return of some suitable spray paint then 100mm/m full power also managed a nice plasma and associated mark.
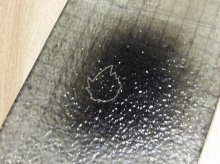

One quick go on the wire wheel and some sanding sponge (both of which are far softer than glass but can remove paint) to remove the remaining paint around it.
For windows or other glass items wanting a sign you would probably be better off finding some window backing/privacy film of a material you can safely burn off/cut an outline for and using that. That or the old adage of coating engineering “every problem is a surface problem” will make its unwelcome appearance.
Pyrex was attempted here, with and without acrylic there was no effect, though could be useful as a guide for an engraving session.
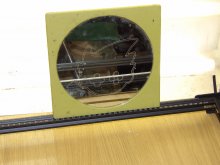
Cheap mirror.
Decorative mirrors and mirrors with nice light transmission patterns is a thing some like to do. Rather than the usual scraping backing material off with a sharp tool/rotary tool it was put before the laser. Here what was a travesty of 80s design is now a super rare and limited edition GBAtemp mascot themed mirror, sure to be the envy of all your friends.
PCB top material.
We will cover copper shortly but those making custom PCBs using things like veroboard might not have the ability to note what parts are what compared to professional PCBs that often have a silkscreen. Could you use the laser to make markings on such a board? Yes but be careful as some of the glues used do not burn safely, and burned PCB is often basically carbon which is quite conductive.
Metals
Hopefully metals need no introduction as a general concept. You have some abilities here, though limited and more for secondary operations and guides.
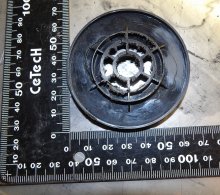
Copper (as in what is used for PCBs).
No cutting on a piece of veroboard/stripboard, some marking was observed but minimal and more likely to be basic heating of the underside similar to the ceramics. Substrate worked pretty well though and could possibly serve as a kind of "this component here" mask.
Brass.
A common decorative metal, and one that stands up to outside conditions more readily than a lot of others. To that end laser engraving name plates, information plates and more might be the order of the day for some. Enamel on the brass can also be something that changes how this plays out. No effect on plain, coated with acrylic paint then nothing but at 300mm/m full power the paint is removed so you could use it as a guide for engraving.
Forgive the awful quality of this "engraving" (for a better example of what can be done with such techniques); it was done with the edge of a blunt chisel on anything but a secure setup.
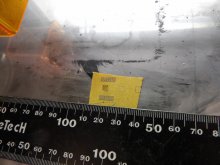
Aluminium.
Aluminium is also noted as often being “anodised”, which you will typically see as aluminium but sporting fancy colours. When engraving things then anodised aluminium represents something different on the materials front, almost more akin to a paint, and something you can do designs on with some setups. Here some old motocross handlebars were set before the laser. A very light marking was obtained with acrylic, the suggested permanent marker did nothing.
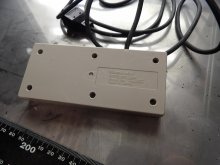
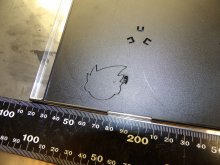
As far as plain aluminium then the metal plate you see in various other images, used in dozens of tests now as backing with things going all the way through. Nothing that does not wipe off.
Chrome.
A plate of chrome was available to test with here, though in everyday life you will probably be dealing more with items that have a chrome coating you might want to mark as yours or mark for another purpose. With acrylic paint and without. No effect.
Titanium.
Sadly none was available and going grave robbing for an artificial hip was deemed a bit beyond the pale for this. Might be an interesting test as heating titanium often is done to make nice rainbow colours.
Steel.
Typically the test of any machine tool (you will see things split between ferrous and non ferrous for a reason). All of the softer materials above had not a lot happen so nothing was expected here. Nothing obtained for general mild steel or cast iron, regardless of application of paint. The black oxide finish popular on cheap allen keys and drills was just about able to be marked (full power 100mm/m made something just about visible, though that might be enough for a drill line, note of what it is, secondary chemical effect or similar.
Coated steel.
Coatings as a general concept are covered elsewhere, however it was able to mark things. Note also black oxide in the section above was able to be marked, below is the multi coloured plastic dip approach favoured by many things today.
Stainless Steel.
If steel is the test of any machine tool normally then stainless steel is the thing that breaks them. That said for laser purposes it can be one of the better to engrave. Coating a piece of stainless (unknown grade, from a restaurant environment rather than anything special) with a thin layer of acrylic paint however saw wonderful markings. Said markings rubbed off with the slightest touch of sandpaper (the one in the picture being some 800 grit, unknown what depth was achieved here but commercial ones note it as being tens of micrometres at best which make sense) but were clear as anything before it did, even if not so much for the camera.
Tungsten.
Hardest of any metal you are likely to encounter in day to day life, and melts at temperatures some other common metals are now a gas. As some was available we decided to see what a laser would do against it. Short version. Little and less.
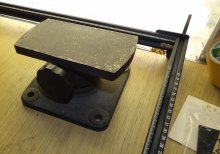
The rotary addon.
Ortur also sent a rotary addon with the main kit to review. It is aimed at allowing people to use with cylindrical or conical items, which, if you will pardon the pun, is popular in decorative circles. The diagram shows a wine glass but lightbulbs, simple cylinders, pens and more would be possible with this. If the laser is designed to work at a fixed distance from the item then if that item is a cylinder any movement in a normal X-Y line from it will make it greater or less (presumably less for most setups) and thus out of focus or effective range. Rotating the item through the path of the beam on the other hand keeping it a fixed distance from the beam at all points and thus able to be used with the laser cutter/engraver. This also means the texture you place on top of an item is then basically just a flat image wrapped around it (hence the concept of texture unwrapping in 3d modelling), the rotary addon then serving to make it a flat image as far as the laser is concerned by synchronising respective movements.
There are parts you can add on (included in the package) to allow you to do cones and more complicated shapes by raising a part up to place it in line. The manual that comes with it claims it will support other devices but is built for the laser master line.
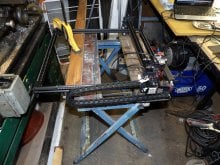
As this rotary addon raises the workpiece up by default then you are left to find a means to raise the whole stage of the main laser cutter up. This might be daunting to some but is actually not so bad as you are not required to find something of a given length as much as have four items of the same length, and maybe use some screws to adjust the final result like you might have anyway on the basic setup.
It works by you removing power to one axis and then aligning it yourself (get a cylindrical item, mark a line down it with something at a fixed height, make sure the laser hits the line at both ends of the cylinder), though you theoretically could align it to the main assembly frame and go from there. Building the rotary attachment was probably more involved than the main builder as it comes with a bunch of rollers, timing gear and more, was certainly more fiddly. Once more it was opted to use the included build manual, which was better than the included one for the main setup but still could see you go awry.
The design is as minimal as they can do, quite notably with just a single bar across the base of the roller which means you will want to have a flat surface to check against lest you end up with a twist, though you can happily do that after the fact by loosening a few screws. Also the lock nuts being wound down the thread and then the assembly held on with a more conventional nut is unusual but is what they want.
Said minimality also means you are in for a fun time if you want to adjust the roller gap, or add on the conical riser and limiting plate. It might be advisable to get a very long and thin screwdriver to get in the gaps or bypass issues for normal use (the fat handled screwdrivers in the build pictures being more difficult than was ideal).
Use in software requires you remove the homing feature for those things that bundle it but it is mentioned in the manual, and easily enough done.
Similarly hope you have a set of calipers or some means to measure a circle diameter, and thus circumference (that being pi x diameter for those a few too many years out of maths classes). The precision is pretty good with the roller (the images would not work otherwise) so play to that, though the better plan for many when doing such a thing is to make a pattern that breaks up the line that otherwise forms to the reader but does not matter if it is slightly out.
Time to build, even after reseating the motor a couple of times, was less than the main assembly though.
Starting to build the attachment
Rollers before and after With belts
With conical attachment holding a glass.
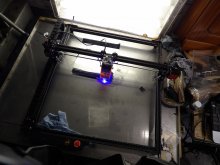
Installed and running
Results. The ability for it to make not insignificant holes in wood meant an obvious choice was a rolling pin. With a such a thing then a patterned rolling pin, a somewhat popular thing in various Nordic countries, was able to be made. Such an article of machining is also quite difficult to make via most conventional means; typically otherwise reserved for CNC mills with an expensive fourth axis addon or CNC lathe with c axis control and a milling attachment, which is similarly rare and expensive. The rollers vs more conventional chucks and turning between centres has advantages and disadvantages, which they do attempt to remedy; in an early attempt the rolling pin moved along in the rollers and started rubbing against the edge, which in turn lost position and made the resulting effect look like it was melted. For shorter items there is a stop provided to be used in place of the conical attachment, you may have to adapt it depending upon what you are doing as well; some bearings acting as stops without rotary friction probably being a good start and easily made.
The rolling pin left a mark.
Future tweaks.
A laser cutter/engraver is for many intents and purposes a slightly tweaked X-Y plotter, indeed the basic sanity test saw a pen taped to the edge of the laser assembly and then to use it as one (the device works fine with the laser unit unplugged). Attaching a small linear actuator to raise and lower a pen might make a useful addition as all the same “cut here, bend here, drill here” markings could be made for your sheet material items. A scalpel might similarly work where laser cutting and associated burn marks might not be ideal in gaskets. For gcode based systems then you would simply have to bypass the laser, attach a holder to the side, define another tool at an offset (move left and right work just the same, however everything is now a certain distance away from the original baseline). Find whatever triggers the laser (assuming you don’t have another tool to define) and have that trigger go to the linear actuator to raise and lower the pen.
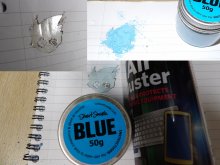
Safety redux.
Safety was mentioned at the start of this but we need to return once more to test the device itself. In the box was a set of laser glasses and a nice print of a certificate for them. Typically the certificates included in such things is quite literally not worth the paper it is printed on. The laser itself also has a shroud. Anyway the glasses it came with were subject to a nice full power run of one of the sample images. Your eyes are something worth saving so do consider getting proper gear.
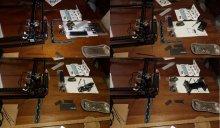
Top left, laser in action, top right, glasses after and paper beneath it
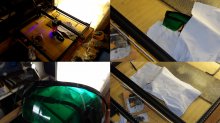
Bottom left, close up of glasses, bottom right, what happens when you do very fast cuts at lower powers on cheap blue workshop paper.
GBAchef
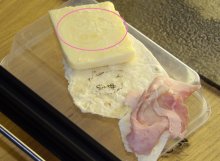
Croque-monsieur a la laser
Ham did not mark, but did cook some (no laser tatoos for you). Cheese was marked a minimal amount but visibly and the wrap saw a nice grill type mark. Ultimately a bit silly but once more returning to the safety thing it shows what goes when organic materials get put under it.
Better note games.
Seen as this is something of a gaming website then probably ought to note what can be done here. The portable nature of it means you can place it on existing flat surfaces. Oh wow now you have a chess board, backgammon board, scrabble board, wargaming board or any number of other things that need a board baked right into the table for a fraction of the time and effort you might need for a stencil and literally in the table compared to a vinyl. Can also do custom tokens for things, though that might need cutting out further, and custom dice (blank dice are a thing you can use as blanks for this, though do note materials used and as you are cutting things you may face some issues with dice being poorly weighted).
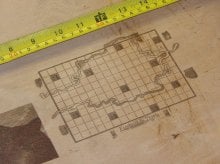
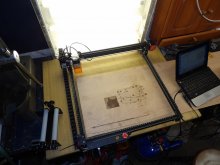
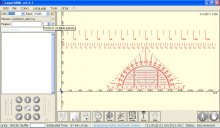
Here you can see both the image abilities of the LaserGBRL software as it made a nice (small as that alone took 16 or so minutes, time going up in square time as twice the width and height means 4 times the area, though small means precise) from a simple picture of the popular Tigris and Euphrates board found on an image search being cut into a much larger piece of plywood (which could represent the top of a table somewhere, or just a large piece of wood you can do a lot with).
Imagination is then your limit but custom dungeon layouts for tabletop, outlined sections for a card game, something a bit more custom, general decorative. A board being on the table already often reduces the need for things to some dice and some game pieces which can be carried in a small bag. Nothing to stop you from painting your newly fraction of a mm (or more) cut down sections either. Some cuts to hold a wall piece up is also within reason, though drills similarly exist for a reason.
Conclusion.
While not as attractive for some as 3d printers, CNC milling machines and injection moulding devices, and arguably less well known than a lot of those, there never the less remains many uses for those that would otherwise be drawn to such devices, both in the primary building, steps along the way and secondary activities. The range of materials it can usefully accomplish operations with is also considerable compared to many of those, especially if you are aiming at products to sell.
This device is an odd take on the traditional laser engraver in that it is more mobile. While this raises a concern or two for safety it also changes the usage scenarios and opens it up to a lot of interesting possibilities over the traditional large box you put (typically small and somewhat flat) things into.
The software powering it appears to be robust enough for the task, and the whole setup was able to take a list of commands well north of 100 thousand commands which is more than some more legacy setups might manage if doing conventional CNC milling.
Laser lifetime is ever the concern. This review was only done over a few weeks so not enough time to make a call there, though it maintains a fan that actively cools it and generally in lab settings similar lasers do last quite a while. $150 for a replacement laser is also what a few sets of basic hand tools or various flavours of mill, drill and lathe tooling will run you as well if you want to look at it that way.
Building it and getting it ready to work is able to be accomplished by those of reasonable mechanical skills and without specialist gear. Proper calibration might benefit from more specialist tools (albeit specialist tools you can get for less than £20) but should be able to be accomplished with what is in the box.
The designers of the package have done a good job of stripping away cost where they can but also keeping quality where they have to; making sure the USB lead had a ferrite bead around it for instance.
Using it on much more than thin sheet materials will take a bit of thought and maybe building something to raise it up but nothing radical.
All in all a useful device that more or less did what it was told and was a pleasure to use. More than adequate construction at a price point that is competitive enough within its own market, if not outright good, and something the aspiring maker of items might well find compelling where it was often a limited option before.
Product details
$449.99 for basic package
$67.99 for roller addon.
Verdict
- Firing a laser.
- Makes small accurate parts, both artistic and mechanical
- Engraves a lot of materials
- Ability to move it means massive work size potential
- Uses industry standard open protocols.
- Safety is a a concern, though manageable
- Rotary roller not great at holding as is.
- Basic setup needs PC to manage it.
- Raising and lifting assembly to accommodate roller/work a bit of a hassle as is.
