Tutorial  Updated

How To: Upgrading / Rebuilding Wii U Internal Memory (MLC)

Warning


This tutorial is only for advanced users and has a serious risk of bricking the console. Make sure you read it completely before executing any step and that you understand every step and its implications. With de_Fuse everything should be unbrickable if you know how.

You should at least have a backup of SLC and SLCCMPT, as we can’t rebuild them at the moment. (can be done in minute_minute, so there is no excuse). We had two cases where the SLC corrupted for an unknown reason, so a backup is essential.

What is this for?


This tutorial goes into rebuilding the MLC from scratch on a clean media. This can become useful, if
  • the MLC (eMMC) chip died or corrupted the filesystem
  • the SCFM (SLC cache for MLC) became inconsistent
  • you want to upgrade the capacity of the internal storage.
  • you want to set up a redNAND without SCFM
If you have a bad eMMC chip, but the recovery still works (which is most likely), then there are also ways to fix it without a complete reformat.
If the LED is blinking blue, you have a SLC problem and not a MLC problem, so this tutorial won't help with that.

It will format your MLC, so all data on the internal Wii U memory will be lost.

Update


13.03.2024 - The wafel_setup_mlc.ipx now uses a built in IOSU function to create system folders, that should make sure the permissions are right, which caused problems with game updates in the past. It will also recreate the update folder (so system updates won't be blocked by that)

Prerequisites


Backing up save games


Do a backup of what you want to preserve, like savegames and Miis.
For Backing up Save games, it is recommended to use SaveMii. That requires that you have Tiramisu or Aroma running.
You can also move your savgames (or whole games) to USB, which should still be readable. When recreating the users after the rebuild, you just have to be carefull to create the users in the right order, to make the ID’s match. A backup by other means (Like savemii) is still recommended.
If you are using this tutorial to fix a failing eMMC you might not be able to use the other Backup options. In that case use the Dump MLC option in the Recovery. You can extract your data from there using wfs-extract.

Storage Options


The Wii U has two ways of connecting internal memory, each with its own drawbacks:
  • SDIO – On retail consoles the internal memory is a eMMC chip connected through an internal SDIO bus to the Latte chip. This SDIO bus can also use SD cards (hence the name SD IO). Access to media connected on the SDIO is cached through a file on the SLC, presumably to reduce writes on the MLC. This cache is called SCFM and it is the reason why you always need to backup / restore SLC and MLC together and doesn’t allow easy swapping of multiple SDs.
    IOSU also only supports 3 sizes of media on this bus: <=8GB, 32GB and 64GB. The size will be limited to the biggest it fits, the rest is unusable. This bus is limited to 26MB/s (4bit@52Mhz). For replacing the eMMC with an micro SD you can use MLC2SD or a similar Interposer. Soldering and micro SD adapter using wires, works too.
    It is recommended to use a 64GB Sandisk Max Endurance card (But similar card should also be fine), since the Wii U is known for writing much.

  • SATA – The Disc drive is connected through SATA, the connectors are different but the electrical signals are still the same. Some Kiosk consoles used this Interface to connect to a HDD. The type of the SATA device can be configured in the SEEPROM, so we can configure our retail consoles to also use a SATA HDD / SSD.
    NOTE: @QuarkTheAwesome is building an SATA adapter for that purpose, available soon™.

    The advantage of using this interface is, that the size isn’t limited (well WFS is limited to 2TB) and it doesn’t use SCFM, which makes some things easier and improves performance in some circumstances. The obvious disadvantage is that you can’t use your disc drive anymore. Without the Disc Drive vWii System Menu doesn't work. vWii Injectes / Wii VC from the eShop can still be used, but only when installed to USB. Also you still might need to disable the MLC on the SDIO bus, or else the wii u might still use the SDIO one if the SATA device takes too long to init.

  • redNAND – redirects the read / writes to one or more of the internal storage devices to paritions on the SD card. You can create an arbitrary size MLC partition on the SD card and set it up using this tutorial. SCFM can be easily disabled for the redNAND. The 64GB limit does not exist for redNAND if the SCFM is disabled. For redNAND we have a dedicated Tutorial here: https://gbatemp.net/threads/fixing-...-soldering-using-rednand-with-isfshax.642268/

Does that mean we can’t get more than 64GB on the SDIO bus? No, BUT it requires ISFShax / defuse to boot the console every time. @GaryOderNichts created a patch to remove the limits and always use the maximum size of the SDIO media and it also disables SCFM, because SCFM doesn’t work with more than 64GB and disabling SCFM improves performance and reduces wear on the SLC, at the cost of increasing wear of the MLC media. I packaged this patch in wafel_unlimit_mlc.

Rebuilding the MLC


Now that you decided what media you want to use as MLC, we can start with the actual process:
  1. Download all the mlc system titles for your region from NUS. This can be done conveniently with MLCRestorerDownloader by @Xpl0itU. Copy the otp.bin from the SD to the folder with the MLCRestorer Downloader so it can get the common key from there.

    You will get the output/MLC/{region} directory, which then contains a directory for each title. In total there should be 52 titles totaling ~1.1GiB.

    If your console has an old firmware it might also be necessary to get the latest SLC titles.

  2. On the root of your SD card (the one that will go in the front slot, not the MLC replacement) create a folder wafel_install. Then copy all 52 titles to the wafel_install folder, so it now contains the 52 subfolders, one for each title. If you want to reinstall / update SLC titles, you would also put them there.

  3. Attach your MLC media of choice. (If you are using SATA got to Backup and Restore, then at Set SATA Device in SEEPROM select GEN2-HDD (Kiosk CAT-I with HDD)).
    For installing MLC2SD look here: https://gbatemp.net/threads/using-n...emmc-fix-160-0103-system-memory-error.636361/ at the Soldering section.

  4. If you install to eMMC / MLC2SD, got to Backup and Restore and select Erase MLC and Delete scfm.img. If the Erase MLC fails, you can ignore that if it wasn't formatted as MLC before (from a failed install or so).

  5. Put the wafel_setup_mlc.ipx on the SD card in /wiiu/ios_plugins. If you want more than 64GB on SDIO you also need to put the wafel_unlimit_mlc.ipx there. If you install with wafel_unlimit_mlc.ipx, it will be permanently required and therefore also permanently requires ISFShax or defuse.

  6. [Optional, only when using defuse] Open the serial monitor on the PC (Putty / minicom) for defuse to see the setup progress. There will be no display output in the Wii U itself. I attached the whole serial log of a successfull install as a reference.

  7. Select Patch (sd) and boot IOS (slc) in minute to start the setup of your fresh MLC.During the setup you won't see anything on the screen. You have to go by the power led.
    The power LED will flash blue, while it is installing the titles.
    if something goes wrong the LED will turn orange, but it will continue as long as it is blinking.
    The LED will become static once it finished. You can now power off the console.
    If the led is blinking red, something fatal happend. Ask for help.
    During the setup a short log gets written to the SD: wafel_setup_mlc.log.
    In the end it will enable the initial setup on the next boot.

  8. Remove the wafel_setup_mlc.ipx from /wiiu/ios_plugins on the SD.

  9. Boot the console. Patch (sd) and boot IOS (slc)

  10. If everything worked, the initial setup should launch.

  11. (Optional) delete the wafel_install folder to free up space

ISFShax only: Finalizing


If you are using the wafel_unlimit_mlc.ipx you need to keep ISFShax installed. If you haven't done already complete the "Booting without SD" step form the ISFShax tutorial but also add the wafel_unlimit_mlc.ipx renamed to 9unlimit.ipx to the /storage_slc/sys/hax/ios_plugins directory.
If you are not using the wafel_unlimit_mlc.ipx you can either uninstall ISFShax or keep it as a brick protection. If you keep it complete the "Booting without SD" step form the ISFShax tutorial.
The Wii U should now boot automatically if you don't have an SD in.
You probably also want to enable the autobooting now.

See Also


https://gbatemp.net/threads/wii-u-internal-storage-upgrades-are-possible.635629/

Pictures


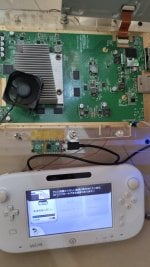
512 GB SD card:
img_20230702_021647-jpg.381270


@QuarkTheAwesome 120 GB SSD:
img_2709-jpg.381271


Thanks


Attachments

  • serial-log.txt
    87.6 KB · Views: 94
Last edited by SDIO,

Ysecond

Well-Known Member
Member
Joined
Apr 27, 2023
Messages
189
Trophies
0
Age
26
XP
565
Country
China
WELL DONE!
Thanks all the people !
GaryOderNichts, shinyquagsire23, QuarkTheAwesome, V10lator, Xpl0itU, Lazr1026, and SDIO!!!

Edit:
I did it too! Thank you all authors, you are the artists of the code world! Make the installation steps easier!
2222222.jpg
 
Last edited by Ysecond,
  • Like
Reactions: SDIO and Xpl0itU

witloof

New Member
Newbie
Joined
Jul 13, 2023
Messages
2
Trophies
0
Age
34
XP
21
Country
United States
Potentially silly question (apologies if I'm misunderstanding something) - on step 1 where we download the system titles, I noticed that EUR includes 00050030-100112FF, whereas USA and JPN do not include their versions of that title. Is there a reason for that?
 
  • Like
Reactions: SDIO

witloof

New Member
Newbie
Joined
Jul 13, 2023
Messages
2
Trophies
0
Age
34
XP
21
Country
United States
Thanks @SDIO! The instructions said there should be 52 folders, but when I tried it there was only 51. From there I worked backwards and it worked correctly when I manually added the missing title to the titles.json, so I figured it might have been missed.

I've got a Wii U that won't initialize any MLC memory (even when using de_fuse lol), everything else seems to work though so can't wait to try this once the disc drive > sata adapter is released!!
 
  • Like
Reactions: SDIO

Valery0p

Well-Known Member
Member
Joined
Jan 16, 2017
Messages
560
Trophies
0
XP
1,646
Country
Italy
Simply awesome :yayu: infinite thanks to everyone involved, this is literally a revolution for the Wii U scene.
If you have a bad eMMC chip, but the recovery still works (which is most likely), then there are also ways to fix it without a complete reformat. You would still need to replace the eMMC (with a SD card) first.
Could you elaborate on this? I guess some people just want to unbrick their consoles and try to recover their data if possible;
also I hope SLC bricks will get easier to fix in the future, since AFAIK all you need to run de_Fuse is a non corrupt boot1 in theory (leaving a link to this thread if anyone is dealing with an SLC brick).


Two more things:
1) Could this process be used to build a redNand from scratch? (and maybe use that instead of soldering a NandAid with a microSD card);

2) Did anyone try to use the SATA interface to emulate an external USB storage device? (or even both the MLC and external storage at the same time?)
No risk of future updates of messing with the MLC having a weird size, and maybe it could even work without deFuse (even if I see no reason to not have it at this point).

Thanks again!

EDIT: also, I think we could call the internal storage mod SATANAND or Sata-Nand :P
 
Last edited by Valery0p,

VashTS

Beat it, son
Member
Joined
Mar 14, 2009
Messages
4,314
Trophies
1
Age
40
Location
Upstate NY
XP
3,917
Country
United States
i got a Wii U that won't boot UDPIH, is this still possible to accomplish? I haven't seen any detailed tutorials for de_fuse, anyone got a link?
 

SDIO

Well-Known Member
OP
Member
Joined
Feb 13, 2023
Messages
2,969
Trophies
2
Age
29
XP
2,288
Country
Germany
@VashTS I think it would be best, if you could open a thread for your problem.

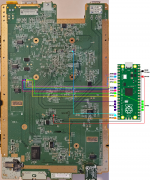
For wiring the pico up see this page: https://github.com/shinyquagsire23/wii_u_modchip/tree/main/pico_defuse and also the attached picture (by @JadeStrike), which helps you to locate the TPs.

For the software side, see the included README in the release: https://github.com/shinyquagsire23/wii_u_modchip/tags
Post automatically merged:

@witloof do you see anything in the serial output / syslog related to mmc or mlc? Maybe open your own thread for that.
 

Attachments

  • diagram_final.png
    diagram_final.png
    4.5 MB · Views: 79
Last edited by SDIO,
  • Like
Reactions: VashTS

V10lator

Well-Known Member
Member
Joined
Apr 21, 2019
Messages
2,753
Trophies
1
Age
36
XP
5,952
Country
Germany
@Valery0p Note that multiple people have editing rights for both, this and the tutorial you linked, so I could edit this in, too.
Still the tutorial you linked is a WIP and needs some refinement, so I don't think we should link to it yet but maybe in a few days.

//EDIT:
Could this process be used to build a redNand from scratch? (and maybe use that instead of soldering a NandAid with a microSD card);
Maybe but we aren't there yet.
2) Did anyone try to use the SATA interface to emulate an external USB storage device? (or even both the MLC and external storage at the same time?)
Not sure about the details here but my guess is: No. The SATA mod uses existing codes from Nintendo as they use HDDs in dev and some kios units. The patch just enables the codes on retail consoles. I don't think any code exists for emulating a USB device through this.
It might still be possible but probably requires a lot of work, so don't hold your breath.
No risk of future updates of messing with the MLC having a weird size
We don't expect any future updates. If anything they would have given one for the eShop closure (like 5.5.6 was to remove credit card purchases) but they didn't.
and maybe it could even work without deFuse
Maybe in form of an Aroma plugin, yea.

//EDIT²: But then again the console won't even boot far enough for Aroma to kick in without the optical disc drive, so you need de_fuse no matter what.
 
Last edited by V10lator,
  • Like
Reactions: Valery0p

AceCuba

Well-Known Member
Newcomer
Joined
Feb 4, 2021
Messages
81
Trophies
0
Age
26
Location
Mi cueva
XP
318
Country
Cuba

@V10lator

ok lets see if i understand , i have a wiiu nand is dead . can i use this tutorial , a rasperri pi pico , a micro sd card soder to the board , to fix the console ? . and remove the pi pico after . just normal 8 or 32micro sd using the original drive
 

V10lator

Well-Known Member
Member
Joined
Apr 21, 2019
Messages
2,753
Trophies
1
Age
36
XP
5,952
Country
Germany
@AceCuba Yes, you can use this tutorial when you plan to upgrade the storage anyway. You can go up to 64 GB without the Pico beeing connected all the time (just need it for setup). Over 64 GB you need the Pico every time to boot.

Anyway, have a look at this, too: https://gbatemp.net/threads/using-nand-aid-to-replace-a-hardware-damaged-mlc-160-0103-error.636361/ - Might be better suited to your usecae but you need to be able to still boot UDPIH with the "dead" NAND. Also note that the linked tutorial is a WIP, so in case you have any questions: Just ask.

//EDIT:
a micro sd card soder to the board
We highly recommend the NAND-AID for this:
img-20230707-154842.jpg


But ofc. it's also possible to DIY with some cables, a cap and a micro SD to SD adapter:
sdemmc-jpeg.354296

IMG_20230401_174716.jpg

IMG_20230402_121608.jpg

(note that these pictures are from the first tries, so there's a small mistake (3.3V line beeing grabbed from at the wrong spot)).
 
Last edited by V10lator,

Ysecond

Well-Known Member
Member
Joined
Apr 27, 2023
Messages
189
Trophies
0
Age
26
XP
565
Country
China
I have a question. If the console has old firmware, should the optical drive be kept connected when installing the new title using wafel setup mlc.ipx (maybe the new title include optical drive firmware upgrade?)? :)
 

SDIO

Well-Known Member
OP
Member
Joined
Feb 13, 2023
Messages
2,969
Trophies
2
Age
29
XP
2,288
Country
Germany
I don't know of any firmware update for the odd.
Post automatically merged:

Could you elaborate on this? I guess some people just want to unbrick their consoles and try to recover their data if possible.
I will link to the resources, when they are ready. For now people should just know this option exists, before they solder defuse.

also I hope SLC bricks will get easier to fix in the future, since AFAIK all you need to run de_Fuse is a non corrupt boot1 in theory (leaving a link to this thread if anyone is dealing with an SLC brick).
Defuse doesn't need a working boot1. The boot0 in the rom of the latte wil directly load boot1 from SD
https://gbatemp.net/threads/de_fuse...-by-shinyquagsire.630931/page-9#post-10199623
Two more things:
1) Could this process be used to build a redNand from scratch? (and maybe use that instead of soldering a NandAid with a microSD card);
I never used redNAND. We can't rebuild the SLC for now. But I could imagine that these plugins would also work to rebuild a MLC on redNAND. But I never tried it. A risk would be that the format for example doesn't get redirected properly and i would destroy the MLC in the console. Also redNAND with defuse requires swapping SDs for now, which is annoying. But with boot1 @ slcmtp, that could be solved.


2) Did anyone try to use the SATA interface to emulate an external USB storage device? (or even both the MLC and external storage at the same time?)
If you have both SDIO and SATA MLC connected, there is a race, which device comes up first. The first one will become mlc01. You would need to make sure, that the SATA device takes longer. Then you could in theory try to just mount it to the usb mountpoint manually. But never tried that, since I am still waiting for the SATA adapter to arrive.
Another way would be to make an IOSU patch, that changes the name of the SATA device from mlc to usb, but I can't do that for now. Maybe @QuarkTheAwesome could do that.
 
Last edited by SDIO,

V10lator

Well-Known Member
Member
Joined
Apr 21, 2019
Messages
2,753
Trophies
1
Age
36
XP
5,952
Country
Germany
Then you could in theory try to just mount it to the usb mountpoint manually
Wasn't there someone on Discord who had one drive mounted as internal and USB at the same time? I normally try to keep such informations away from end users through, just saying something like "we're not there yet", "don't hold your breath" and so on. ;)
 
  • Like
Reactions: Valery0p

SDIO

Well-Known Member
OP
Member
Joined
Feb 13, 2023
Messages
2,969
Trophies
2
Age
29
XP
2,288
Country
Germany
Yeah I think it was shutterbug, who mounted USB on the MLC mountpoint. I don't see why it wouldn't work the other way around.

But I don't see a real use case for that. You lose the disc drive and the OS still runs off the sdio and you need iosu patches for that. So you combine all the disadvantages.

Instead you could just solder a USB device to one of the USB ports, don't require any software modifications and can keep the disc drive.

The only real use I see for the sata mod is to get rid of scfm and get unlimited internal storage without permanent iosu modifications.
Maybe you get a little better performance out of it, but doubt that the performance is much better then SDIO with SCFM disabled. Peak throughput I saw, was 11MB/s, with crypto and SCFM disabled, which is half the speed of the SDIO. Also load times for MK8 didn't change much, now matter what storage I used, so the Wii U seems to be limited somewhere else.
When I get the sata adapter, I can test with that and can tell if there is any performance benefit to it.

Maybe someone knows a game, which depends heavely on storage performance, then I could give that a try.
 
  • Like
Reactions: Valery0p

V10lator

Well-Known Member
Member
Joined
Apr 21, 2019
Messages
2,753
Trophies
1
Age
36
XP
5,952
Country
Germany
get rid of scfm
I'm still unsure if this is a good thing... Time will tell I guess... ;)
without permanent iosu modifications.
You still have to apply the unlimitting patch, don't you? Also the SATA patch from Quarky... And the ODD disabling patch... And by replacing the USB drive probably a new, even bigger patch... So impossible without de_fuse aka permanent IOSU modifications.
 
  • Like
Reactions: depaul and Valery0p

Valery0p

Well-Known Member
Member
Joined
Jan 16, 2017
Messages
560
Trophies
0
XP
1,646
Country
Italy
Thanks for all the insights :)
Defuse doesn't need a working boot1. The boot0 in the rom of the latte wil directly load boot1 from SD
My bad, what I meant is that the console's OTP can't be dumped without a native, working boot1:
Screenshot 2023-07-17 215316.png


The only real use I see for the sata mod is to get rid of scfm and get unlimited internal storage
That would be the objective for me, especially if Sata can be made faster than sdio and the hardware is not the speed limit.
 
  • Like
Reactions: MoscoMon and SDIO

SDIO

Well-Known Member
OP
Member
Joined
Feb 13, 2023
Messages
2,969
Trophies
2
Age
29
XP
2,288
Country
Germany
I'm still unsure if this is a good thing... Time will tell I guess... ;)
I am sure it's a good thing, No matter what I try to do this thing gets in my way. Learned to hate it. The only purpose I see is taking some writes, which would go the the mlc and puts them on the SLC. The SLC should still be able to take around double writes than the 32GB Max Endurance form SanDisk, but I would still would rather wear out an SD card than the SLC. That said I don't believe any of them would wear out in a reasonable time frame. With my back of the envelope calculations I expect the SLC to take 50TB of writes and the Max Endurance Card 22TB.

You still have to apply the unlimitting patch, don't you?
No SATA should be unlimited by default

Also the SATA patch from Quarky...
No, the patch is only to disable the MLC on sdio, but you can also do this in hardware, by cutting the clk trace or removing the cmd resistor.

And the ODD disabling patch...
No this is done by setting the right value in the SEEPROM, minute has an option for that.

And by replacing the USB drive probably a new, even bigger patch...
If you somehow can work around the race, then I think you could inject the code to mount it to usb later with aroma plugin or so, I would assume.

So impossible without de_fuse aka permanent IOSU modifications.
Only if you would want to solve the race in software or want to rename the device
Post automatically merged:

My bad, what I meant is that the console's OTP can't be dumped without a native, working boot1
Good point. But a good thing is, that the boot1 isn't encrypted with a console specific key. so we could flash back the boot1 of another console to then get PRSH working to dump the OTP.
 
Last edited by SDIO,
  • Like
Reactions: Valery0p

Site & Scene News

Popular threads in this forum

General chit-chat
Help Users
    Psionic Roshambo @ Psionic Roshambo: Richard Simmons and Gene Simmons should have teamed up for a workout video +1