Tutorial
Updated
How to play Nintendo DS Wiimmfi without a hotspot
(Rewritten on 12-3-2021.)

Important: nds-constraint does not work with this method, due to the USB Connector always having to be connected to a preset local IP. Changing this IP results in maintenance errors upon connecting.
This brief tutorial will showcase how to use Wiimmfi / AltWFC / whatevers without a WEP router or a hotspot. Keep in mind that this does make use of the Nintendo Wi-Fi USB Connector and a Virtual Machine (if you prefer to use that over real hardware), so keep those handy.

Preferred DNS server: 164.132.44.106
Alternate DNS server: 8.8.8.8 (or 1.1.1.1)
Wiimmfi:
Preferred DNS server: 46.4.79.141
Alternate DNS server: Leave it empty.
AltWFC:
Preferred DNS server: 104.131.93.87
Alternate DNS server: Leave it empty.
When you've typed out your DNS, click OK, close everything and open up the USB Connector software.
*a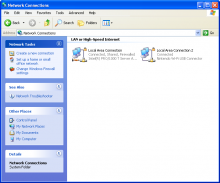
*b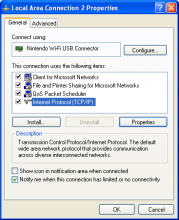
*c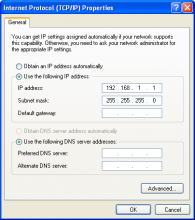
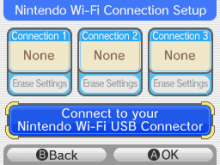
*b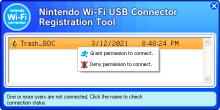
Important: nds-constraint does not work with this method, due to the USB Connector always having to be connected to a preset local IP. Changing this IP results in maintenance errors upon connecting.
This brief tutorial will showcase how to use Wiimmfi / AltWFC / whatevers without a WEP router or a hotspot. Keep in mind that this does make use of the Nintendo Wi-Fi USB Connector and a Virtual Machine (if you prefer to use that over real hardware), so keep those handy.
- A Nintendo DS/DSi/3DS/2DS (of course)
- A Nintendo Wi-Fi USB Connector
- A computer or VM running either Windows XP or Windows Vista (use XP if you can, since it often has better results than Vista)
- Nintendo's Wi-Fi USB Connector software
- AdmiralCurtiss' WFC Patcher
- A WFC game that is supported by Wiimmfi or AltWFC
- Unpack the *.zip file and run the setup. Before running the setup file, first plug in your Nintendo Wi-Fi USB Connector and make sure your Firewall is either disabled or isn't blocking the software.
- Only for VirtualBox users: If the USB Connector isn't detected by VirtualBox straight away, click on Devices > USB > Nintendo Wi-Fi USB Connector [0001] and try again.
- If installed successfully, a little icon that looks like this should appear every time you insert your USB Connector.
- Click on the small Network icon that should be next to the Connector USB software. If it's not there, go to the Control Panel under Network Properties.
- Click on the network that reads Nintendo Wi-Fi USB Connector (*a).
- Select Internet-protocol (TCP/IP) > Properties (*b).
- Select Use the following DNS server address and use either one of these DNS'es (*c):
Preferred DNS server: 164.132.44.106
Alternate DNS server: 8.8.8.8 (or 1.1.1.1)
Wiimmfi:
Preferred DNS server: 46.4.79.141
Alternate DNS server: Leave it empty.
AltWFC:
Preferred DNS server: 104.131.93.87
Alternate DNS server: Leave it empty.
When you've typed out your DNS, click OK, close everything and open up the USB Connector software.
*a

*b

*c

- Unzip all the contents from WfcPatcher1.6.zip.
- Simply drag the DS game you want to patch onto WfcPatcher.exe. The output file is titled Romname (No SSL).nds.
- Copy the No SSL rom onto your flashcart.
- Launch whatever game you want to play and go to the WFC settings.
- Press Connect to your Nintendo Wi-Fi USB Connector (*a).
- A connection is trying to be made. On your computer, right-click on your name and press Grant permission to connect (*b).
- Follow the rest of the instructions on screen. If the USB Connector is found and no errors display, you are connected with a different DNS. Leave the WFC settings and go online!

*b

- "The VM software I'm using doesn't want to connect the USB Connector."
- "My DS can't find the USB Connector."
- "I got error 52003 / 52103."
- "I got error 20100 / 20110 / my game froze."
Last edited by MaxiBash,


