

Emulation Homebrew Tutorial
Updated
Building SM64 for Nintendo Switch from sm64ex-alo Repository
Hi, I hope the next steps help to somebody, first forgive my bad English, is no my native language.
After the project «n64decomp» finished lots of forks emerged. One of them is the SM 64 PC Port which have as aim to be a port of n64decomp for modern devices.
Some of these ports was for the Switch console and become real on the fork fgsfdsfgs that fork seems to be staled, Now AloUltraExt have resumed the work and add some features and converged the latest code with latest refresh of the decomp project.
Switch Building Process
If you read the guide:
https://github.com/fgsfdsfgs/sm64pc/wiki/Compiling-for-Nintendo-Switch
The steps are loosely explained, but they don’t work well for me, so I decided read a lot of documentation and the official SM64 thread completely.
I choose to use for this set of instructions the MSYS environment, which for me is easy to setup and as it is an enclosed environment which is not affected by other software on your computer, I mainly use Windows, but as MINGW is a Cygwin environment I think the steps could be easy extrapolated to Linux environments.
First you need Install a MSYS environment:
The latest instructions for install the MSYS environment are on https://gbatemp.net/threads/install-msys-environment.652234/ if you don't have one working, use them.
After you have the MSYS environment working you need to install DevKitPro
For that you can follow the instructions on the tutorial https://gbatemp.net/threads/setup-a-devkitpro-environment-on-windows.652238/
Now you can start the building process:
First install the prerequisites
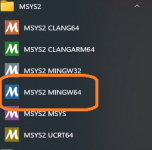
In a MinGW64 shell (or MinGW32 if you have a Windows 32 bit edition, why will you do today?). Be sure the prompt shows MINGW64 or MINGW32 if not you started the wrong shell, close it and open the right one.

Please execute the next command, several times until you get the message "there is nothing to do", you can be asked to restarts the MINGW64 environment few times:
Then execute the next commands:
Once the installation end, verify the MSYS2 database again:
Clone the repository, using the
The repository is cloned to a subfolder of the "Home" directory of MinGWXX Shell, on the prompt "~" means your home directory.
You need copy a legal copy of the original ROM in the cloned directory, it must be in "Big Endian" formatted and called:
copy the file to the path
If your ROM isn't on Big Endian format, use https://hack64.net/tools/swapper.php to convert it.
You must be sure the
Execute the command
And check the
For Windows 64 bits use the command:
And for Windows 32 bits use:
Also if the DekKit variables (DEVKITARM, DEVKITPPC, DEVKITPRO) are missing, you can run:
Now the environment is ready to build Switch version using any combination of the options you like, by example:
Will activate a better camera handling, enable the drawing of far objects on the game, Fixes some texture related bugs (by example smoke).
sadly the actual repo is not so compatible with multiple cores, so please do not use
After the process ends the NRO is on the build subfolder.
Additional Note: For Build Windows version you can run the command without the
BUILD OPTIONS
NEW BUILD OPTIONS ADDED BY sm64ex-alo REPO
After the NRO file is created, you can use SAK Switch Army Knife to make a NSP forwarder installable on the HOS.
Or better, use nsp-forwarder.n8.io to create a customized Forwarder.
Troubleshooting
After the project «n64decomp» finished lots of forks emerged. One of them is the SM 64 PC Port which have as aim to be a port of n64decomp for modern devices.
Some of these ports was for the Switch console and become real on the fork fgsfdsfgs that fork seems to be staled, Now AloUltraExt have resumed the work and add some features and converged the latest code with latest refresh of the decomp project.
Switch Building Process
If you read the guide:
https://github.com/fgsfdsfgs/sm64pc/wiki/Compiling-for-Nintendo-Switch
The steps are loosely explained, but they don’t work well for me, so I decided read a lot of documentation and the official SM64 thread completely.
I choose to use for this set of instructions the MSYS environment, which for me is easy to setup and as it is an enclosed environment which is not affected by other software on your computer, I mainly use Windows, but as MINGW is a Cygwin environment I think the steps could be easy extrapolated to Linux environments.
First you need Install a MSYS environment:
The latest instructions for install the MSYS environment are on https://gbatemp.net/threads/install-msys-environment.652234/ if you don't have one working, use them.
After you have the MSYS environment working you need to install DevKitPro
For that you can follow the instructions on the tutorial https://gbatemp.net/threads/setup-a-devkitpro-environment-on-windows.652238/
Now you can start the building process:
First install the prerequisites
In a MinGW64 shell (or MinGW32 if you have a Windows 32 bit edition, why will you do today?). Be sure the prompt shows MINGW64 or MINGW32 if not you started the wrong shell, close it and open the right one.
Please execute the next command, several times until you get the message "there is nothing to do", you can be asked to restarts the MINGW64 environment few times:
pacman -Syuu --needed --noconfirmThen execute the next commands:
Code:
pacman -Syuu --needed --noconfirm base-devel git make mercurial python3 subversion unzip autoconf automake libtool pkg-config autoconf-wrapper mingw-w64-x86_64-cmake mingw-w64-x86_64-gcc mingw-w64-x86_64-glew mingw-w64-x86_64-SDL2 mingw-w64-x86_64-toolchain mingw-w64-x86_64-SDL switch-dev devkitA64 dkp-toolchain-vars libnx switch-tools switch-mesa switch-libdrm_nouveau switch-sdl2Once the installation end, verify the MSYS2 database again:
pacman -Syuu --needed --noconfirmClone the repository, using the
--recursive option in order to clone all the trees.git clone --recursive https://github.com/AloUltraExt/sm64ex-aloThe repository is cloned to a subfolder of the "Home" directory of MinGWXX Shell, on the prompt "~" means your home directory.
You need copy a legal copy of the original ROM in the cloned directory, it must be in "Big Endian" formatted and called:
./baserom.us.z64copy the file to the path
c:\msys64\home\<USERNAME>\sm64ex-aloIf your ROM isn't on Big Endian format, use https://hack64.net/tools/swapper.php to convert it.
You must be sure the
$PATH variable include the mingwXX binaries.Execute the command
Code:
echo $PATHAnd check the
/mingw64/bin and/or /mingw32/bin are on the path, if they are not you can add using the commands:For Windows 64 bits use the command:
export PATH=/mingw64/bin:/mingw32/bin:$PATHAnd for Windows 32 bits use:
export PATH=/mingw32/bin:/mingw64/bin:$PATHAlso if the DekKit variables (DEVKITARM, DEVKITPPC, DEVKITPRO) are missing, you can run:
Code:
source $DEVKITPRO/switchvars.shNow the environment is ready to build Switch version using any combination of the options you like, by example:
Code:
cd ~/sm64ex-alo
make TARGET_SWITCH=1 BETTERCAMERA=1 NODRAWINGDISTANCE=1 TEXTURE_FIX=1
Will activate a better camera handling, enable the drawing of far objects on the game, Fixes some texture related bugs (by example smoke).
sadly the actual repo is not so compatible with multiple cores, so please do not use
-j parameter.After the process ends the NRO is on the build subfolder.
Code:
Build succeeded.
==== Build Details ====
File:           build/us_nx/sm64.us.f3dex2e.nro
Version:        us
Target:         Nintendo Switch
Additional Note: For Build Windows version you can run the command without the
TARGET_SWITCH=1 parameter.BUILD OPTIONS
| Build option | Default | Possible values | Description |
| VERSION | us | us, eu, jp, sh | Which ROM to use. The selected ROM has to be in the repo folder with the name baserom.$VERSION.z64. sh is currently broken. |
| TARGET_BITS | 32, 64, | TARGET_BITS=n appends some compiler flags for an n-bit build. If the value is empty, the option does nothing, assuming your native toolchain will set everything up by itself. Use this only if you're having trouble otherwise. | |
| TARGET_RPI | 0 | 0, 1 | If 1, select optimal settings for Raspberry PI hardware. See the main article (https://github.com/sm64pc/sm64pc/wiki/Helper-compiling-script-for-Raspberry-Pi) on that. |
| TARGET_WEB | 0 | 0, 1 | If 1, build Emscripten version. See the main article (https://github.com/sm64pc/sm64pc/wiki/Compiling-for-the-web) on that. |
| WINDOWS_BUILD | 0, 1 | If 1, build for Windows. Usually set automatically if building on Windows. | |
| OSX_BUILD | 0 | 0, 1 | If 1, build for OSX. |
| WINDOWS_CONSOLE | 0 | 0, 1 | If 1, append -mconsole to Windows CFLAGS, making a console window appear while the game is running. Can be useful for debugging purposes. |
| DEBUG | 0 | 0, 1 | If 1, build with debug symbols and default optimization level. Otherwise build with -O2. |
| RENDER_API | GL | GL, GL_LEGACY, D3D11, D3D12 | Select rendering backend to use. GL corresponds to OpenGL 2.1 (gfx_opengl.c), GL_LEGACY corresponds to OpenGL 1.3 (gfx_opengl_legacy.c). Direct3D backends will also force WINDOW_API to DXGI. |
| WINDOW_API | SDL2 | SDL2, DXGI | Select windowing backend. GL renderers force SDL2 and D3D renderers force DXGI for now, so you don't need to specify this. |
| AUDIO_API | SDL2 | SDL2 | Select audio backend. There's only one right now. |
| CONTROLLER_API | SDL2 | SDL2 | Specify list of controller backends to use. There's only one right now. |
| BETTERCAMERA | 0 | 0, 1 | If 1, build with analog camera support (uses Puppycam). |
| NODRAWINGDISTANCE | 0 | 0, 1 | If 1, build with disabled draw distance (every object is active at all times). May affect gameplay. |
| TEXTURE_FIX | 0 | 0, 1 | If 1, enable various texture-related bugfixes (e.g. fixes the smoke texture). |
| EXT_OPTIONS_MENU | 1 | 0, 1 | If 1, enable Options menu. Accessed from the Pause menu by pressing R. |
| EXTERNAL_DATA | 0 | 0, 1 | If 1, load textures and soundbanks from external files. Allows you to use texture packs. The default data is copied to a res folder next to the produced executable. (On the console the folder goes on the root of SD Card) |
| DISCORDRPC | 0 | 0, 1 | If 1, enable Discord Rich Presence support. Only works on x86_64. |
| TEXTSAVES | 0 | 0, 1 | If 1, use INI-based save format instead of binary EEPROM dumps. Experimental. |
NEW BUILD OPTIONS ADDED BY sm64ex-alo REPO
| Build option | Default | Possible values | Description |
| QOL_FIXES | 0 | 0, 1 | QOL improvements |
| QOL_FEATURES | 0 | 0, 1 | QOF improvements |
| MOUSE_ACTIONS | 0 | 0, 1 | On desktop versions, enable mouse support, Only works on SDL modes, DirectX is WIP. |
| EXT_DEBUG_MENU | 0 | 0, 1 | Enable Simple Debug Menu |
| PORT_MOP_OBJS | 0 | 0, 1 | Kazel's More Object Patch enable |
After the NRO file is created, you can use SAK Switch Army Knife to make a NSP forwarder installable on the HOS.
Or better, use nsp-forwarder.n8.io to create a customized Forwarder.
Troubleshooting
- If you get the error gcc: command not found or make: gcc: No such file or directory you do not install all needed packages or run the wrong Shell, be sure of running «MINGW32» or «MINGW64» and what that is pointed on the prompt in purple.
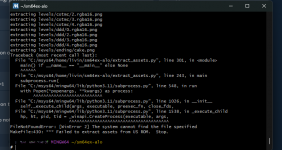
- If the ROM is missing or wrong format/version you get the error Failed to open baserom.us.z64! Verify the correct ROM at the c:\msys64\home\<username>\sm64ex.folder.
- If you get the error make: *** No targets specified and no makefile found. Stop. You are on the wrong folder the last make command should be run from c:\msys64\home\<username>\sm64ex folder.
- Be sure of get the responses Target: i686-w64-mingw32 or Target: x86_64-w64-mingw32 when you run the command gcc -v if else other is shown on screen you install the wrong gcc package or run MSYS shell, remember the process should be run on «MINGW32» or «MINGW64» shells.
Attachments
Last edited by impeeza,


 He Row. Is that Michael rowing that boat ashore?