Before y1ou start reading this tutorial you need to have the following items.
Have Photoshop css6 or higher installed on your PC.
Download this bundle of editable files so you can practice the tutorial - Click here to download the files.
Have patience while reading the tutorial if you have any questions post a comment on the site.
If this tutorial has been helpful to you please:
This tutorial will abort the basics of how to create a Colored border using only the basic Photoshop effects. At the end of the tutorial I will post two extra content.
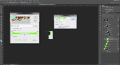
Part 1 - To begin remove all padlocks from the BG-1 layers from A to C. These layers should not have their positions and height changed as these layers serve to prevent any occurrence of errors when you apply the effects on the Mask layers. You will only be able to change your colors, but this will be explained later.
Note: You change the color.
Part 2 - Select the layer BG-1-A and press control + J so that the layer is duplicated, select the layer that was duplicated and change its color. You can use various color effects, in the example shown in the picture above I'm using the linear effect and put two colors.
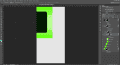
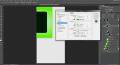
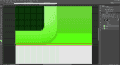
Part 3 - Select the Mask-1 layer, you must click on the folder icon to make the selection.After selecting this layer click the text called effects so that a settings panel opens.
Part 4 - You must select the INTERNAL BRIGHTNESS option, change only the brightness color, it must have the same color as you used to create the texture, in the example shown in the image and the color green. You should put the color in a darker tone, in the example shown in the picture the green color with a darker tone will be used.
Tip: Copy the color code you used in the example shown in the image the code is # 41b701.
This effect will create the first part of the inflatable effect on the edge, I use this effect to create various types of texture.
Note: Only change the other settings of this option if you want to create a different effect, otherwise do not make any changes in the other fields.
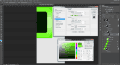
Part 5 - Click on effects located below gives layer Mask-2 to open the effects panel. You must paste in the field that allows you to edit the colors o color code that you had copied.
Note: Only change the other settings of this option if you want to create a different effect, otherwise do not make any changes in the other fields.
All the explanations posted in this tutorial have been applied in creating the border textures of the examples below.
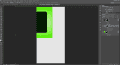
Part 6 - Click the arrow next to the Mask-2 Layer folder icon so that all layers are collapsed. With the selected layer press control + J so that it is duplicated. This will duplicate all layers contained within the Mask-2 folder. You will have two layers one called Mask-2 and the other called Mask-2 Copy. The following procedures will be applied to the Mask-2 Copy layer.
Part 7 - For ease of explanation I deleted the Mask-2 folder, you should not do this because the Mask-2 folder will contain all layers in editable mode.If you make a mistake from this point you can use the files contained in this folder to perform the correction.
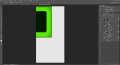
Select the layer BG-0 and change its color, put the same color that you used in the panel of efetos in the mask-1 layer. Open the effects panel so you can copy the code gives color. Then just use this color in the BG-0 file.
Now select the Mask-2 Copy selected layer, right-click on it to open an options panel, select the CONVERT TO INTELLIGENT OBJECT option, then go back to that menu and choose the RASTERIZE LAYER option.
Note: Do not use the Merge Layers option as this will damage the effects applied to the texture.
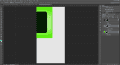
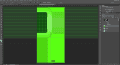
Part 9 - Press the letter M so that the cut selection tool is activated. Use it to make a selection in the same way as it is shown in the image above. After making the selection press control + J so that the selected area is duplicated. Press control +; To turn off the guides.
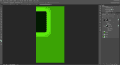
Part 10 - Select the duplicate layer then press the letter V to have the selection tool activated. You should stretch this layer to the right, in the same way it is being shown in image two above.
Part 11 - Activate the guides again by pressing +; , Then press M to activate the cut selection tool again, with the Mask-2 layer selected, you must create a cut selection as shown in the image above then press control + j to duplicate the layer.
Part 12 - Select the layer that was stretched to the right and the new layer that was created. Right-click the MOUSE on the stretched layer and choose the Merge layers option.
Part 13 - Select the layer that has been merged, then press the letter M to activate the cut selection tool again. Perform a cut selection as shown in the image above. Then press control + j so that the layer is duplicated.
Have Photoshop css6 or higher installed on your PC.
Download this bundle of editable files so you can practice the tutorial - Click here to download the files.
Have patience while reading the tutorial if you have any questions post a comment on the site.
If this tutorial has been helpful to you please:
- Make available the textures you learned to create in an editable file in the forum.
- Please pass this tutorial to other users who want to learn how to make this material.
- Click the LIKE button at the end of this post.
This tutorial will abort the basics of how to create a Colored border using only the basic Photoshop effects. At the end of the tutorial I will post two extra content.
- How to Create an border Drilling.
- How to make a border using Photoshop textures.
Creating the texture in size 48px.
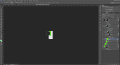
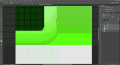
Open the border-48px file, you will come across the items shown in the image below.
Press control + 0 to enlarge the image, to facilitate the process of creating the textures.
Open the border-48px file, you will come across the items shown in the image below.
Press control + 0 to enlarge the image, to facilitate the process of creating the textures.
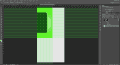
Part 1 - To begin remove all padlocks from the BG-1 layers from A to C. These layers should not have their positions and height changed as these layers serve to prevent any occurrence of errors when you apply the effects on the Mask layers. You will only be able to change your colors, but this will be explained later.
Note: You change the color.
Part 2 - Select the layer BG-1-A and press control + J so that the layer is duplicated, select the layer that was duplicated and change its color. You can use various color effects, in the example shown in the picture above I'm using the linear effect and put two colors.
Part 3 - Select the Mask-1 layer, you must click on the folder icon to make the selection.After selecting this layer click the text called effects so that a settings panel opens.
Part 4 - You must select the INTERNAL BRIGHTNESS option, change only the brightness color, it must have the same color as you used to create the texture, in the example shown in the image and the color green. You should put the color in a darker tone, in the example shown in the picture the green color with a darker tone will be used.
Tip: Copy the color code you used in the example shown in the image the code is # 41b701.
This effect will create the first part of the inflatable effect on the edge, I use this effect to create various types of texture.
Note: Only change the other settings of this option if you want to create a different effect, otherwise do not make any changes in the other fields.
Part 5 - Click on effects located below gives layer Mask-2 to open the effects panel. You must paste in the field that allows you to edit the colors o color code that you had copied.
Note: Only change the other settings of this option if you want to create a different effect, otherwise do not make any changes in the other fields.
All the explanations posted in this tutorial have been applied in creating the border textures of the examples below.
Part 6 - Click the arrow next to the Mask-2 Layer folder icon so that all layers are collapsed. With the selected layer press control + J so that it is duplicated. This will duplicate all layers contained within the Mask-2 folder. You will have two layers one called Mask-2 and the other called Mask-2 Copy. The following procedures will be applied to the Mask-2 Copy layer.
Part 7 - For ease of explanation I deleted the Mask-2 folder, you should not do this because the Mask-2 folder will contain all layers in editable mode.If you make a mistake from this point you can use the files contained in this folder to perform the correction.
Select the layer BG-0 and change its color, put the same color that you used in the panel of efetos in the mask-1 layer. Open the effects panel so you can copy the code gives color. Then just use this color in the BG-0 file.
Now select the Mask-2 Copy selected layer, right-click on it to open an options panel, select the CONVERT TO INTELLIGENT OBJECT option, then go back to that menu and choose the RASTERIZE LAYER option.
Note: Do not use the Merge Layers option as this will damage the effects applied to the texture.
View attachment 75099
Part 8 - With the RASTERIZED layer selected press control +; To activate the tabs.
Part 8 - With the RASTERIZED layer selected press control +; To activate the tabs.
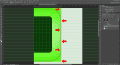
Part 9 - Press the letter M so that the cut selection tool is activated. Use it to make a selection in the same way as it is shown in the image above. After making the selection press control + J so that the selected area is duplicated. Press control +; To turn off the guides.
Part 10 - Select the duplicate layer then press the letter V to have the selection tool activated. You should stretch this layer to the right, in the same way it is being shown in image two above.
Part 11 - Activate the guides again by pressing +; , Then press M to activate the cut selection tool again, with the Mask-2 layer selected, you must create a cut selection as shown in the image above then press control + j to duplicate the layer.
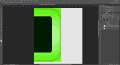
Part 12 - Select the layer that was stretched to the right and the new layer that was created. Right-click the MOUSE on the stretched layer and choose the Merge layers option.
Part 13 - Select the layer that has been merged, then press the letter M to activate the cut selection tool again. Perform a cut selection as shown in the image above. Then press control + j so that the layer is duplicated.
View attachment 75106
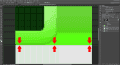
Part 14 - Select the duplicate layer and stretch it down as shown in the image above.
Part 14 - Select the duplicate layer and stretch it down as shown in the image above.
View attachment 75108
Part 15 - Save edits and then save the image in .png
Part 15 - Save edits and then save the image in .png
If you have any questions leave a comment.