Before starting this tutorial, here are some explanations, the settings imposed in this tutorial, allowed you to create uniform colors on the buttons of your themes, there may be a small margin of error if you do not position the colors perfectly . These settings will only work in the Usagi Editor.
Note: The colors used in the main fields shown in the images below, were obtained through the Usagi editor's color palette
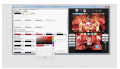
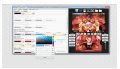
Note: As shown in the picture this process was performed twice .
View attachment 106140
You have just set the highlight color with uniform parameters.
View attachment 106141View attachment 106142
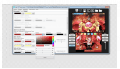
Now let's set the border color, to do this I left in the image two cursors, the first will serve for you to measure the distance, the second is where you should click.
Position the mouse as shown in the picture, following the order of the first cursor, so that you use the mouse as a ruler, after having a notion of distance, position the mouse in the same way as the second cursor shown in the image, and click to position the cursor.
View attachment 106143 View attachment 106144
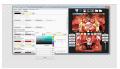
After setting the color of the lower icon, on the top icon tab, position the mouse as shown in the image then click to create a slightly lighter color .
View attachment 106145
I usually use the same colors, which I configured in the buttons at the bottom, in the button settings, to open application .
This saves time. Currently the official themes are using shadow percentage at position 0, this setting hides the color on the open application buttons, I advise you to use this setting.
View attachment 106146
Some important explanations.there are occasions that you will come across colors positioned in the corners to perfectly set the highlight button colors, I left an example in the image above, where the color is located in the left corner, to set the color perfectly, position the cursor, as shown in the image above.
View attachment 106147
The process must be performed twice. After positioning and clicking the cursor in the first position, repeat the same procedure.
View attachment 106148
In the image above, I left another example, where you will come across the color in the left corner, only this time, you can only apply the positioning once, there are occasions, that you can only apply, the positioning of the button highlight, a single time, this can happen, withcolors positioned in the corners. In the example of the image above, the cursor should be positioned using the upward positioning only once.
View attachment 106149 View attachment 106150 View attachment 106151
In the example above, the cursor should be positioned to the left, you should place the cursor as shown in the image above, using it as a ruler, after seeing the position just mark for the color to be defined, this marking must be done twice.
View attachment 106152View attachment 106153
Another example, if for some reason you get to use, the white button, the highlight color, should be set as shown in the image above. The mouse positioning will only be used once.
View attachment 106154 View attachment 106155
If you happen to use colors that are located in the area shown in the image above, you must mark the cursor to the right using methods explained above, the marking process must be done twice. in this type of example the marking must be done to the right, because it is the color of the border.
View attachment 106156
The cursor colors, are divided into three, main - shading and brightness. After setting the main color, copy it in the other fields as shown in the image above.
The brightness color should not be changed, you should only change the color of the shading.
View attachment 106157
To create the shading color, you must use the main color, you must darken the shading color in one of these directions. down, right diagonal, following the direction down and if the color is in the right corner, as is shown in the image above, you should use the position down. You must position the cursor in one of the informed positions until the main color turns dark.
The explanations of how to create the colors of the arrow buttons will be given next week.
And it will be the final part.
Note: The colors used in the main fields shown in the images below, were obtained through the Usagi editor's color palette
View attachment 106137
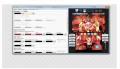
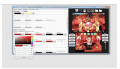
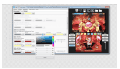
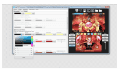
To start after setting the main color of the lower corner buttons, copy the color used in the main color to the fields, border, and highlight. See the example I left in the image.
View attachment 106138
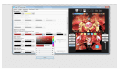
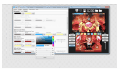
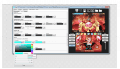
To start we will create the highlighted color, this color represents the brightness of the button. Position the mouse in the same way it is shown in the image. Now click, to place the cursor positioned correctly.
View attachment 106139
Position the mouse one more time as shown above, and click the mouse so that the color cursor is positioned at the position where the cursor is marking.
To start after setting the main color of the lower corner buttons, copy the color used in the main color to the fields, border, and highlight. See the example I left in the image.
View attachment 106138
To start we will create the highlighted color, this color represents the brightness of the button. Position the mouse in the same way it is shown in the image. Now click, to place the cursor positioned correctly.
View attachment 106139
Position the mouse one more time as shown above, and click the mouse so that the color cursor is positioned at the position where the cursor is marking.
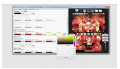
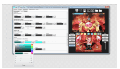
Note: As shown in the picture this process was performed twice .
View attachment 106140
You have just set the highlight color with uniform parameters.
View attachment 106141View attachment 106142
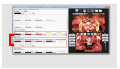
Now let's set the border color, to do this I left in the image two cursors, the first will serve for you to measure the distance, the second is where you should click.
Position the mouse as shown in the picture, following the order of the first cursor, so that you use the mouse as a ruler, after having a notion of distance, position the mouse in the same way as the second cursor shown in the image, and click to position the cursor.
View attachment 106143 View attachment 106144
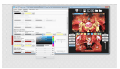
After setting the color of the lower icon, on the top icon tab, position the mouse as shown in the image then click to create a slightly lighter color .
View attachment 106145
I usually use the same colors, which I configured in the buttons at the bottom, in the button settings, to open application .
This saves time. Currently the official themes are using shadow percentage at position 0, this setting hides the color on the open application buttons, I advise you to use this setting.
View attachment 106146
Some important explanations.there are occasions that you will come across colors positioned in the corners to perfectly set the highlight button colors, I left an example in the image above, where the color is located in the left corner, to set the color perfectly, position the cursor, as shown in the image above.
View attachment 106147
The process must be performed twice. After positioning and clicking the cursor in the first position, repeat the same procedure.
View attachment 106148
In the image above, I left another example, where you will come across the color in the left corner, only this time, you can only apply the positioning once, there are occasions, that you can only apply, the positioning of the button highlight, a single time, this can happen, withcolors positioned in the corners. In the example of the image above, the cursor should be positioned using the upward positioning only once.
View attachment 106149 View attachment 106150 View attachment 106151
In the example above, the cursor should be positioned to the left, you should place the cursor as shown in the image above, using it as a ruler, after seeing the position just mark for the color to be defined, this marking must be done twice.
View attachment 106152View attachment 106153
Another example, if for some reason you get to use, the white button, the highlight color, should be set as shown in the image above. The mouse positioning will only be used once.
View attachment 106154 View attachment 106155
If you happen to use colors that are located in the area shown in the image above, you must mark the cursor to the right using methods explained above, the marking process must be done twice. in this type of example the marking must be done to the right, because it is the color of the border.
View attachment 106156
The cursor colors, are divided into three, main - shading and brightness. After setting the main color, copy it in the other fields as shown in the image above.
The brightness color should not be changed, you should only change the color of the shading.
View attachment 106157
To create the shading color, you must use the main color, you must darken the shading color in one of these directions. down, right diagonal, following the direction down and if the color is in the right corner, as is shown in the image above, you should use the position down. You must position the cursor in one of the informed positions until the main color turns dark.
The explanations of how to create the colors of the arrow buttons will be given next week.
And it will be the final part.