First time modding AGB-001. Issues with brightness control, loss of select button, and sticky trigger

jdsteel7

Well-Known Member
OP
Newcomer
Joined
Jul 24, 2020
Messages
88
Trophies
0
Age
34
XP
158
Country
United States
Hi there,

I just attempted an install of the new-ish ITA screen from funnyplaying. This is my first ever handheld mod and the very first time I've ever picked up a soldering iron too. I got the whole kit, including Funnyplaying's ITA/IPS shell, buttons, and membranes.

The good news is that I was able to get everything assembled and the screen looks great. I do have some problems though:

1) I don't have a select button... not sure why that would be or how to fix it?

2) My brightness controls are wonky... the touch sensor works perfect but if I hold the left trigger and press the right trigger, or vise versa, it increases the brightness. Also, because of not having a select button, I have no way to test if the select + L/R trigger lowers or increases the brightness.

3) My right trigger is super sticky and even gets stuck sometimes. I tried loosing up the screw but that didn't seem to help. Any suggestions?

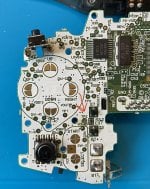
I did struggle with the soldering the wires to the actual GBA motherboard. Soldering the wires to the ribbon cable was a piece of cake, but when trying to solder to the motherboard, the solder didn't seem to want to go onto the test pads and would instead stick to the iron. That's even after using flux, and trying my best to use proper technique (applying the iron to the board, then feeding the solder, leaving the iron for a second, then pulling away).

Thanks in advance for any help!
 

FAST6191

Techromancer
Editorial Team
Joined
Nov 21, 2005
Messages
36,798
Trophies
3
XP
28,348
Country
United Kingdom
Soldering. Try scratching the pads a little bit -- some will use a fibre pen (you can get them from electronics suppliers, sometimes even with flux in it, but they are also similarly sold to restore wall grout in bathrooms, though make sure to get the ones without paint), some will go with sandpaper, others other means.

Can't say I have dealt with the company to know quality of things.

1. So replacement pad/membrane does not work? Check under it to make sure some fluff did not get somewhere, and you can try with another part of the membrane with it all open to see if it works to try to eliminate things (and the part that should be over select try on another area to see if it works there). But yeah fluff and alignment, or possibly flux being in the wrong place, are the usual causes.

2. I don't know what was done to know if this is wrong or what is supposed to be wrong with that scenario. That said select button being always pressed might be a thing to consider in this.

3. Third party replacements for things are commonly noted as maybe not having the best fit, or cleanup during manufacture. Check to see if anything needs a kiss with some needle files or something.
 
  • Like
Reactions: Takokeshi

Takokeshi

Well-Known Member
Member
Joined
Mar 7, 2022
Messages
532
Trophies
0
Location
-
XP
1,046
Country
Antarctica
If you've got a flashcart, you could try something like this to check if Select isn't simply always "pressed"

https://www.romhacking.net/homebrew/142/

Also I assume that your screen comes with an extra board/ribbon cable, that folds up behind the screen and to which you want to solder wires from L/R and Select. You need to properly insulate that away from the back of the screen, otherwise you may be shorting stuff which could explain Select being unresponsive (and L/R triggering brightness change on their own.)
 

jdsteel7

Well-Known Member
OP
Newcomer
Joined
Jul 24, 2020
Messages
88
Trophies
0
Age
34
XP
158
Country
United States
@FAST6191 @Takokeshi
Thanks for the responses and suggestions! I've been trying to narrow down why my select button is still not registering before I move on to the brightness. I did try the input test roms and it's definitely not always pressed. I tried my OEM start/select membranes, trimmed a bit of the shell to make sure that those buttons sit flush, I even removed my solder job, basically going to a barebones screen install to see if that would help, but nothing. I don't remember if my select button worked before I took apart the GBA (though I think it did?), but is it possible I destroyed the select button while soldering earlier?

Here's a picture. The red arrow is TP2, the pad that gave me the most trouble. Did I wreck that pad with too much heat, and if so, would that affect my select button's functionality? Or the neighboring pads, components, or connections?

I'm totally lost as to why my select button isn't functioning.
 

Attachments

  • IMG_1960.jpg
    IMG_1960.jpg
    1.1 MB · Views: 159

FAST6191

Techromancer
Editorial Team
Joined
Nov 21, 2005
Messages
36,798
Trophies
3
XP
28,348
Country
United Kingdom
It is possible. Pending the picture I won't be able to tell much.

Did you try the thing where you remove the membrane but power the device and then both try the select part of the membrane on another button and/or another part of the membrane you know to work on the select part?

Few months back a friend's TV decided to mute and the button on the remote decided not to work even under large force. Unlike all other TVs I have ever played with the buttons on the box did nothing. Whipped apart the remote, removed the membrane, tried cleaning but no joy, moved the membrane so it was the 9 button or whatever over the mute section. Pressed and TV unmuted. It would be odd for it to happen with a new setup but not really out of the realm of possibility.
 

jdsteel7

Well-Known Member
OP
Newcomer
Joined
Jul 24, 2020
Messages
88
Trophies
0
Age
34
XP
158
Country
United States
It is possible. Pending the picture I won't be able to tell much.

Did you try the thing where you remove the membrane but power the device and then both try the select part of the membrane on another button and/or another part of the membrane you know to work on the select part?

Few months back a friend's TV decided to mute and the button on the remote decided not to work even under large force. Unlike all other TVs I have ever played with the buttons on the box did nothing. Whipped apart the remote, removed the membrane, tried cleaning but no joy, moved the membrane so it was the 9 button or whatever over the mute section. Pressed and TV unmuted. It would be odd for it to happen with a new setup but not really out of the realm of possibility.
Sorry, I forgot to attach the picture. It's updated now.

No, I haven't tried that yet and will do so now
 

FAST6191

Techromancer
Editorial Team
Joined
Nov 21, 2005
Messages
36,798
Trophies
3
XP
28,348
Country
United Kingdom

jdsteel7

Well-Known Member
OP
Newcomer
Joined
Jul 24, 2020
Messages
88
Trophies
0
Age
34
XP
158
Country
United States
That does look like a lifted pad on TP2.

Sometimes test pads are test pads flapping in the breeze at the end of a line, other times not. We don't really have much in the way of diagnostic manuals (don't think we got fun things in the gigaleaks) but https://circuit-board.de/forum/index.php/Thread/13913-STRIP-CLUB-PCB-Scans/?pageNo=1 might well yield some pictures you can follow the traces for.
I see. And you think it's possible that it could have impaired the functionality of my select button?

I just reassembled my original screen and shell back on to the motherboard, and the select input doesn't work with that either. I also don't have those little alligator clips to provide external power to test the GBA without having to mostly assemble it together, so I can't really think of a way to test different membranes...
 

FAST6191

Techromancer
Editorial Team
Joined
Nov 21, 2005
Messages
36,798
Trophies
3
XP
28,348
Country
United Kingdom
I have done sillier things with tin foil and a power supply before but whether you want to go there here or not I don't know. Can you not get enough of the rear shell together to hold some AAs?
 

jdsteel7

Well-Known Member
OP
Newcomer
Joined
Jul 24, 2020
Messages
88
Trophies
0
Age
34
XP
158
Country
United States
I have done sillier things with tin foil and a power supply before but whether you want to go there here or not I don't know. Can you not get enough of the rear shell together to hold some AAs?
I'm dumb, I didn't think to flip it around and put just the back shell on with the motherboard exposed :shy:

In doing so, I think I've definitely ruled that it's an issue with the select pad. It's not the membranes themselves, because known working membranes work on start but not select. I don't know if it's something I did or if it already wasn't working before. Either way, it's a bummer, and I think repairing it is way beyond my skill level...
 

FAST6191

Techromancer
Editorial Team
Joined
Nov 21, 2005
Messages
36,798
Trophies
3
XP
28,348
Country
United Kingdom
If you can follow along (literally like following a maze on the back of a cereal box) with the pictures you can find out whether it is a test point on the path somewhere or road to nowhere (though that does then bring up the problem of what changed to cause this issue) and whether there are other points that might instead want to be joined.
Also there is nothing special about the select button for the purposes of this mod by the looks of things -- could extend whatever wires to the start button (or some other button) instead and just have that as the combo.
 

jdsteel7

Well-Known Member
OP
Newcomer
Joined
Jul 24, 2020
Messages
88
Trophies
0
Age
34
XP
158
Country
United States
If you can follow along (literally like following a maze on the back of a cereal box) with the pictures you can find out whether it is a test point on the path somewhere or road to nowhere (though that does then bring up the problem of what changed to cause this issue) and whether there are other points that might instead want to be joined.
Also there is nothing special about the select button for the purposes of this mod by the looks of things -- could extend whatever wires to the start button (or some other button) instead and just have that as the combo.
Thanks, that's a good suggestion. At this point I'm way less concerned about the mod and more concerned about not having a functioning select button. I know not a lot of games use it but it's still a bummer to not have it
 
  • Like
Reactions: Takokeshi

jdsteel7

Well-Known Member
OP
Newcomer
Joined
Jul 24, 2020
Messages
88
Trophies
0
Age
34
XP
158
Country
United States
I did a little more research and found this reddit thread. I think this is exactly what I did to my TP2 pad.

"If looks like you pulled off part of the trace for the select button along with TP2 -- you can see where it came up from the line going through "2". You'll have to scrape back the solder mask and run a wire between the disconnected points.

These board scans are a great reference."


Sounds like a pretty big repair job for someone with basically no experience huh? Am I better off just selling the GBA as-is and trying again?
 

FAST6191

Techromancer
Editorial Team
Joined
Nov 21, 2005
Messages
36,798
Trophies
3
XP
28,348
Country
United Kingdom
Small bridges for surface mount stuff is not so bad. It would be preferable not to have to do it but this is not some fancy BGA replacement or anything.

Make sure your scalpel is sharp, dragging motion usually does pretty well, tin the exposed traces first, and I would go for the solder a longer wire and cut/fatigue it off afterwards rather than messing with short lengths and glue or something. That is to say get a length long enough that you can manipulate it with your fingers if needs be (though tweezers are good stuff). Strip if if you are going to but solder the length in from the end first, now you can manipulate the shorter section to where it needs to be and go straight there, cut the remaining tail off.

Find something to practice on first though.
 

jdsteel7

Well-Known Member
OP
Newcomer
Joined
Jul 24, 2020
Messages
88
Trophies
0
Age
34
XP
158
Country
United States
Small bridges for surface mount stuff is not so bad. It would be preferable not to have to do it but this is not some fancy BGA replacement or anything.

Make sure your scalpel is sharp, dragging motion usually does pretty well, tin the exposed traces first, and I would go for the solder a longer wire and cut/fatigue it off afterwards rather than messing with short lengths and glue or something. That is to say get a length long enough that you can manipulate it with your fingers if needs be (though tweezers are good stuff). Strip if if you are going to but solder the length in from the end first, now you can manipulate the shorter section to where it needs to be and go straight there, cut the remaining tail off.

Find something to practice on first though.
A little late in responding, but I wanted to give you an update. I ended up buying a replacement Japan GBA on eBay and basically starting over. The second time I got everything working perfectly, so I think that combined with my recent successful Xeno chip mod on the Gamecube, my soldering skills are slowly improving :)

I sold the board with the damaged TP2 trace on Ebay but made that crystal clear, so I'm hoping the next person will have more soldering skills and will be able to restore that. It was my childhood GBA so I'm a little sad I didn't have the skills, nor the time to learn, to make a bridge and fix it myself :( but I'm hopeful the next person will have those skills and be able to enjoy it!
Also, your tip about kissing the triggers with some flush cutters seemed to fix any sticky trigger issues! Thanks again for all your help.
 

Site & Scene News

Popular threads in this forum

General chit-chat
Help Users
    K3Nv2 @ K3Nv2: https://youtube.com/shorts/vKQN3UiNNHY?si=fP6ZlFe-DhQf9SW7