Hacking v2 SX Core install, freezes / hangs on SX OS logo screen

pipes82

Member
OP
Newcomer
Joined
Oct 27, 2020
Messages
5
Trophies
0
Age
42
XP
56
Country
United States
v2 Switch on firmware 10.2.0
Fat32 formatted a class 3 SanDisk extreme 128GB card using GUIformat, copied over SXOS_beta_v3.0.5 boot.dat
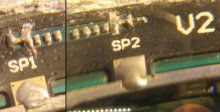
SX core very carefully installed, install photo below, never bridged caps or physically messed anything up. Resistance on each cap is about 160 ohms
SX indicator light is blue for 0-9 seconds (varies on every boot), then green
Booted to OS SX menu and updated chip to v1.3
Created Emunand on hidden SD partition, completed normally
Request offline license, get message that request file was sent to card and then I pressed continue and the switch hung. After waiting for something to happen I powered off and got the license.dat from the website
Powered on and it hands on SX OS logo for a long time
Boot while holding + volume for OS SX boot menu and either OFW or CFW boot option leads to hang on, press either and then screen does not update
As soon as I attempt to start in either OFW or CFW the chips green LED indicator shuts off

I removed the SX Core (left soldered ribbon in place) and replaced the NAND and it boots normally
I ran EaseUS Partition Master surface test and the SD card reported no bad sectors
I looked for missing caps or resistors but see no damage on the board
I removed all of the thermal paste from around the caps on the sides of the die (I had previously just removed the paste on the bottom)

After doing a lot of searching and reading the last thing I think I have not tried is another micro SD card

Any suggestions greatly appreciated, this has been a long road
 

Attachments

  • sx_install.jpg
    sx_install.jpg
    266.1 KB · Views: 176

DPyro

Well-Known Member
Member
Joined
Oct 17, 2008
Messages
370
Trophies
1
XP
833
Country
Canada
Format card with GUI format and try again. I had an issue where it wouldn't detect the card with boot.dat.
 

pipes82

Member
OP
Newcomer
Joined
Oct 27, 2020
Messages
5
Trophies
0
Age
42
XP
56
Country
United States
I think I was able to resolve this issue. The problem was, I believe, I had never used an SD card with this console before the mod.

The way I corrected this was to physically restore the NAND to the factory position and boot normally (I only left the soldered ribbon in place). I formatted the SD card on the PC just to be safe. Inserted the SD card into switch and I was prompted to update to use the SD card which I did. Then I shut down, formatted SD card again in fat32 on PC. moved over boot and license files. Restored SX Core into position and then once I was pretty sure I might have fixed it I got a blue LED indicator on start up and no green. After about 30 minutes of unplugging and replugging every part of the assembly suddenly reseating the NAND into the SX core I suddenly got a green LED. I then rebuilt a emunand on a hidden partition and it boots into OS SX!!!!!!

This has been a long and painful project. I solder every day so I was pretty confident and I got this switch for free so I was ok with throwing it out if it went wrong. But it took a month to get the chip, this took hours to complete and if I had to do it again I would have gotten a V1.
 
Last edited by pipes82,

ps786

Well-Known Member
Newcomer
Joined
May 1, 2017
Messages
47
Trophies
0
Age
44
XP
173
Country
United States
I think I was able to resolve this issue. The problem was, I believe, I had never used an SD card with this console before the mod.

The way I corrected this was to physically restore the NAND to the factory position and boot normally (I only left the soldered ribbon in place). I formatted the SD card on the PC just to be safe. Inserted the SD card into switch and I was prompted to update to use the SD card which I did. Then I shut down, formatted SD card again in fat32 on PC. moved over boot and license files. Restored SX Core into position and then once I was pretty sure I might have fixed it I got a blue LED indicator on start up and no green. After about 30 minutes of unplugging and replugging every part of the assembly suddenly reseating the NAND into the SX core I suddenly got a green LED. I then rebuilt a emunand on a hidden partition and it boots into OS SX!!!!!!

This has been a long and painful project. I solder every day so I was pretty confident and I got this switch for free so I was ok with throwing it out if it went wrong. But it took a month to get the chip, this took hours to complete and if I had to do it again I would have gotten a V1.

I am glad to hear you are able to get it working. If you are able to boot into SX OS and successfully dump nand, then you solder points are definitely good.
 

pipes82

Member
OP
Newcomer
Joined
Oct 27, 2020
Messages
5
Trophies
0
Age
42
XP
56
Country
United States
After moving some XCIs to the SD card and turning the unit on and off a couple times, I launched a game for 20 seconds to test it. Then on a boot the SX OS logo screen had some pixelation now it is black when booting. When docked and on there is no HDMI output. When I applied thermal paste on the die it was only about 2/3 covered but I had not run any games so I don't think it could have overheated but now the screen is black when booting

I just tried to boot without SD and I get a clear boot.dat error so it might be SD card corruption. This whole thing has been such a rollercoaster, honestly kind of takes the fun out of this whole thing when it's such a PIA. Cannot recommend a v1 path enough

I disconnected the NAND and reseated it and I am able to boot again, seems that was the problem. This is a rollercoaster at every turn
 
Last edited by pipes82,

pipes82

Member
OP
Newcomer
Joined
Oct 27, 2020
Messages
5
Trophies
0
Age
42
XP
56
Country
United States
Thats BS, sorry. The SX Core is such an easy task with its 2 soldering points, i did tons of them, never had an issue with them.
I have only done 3/4 of one so I am less than a noob but from going from knowing nothing to getting a core on a v2 done it has been a challenge with issue after issue. If I had to do another I could bang it out for sure but I was hoping this would take 2-3 hours but it has turned into 10 hours with defeat then success over and over. If I had to do it again I might mail it out for $80 instead of spending 10 hours but I have learned a couple things and it does seem like it is going to end well otherwise I would be so bummed to spend so much time to fail in the end. Something to consider if you are also doing one starting from zero, that's all I'm trying to say
 
Last edited by pipes82,

pipes82

Member
OP
Newcomer
Joined
Oct 27, 2020
Messages
5
Trophies
0
Age
42
XP
56
Country
United States
What kind of solder did you use?
I used 0.3mm Sn63/Pb37 solder, weller ETOB point tip (which might have still been slightly too large), Weller station at 650*F, Kester flux which was very viscous and do not stay on the components like it seems the gel flux does but it still worked

Over all my takeaways, which I hope will help someone, was that if you are starting from nothing expect to spend a lot of time reading and searching a lot and be ok with throwing the thing out if it goes wrong. Here are some problems and solutions I faced

The caps are about 1/3 the size of a grain of rice, very hard to see what is going on without a microscope

The case needed 2.0mm tri-star and 2.0mm phillips to open, I bought a kit of tools advertised as switch tools which included these two drivers plus other useful tools like a plastic crowbar, forget the name right now
I also used curved fine tweezers (I pressed down on the ribbon as I soldered it for good contact, might have been unnecessary), jewelers glasses (harborfreight - magnifier-head-strap-with-lights) which were barely good enough for the job, and a bright light. I think the most important thing is to not introduce too much solder. The instructions stated that you should tin the ribbon contacts first but I did it while the ribbon was on the die which I think was a mistake I would follow the instructions next time.
My first major mistake was after I had soldered the contact points with about half the solder you see in tutorials because I was nervous about bridging the caps. I tested the continuity and then moved forward. When I attached the ribbon to the core I lifted the ribbon off one of the first cap but did not notice that until I went back in a second time and pressed down on the ribbon with tweezers and I could see the ribbon could move up and down slightly and was no longer attached to the cap. I'm not sure if it's a good idea but next time I might attach the core to the ribbon before soldering the caps so that I do not have to pull up on the ribbon after the caps are soldered. In that case I would leave the core unseated from the board since when the core is seated the ribbon position wants to be in a slightly lower position.
My next mistake was to tape the core to the heat shield on one side only so that it would not flop around in the case. When I reinstalled the case I think since the core/NAND was on an angle the NAND unseated. I should have done nothing or taped across the entire section so that it sits flat between the cut out section of the heat shield. With the NAND not seated it would boot to boot.dat? but then black screen with SD inserted. At one point I had to disconnect and reconnect the NAND to the core about 5 times before it suddenly worked - pretty frustrating
Next I had never installed the SD card into the console before the mod which seems to have lead to a frozen screen after the sx boot menu. I read a lot of threads and I never saw anyone mention this so that was another frustrating part - there still seems to be at least one issue that are not commonly known. I might be 1 in 50 that had not inserted a SD card before the mod so it is just a rare case or I might be wrong about this but once I booted normally, inserted a empty SD and was prompted to install an update to use the card (not a system update, I was already on the newest) then I reinstalled the core and I was able to get past the boot menu and boot CFW off the SD card
Then I had an issue with splitting a XCI so that it would fit onto a fat32 card - I got cute and made a subdirectory but it was not found. Once I moved it to the main SD directory the two part XCI file was found. But then once I ran tinfoil with JITS I updated the XCI game and then the game was moved to the "incomplete" section for some reason and once I opted to install it and fix that it downloaded the entire game again - not sure if I have two versions on the card now eating up memory
I downloaded the XCI as a test in case JITS was slow but it was running at 4-7 MB/s which I was very impressed by. Now that I know how fast it runs I would not have messed with downloading the XCI files at all
Another issue I ran into was using a USB extension with the SD card reader which would cause it to sporadically become unresponsive

I followed the ModvillaUSA lbry dot tv channel for the core install

Finally I started with a 128GB card and now wish I had opted for a higher capacity
 
Last edited by pipes82,

ps786

Well-Known Member
Newcomer
Joined
May 1, 2017
Messages
47
Trophies
0
Age
44
XP
173
Country
United States
Pre-tin flex contact point could result fitting issue since the cap clearance is already very tight. One thing I like to add is a lot soldering tutorials on youtube say you can never have too much flux. But make sure you clean them well after done. Any small trace of corrosion can cause problem on these boards.
 

DPyro

Well-Known Member
Member
Joined
Oct 17, 2008
Messages
370
Trophies
1
XP
833
Country
Canada
Not sure what your issue was but it only took me an hour to install. I didn't have a magnifier and use very little solder on the tip of the iron and was gentle putting it to the joints. Only touch for 1 second intervals. Used a 900M-T-IS solder tip.
 

Site & Scene News

Popular threads in this forum

General chit-chat
Help Users
  • No one is chatting at the moment.
    cearp @ cearp: Welcome hazbeans