Tutorial  Updated

How to flash the HWFLY Clone chips

See below for updates.

IF YOU BREAK YOUR BOOT0 PIN. DO NOT DM ME ASKING FOR HELP. THAT'S IT. YOU BREAK THAT PIN AND YOU CANT FLASH. YOUR CHIP IS STUCK WITH WHATEVER HWFLY PUT ON IT


Pre-requisites:


  • Raspberry Pi Zero W
    • You may use another flasher if you desire.
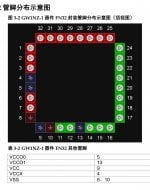
  • Pinout Diagram
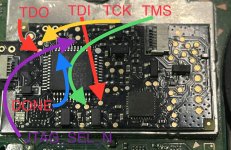
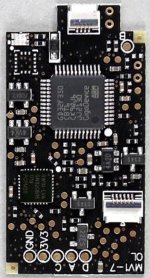
  • Modchip Diagram
  • FULL_CHIP_STOCK.bin
  • Modchip Diagram, find the PA9(TX) and the PA10(RX) pins on your modchip, and do the following:
    • Connect GPIO14(TX) on your Raspberry Pi Zero W to the PA10(RX) pin on your modchip.
    • Connect GPIO15(RX) on your Raspberry Pi Zero W to the PA9(TX) pin on your modchip.

  1. Solder a wire to each of the following pinouts on the Raspberry Pi Zero W:
    • 3.3V
    • Ground
    • GPIO 14 (UART TX)
    • GPIO 15 (UART RX)
  2. Do the following to prepare the modchip:
    1. Lift pin 44 (also known as BOOT0).
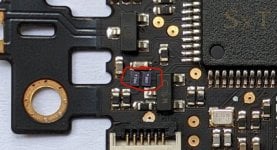
    2. You will need a way to power the chip, so you need to find two 3.3v points. It can be on a MOSFET, but it will differ based on the revision of the modchip.
    3. Connect Ground on your Raspberry Pi Zero W to the Ground pin on your modchip.
    4. Check the Modchip Diagram, find the PA9(TX) and the PA10(RX) pins on your modchip, and do the following:
      • Connect GPIO14(TX) on your Raspberry Pi Zero W to the PA10(RX) pin on your modchip.
      • Connect GPIO15(RX) on your Raspberry Pi Zero W to the PA9(TX) pin on your modchip.
  3. Boot your Raspberry Pi Zero W and do the following:
    1. In the terminal, type the following command, and press enter:
      Bash:
      sudo nano /boot/config.txt
    2. Add the following line to the end of the file:
      INI:
      dtoverlay=pi3-miniuart-bt
    3. Press CTRL + X to save and exit the editor.
    4. In the terminal, type the following command, and press enter:
      Bash:
      sudo nano /boot/cmdline.txt
    5. Remove the following line from the file:
      INI:
      console=serial0,115200
    6. Press CTRL + X to save and exit the editor.
    7. Restart your Raspberry Pi with this command
      Bash:
      sudo /sbin/reboot
    8. In the terminal, type the following commands, and press enter after each command:

      Bash:
      git clone https://github.com/Pheeeeenom/stm32flash.git
      cd stm32flash
      sudo make install
  4. Now you will flash the modchip.
    Note: This will remove read protection, and the modchip will wipe itself (that is what we want).
    1. In the terminal, type the following command, and press enter:
      Bash:
      stm32flash -k /dev/serial0
    2. Now to flash Spacecraft-NX Version 0.2.0, type the following, and press enter:
      Bash:
      stm32flash -v -w ./FULL_CHIP_STOCK.bin /dev/serial0
  5. Once you're done flashing your modchip, remove the wiring from the modchip, and restore the 3.3v pin on the modchip to its original position.

Please post pictures of your work here to further the identification of the different board revisions!


UPDATE: So it seems like stitching the spacecraft bootloader and firmware together from the repo causes unstable glitching behaviors. For now, consistent glitching behavior works with this bootload/firmware combo.
This is the original file on the OLED variant chip which has 0.2.0 spacecraft. As for glitching, I'll figure it out, give me some time...unless someone else wants to hop in and reverse the differences.

For now, this at least solves the 0.1.0 HWFLY gen 3 issue. More to come.

UPDATE 2: This is only going to work on some HWFLY chips. Older ones use higher protection than the new revisions that seem to use the QFN FPGA.

UPDATE 3: This should fully work on OLED modchips with the QFN FPGA. https://github.com/Pheeeeenom/firmware
 
Last edited by Mena,

juanvlc

Well-Known Member
Newcomer
Joined
Jan 7, 2022
Messages
96
Trophies
0
XP
880
Country
Spain
Hi, yesterday my Switch OLED wont turn on. The HWfly LED pulses purple, and then solid red. So i've desoldered the emmc point on the chip, and soldered again. Now the console starts without problem. But this is my second time that this happens. The console wont start like this, always when i leave the console charging too long (like 24h+). Any ideas?
Maybe the culprit in not your wire, could be your dat0 adapter...
I don't like too much the one that comes with the oled v4, the single anchor point one, I prefer the double anchored one. Also check for rests of uncleaned flux that can give to you false contacts in the MMC dat0 point.
Hope it helps
Good luck!!!!
 

tlgug97

Member
Newcomer
Joined
Jan 17, 2022
Messages
6
Trophies
0
Age
27
XP
44
Country
Vietnam
Hi, yesterday my Switch OLED wont turn on. The HWfly LED pulses purple, and then solid red. So i've desoldered the emmc point on the chip, and soldered again. Now the console starts without problem. But this is my second time that this happens. The console wont start like this, always when i leave the console charging too long (like 24h+). Any ideas?
lol I had this exact same problem and the store where I asked them to do the chip installation said they couldn't fix it and offered me to buy new one at discounted price ($150).
 

Hackerman_2137

Well-Known Member
Newcomer
Joined
Feb 15, 2017
Messages
48
Trophies
0
XP
1,409
Country
Poland
lol I had this exact same problem and the store where I asked them to do the chip installation said they couldn't fix it and offered me to buy new one at discounted price ($150).
first i will check the connection between the emmc and the chip. Maybe the adaptor is lose
 

Hongtm77

Well-Known Member
Newcomer
Joined
Jan 13, 2019
Messages
59
Trophies
0
Age
38
XP
296
Country
Malaysia
Hi, guys. I'm having issue on my switch lite! I'm getting the boot loop while the led is flashing purple then boot to OFW when the LED turns red. Here is the video of what happened:-

View attachment 307484

Please help!! 🙏 😭😭
Just an update on what's happening now. My switch is running perfectly now, able to boot into hekate and CFW.

I de-soldered everything and re-solder again, but when I de-solder I accidentally pulled out the SP1 and SP2 capacitors 🤦‍♂️🤦‍♂️ then I tried to solder the chip on the board directly without the SP1 and SP2 caps and it works perfectly!

Will it be any problem in the long run?
 

Sobas034

Member
Newcomer
Joined
May 15, 2022
Messages
5
Trophies
0
Age
36
Location
México
XP
39
Country
Mexico
Do
Hi, I have the following issue. I have reset the chip as it says in your information. The chip is hwfly 7.1 version core. Now I get a fixed blue light and I can't update it, I connect it to the pc and it doesn't seem to exist. I do not know what to do
Do you fix the problema I have one in the same sittuation how can I fix it?? Help me please
 

Sobas034

Member
Newcomer
Joined
May 15, 2022
Messages
5
Trophies
0
Age
36
Location
México
XP
39
Country
Mexico
Please help me I have hwfly core v4 7.1 and first of all to firmware of hwfly-mx 0.6.2 *Method b) - Using hwfly-tool box and it update great why use this methid beacause I plug my hwfly in usb mode and my pc doesn't recognize it only blinks in red ok so good for now, then I saw 0.7 firmware is out and I update in same method b tool box but I got a error while I was updating now my hwfly doesn start I got blue light and only boot oficial firmware and hekate doesnt star only oficial firmware what can I do friends I think I have brick my chip but I know hwfly 7.1 is flashable and updated but my pc doesn't recognize in usb mode help me please
 

l7777

Well-Known Member
Member
Joined
Apr 13, 2022
Messages
329
Trophies
0
Location
Earth
XP
1,170
Country
United States
Please help me I have hwfly core v4 7.1 and first of all to firmware of hwfly-mx 0.6.2 *Method b) - Using hwfly-tool box and it update great why use this methid beacause I plug my hwfly in usb mode and my pc doesn't recognize it only blinks in red ok so good for now, then I saw 0.7 firmware is out and I update in same method b tool box but I got a error while I was updating now my hwfly doesn start I got blue light and only boot oficial firmware and hekate doesnt star only oficial firmware what can I do friends I think I have brick my chip but I know hwfly 7.1 is flashable and updated but my pc doesn't recognize in usb mode help me please
Look for the videos sthetix did. He has a couple on flashing via USB or directly using a flash programmer if needed. It is possible to break the USB functionality if you plug the USB ribbon in upsidedown or if flashing doesn't work and you don't switch to another USB port before trying again.
 

Sobas034

Member
Newcomer
Joined
May 15, 2022
Messages
5
Trophies
0
Age
36
Location
México
XP
39
Country
Mexico
Look for the videos sthetix did. He has a couple on flashing via USB or directly using a flash programmer if needed. It is possible to break the USB functionality if you plug the USB ribbon in upsidedown or if flashing doesn't work and you don't switch to another USB port before trying again.
i saw all videos of sthetix and only shows how to flash or unbrick hwfly core 6 no 7.1, he say when you connect hwfly to pc and you have a red light you have to use a st-link usb, soldering 4 points of welding to hwfly v6 and connect to pc but only to hwfly v6,not hwfly 7.1 i think its another points of welding but i cant find it what points of welding are in 7.1?, it is assume 7.1 can update or flash by usb but when i connect to pc but only blink in blue light and pc dont recognize. Ok my questions are
Is there a driver for pc that recognize hwfly core 7.1 by usb? if not
can i use st-link for flash or update the chip hwfly core 7.1? if i can use st link what points of welding are? help please
 

urherenow

Well-Known Member
Member
Joined
Mar 8, 2009
Messages
4,760
Trophies
2
Age
48
Location
Japan
XP
3,656
Country
United States
It is possible to break the USB functionality if you plug the USB ribbon in upsidedown
I would not say it is "possible". It is a CERTAINTY and it is INSTANT (if you plug in the usb cable to both the computer and adapter, while it's upside down).
 

de9ed

Well-Known Member
Member
Joined
Oct 22, 2020
Messages
278
Trophies
0
Age
30
XP
919
Country
Canada
The thing about the debug port that caused confusion is that the original sx core has the opposite orientation to the mv1.7-1 chips
 

ribenyamaxun123

Member
Newcomer
Joined
May 1, 2022
Messages
6
Trophies
0
Age
39
Location
jpn
XP
45
Country
Benin
Does anyone know what these two originals are? Where can I buy them
 

Attachments

  • 47qp4y04m4z41 (1)_副本_副本.jpg
    47qp4y04m4z41 (1)_副本_副本.jpg
    96.7 KB · Views: 154

oozi

Member
Newcomer
Joined
Jul 18, 2022
Messages
14
Trophies
0
Age
31
Location
usa
XP
81
Country
United States
i saw all videos of sthetix and only shows how to flash or unbrick hwfly core 6 no 7.1, he say when you connect hwfly to pc and you have a red light you have to use a st-link usb, soldering 4 points of welding to hwfly v6 and connect to pc but only to hwfly v6,not hwfly 7.1 i think its another points of welding but i cant find it what points of welding are in 7.1?, it is assume 7.1 can update or flash by usb but when i connect to pc but only blink in blue light and pc dont recognize. Ok my questions are
Is there a driver for pc that recognize hwfly core 7.1 by usb? if not
can i use st-link for flash or update the chip hwfly core 7.1? if i can use st link what points of welding are? help please
- Here you go, late ass reply but I'm stuck in the same boat :) also have a link you can use that really helps with diagrams and everything you need to know to flash your chip properly. sadly cant share but just dm me or reply here
Flashable-Core-SWD.jpg
 
Last edited by oozi,
  • Like
Reactions: White_Raven_X

gnetoak29

Member
Newcomer
Joined
Aug 6, 2022
Messages
5
Trophies
0
Age
37
Location
Thailand
Website
youtu.be
XP
113
Country
Thailand
If anyone has a core that has a QFN FPGA that doesn't come with the stupid eMMC issue, please DM me
help read back fpga
 

Attachments

  • 2C91AEBB-9B75-4410-A055-16043BED20D3.jpeg
    2C91AEBB-9B75-4410-A055-16043BED20D3.jpeg
    570.9 KB · Views: 163
  • 72DE2121-3F28-4716-8804-58AE7E66BC75.jpeg
    72DE2121-3F28-4716-8804-58AE7E66BC75.jpeg
    84.4 KB · Views: 164
  • C59532DF-6AC3-4EFB-BF0B-2D94C14BA089.jpeg
    C59532DF-6AC3-4EFB-BF0B-2D94C14BA089.jpeg
    129.2 KB · Views: 124

Deatwish37

New Member
Newbie
Joined
Aug 14, 2022
Messages
1
Trophies
0
Age
38
Location
Belgium
XP
15
Country
Belgium
Got a problem with hwfly core on Mariko v2 to. Everything worked for a while and then i,ve got a black screen but a green light on the chip. Reset the chip with putty and now it flashes purple in a quick rate.
 

Site & Scene News

Popular threads in this forum

General chit-chat
Help Users
    Veho @ Veho: Cut your life into pieces.