Tutorial
Updated
The Ultimate PS3 Repair Guide, YLOD Repair, Replacing the Nec Tokin Caps, Delid, Syscon Diagnoses
After further research it has been known that the Nec Tokin caps are not the true cause of YLOD failure in a PS3. The best form of repair is to prevent your PS3 from overheating by replacing the thermal pads and the thermal and getting delidding or delidding it yourself if you have right tools and skills if not get it done by a professional.
Introduction:
I picked up this Backwards Compatible NTSC J PS3 CECHA12 an A01 console. That i imported from Japan, not only does this PS3 play PS1 games natively, but it can also play PS2 games flawlessly due to the hardware of the PS1/PS2 being included. The Phat PS3 is an easy system to softmod which allows for region-free support. The use of emulators and other applications like Webman, which allows for the ability to back up your games and play them off the harddrive putting less wear on the BluRay Drive, a temperature monitor, as well the ability to increase the fan speed. I also replaced the old 60gb hard drive with an SSD. This should improve load times. As well as a Delid to replace the old thermal paste with Arctic MX4 or Grizzly underneath the IHS and i recommend spreading the paste over the point method. Thermal Right also sells 1.5 and 2mm thermal pads with a performance rating of 12.5 W/Mk. If you want to replace the old thermal pads aswell. Thermal Grizzly Pads are great too but cost more and you get less. Aeronaught is designed for standard air based cooling systems like on the PS3 and also includes a thermal paste spreader.
Dellidding is very difficult to do and one little slip or a scratch that is deep enough can be the end of your PS3, unless the trace is repairable, you can also replace both the Cell by remarrying it aswell as the RSX which doesn't need to be remarried, thanks to the Syscon hacking community, such chips are able to be replaced.
As for Delidding i recommend practicing on an old computer CPU or the cheaper 80gb PS3 before trying to dellid the more expensive 60gb model. If you aren’t comfortable, find a pro who has experience along with a great method of delidding it.
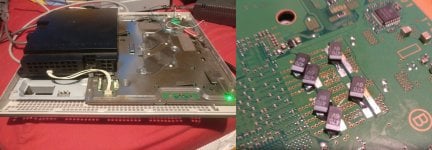
If you have a non working stock PS3. Using the Syscon is the best way to know what the fault of your PS3 is usually a YLOD means you have a bad RSX chip. Sometimes though rare Nec Tokins can fail and getting a hold of the Tantelizer board from OSH Park and populating will be the best replacing for non working Nec Tokin caps. But don’t those caps to fail. In most cases they are in fully working order, but can rarely fail due to heat stress. If you have bad Tokin caps and do not want to use the Tantalizer board 32x 330uf Tantalum Capacitors and 470uf for the Phat models should work as replacements too. I recommend looking into a way of removing the caps and they will likely have to be broken off. But overall i recommend not bothering as the caps are likely to be fine.
The best form of repair is preventative delid, repaste/ repad. As for the repair replacement of the RSX by find someone that has and can use a BGA machine. You can put a 40nm Slim RSX into a Fat PS3 drastically improving it’s reliability from 90nm to 40nm.
Beside the RSX gpu, Other components can be at fault aswell, such as a failing HDMI ic chip. The Syscon is great tooltool to diagnose what the other fault can be. This link goes more into detail with this method https://www.psx-place.com/threads/f...syscon-first-steps-and-error-reporting.30100/
Other riskless ways to improve cooling
Other than Dellidding another way to improve cooling is to replace the thermal pads and replace the 15 blade fan with a 19 blade fan. There is also the cooler and more power-efficient CECHG PSU for the 40gb PS3, an APS 227 PSU for the 60gb PS3 or a Power Brick mod to your PS3 bringing a PSU outside of the PS3 which can reduce heat. People use PC PSU's which looks awful. This person instead used a readily available Dell Power Brick that's the same size as a laptop charger. And since there is extra space available after doing the mod. You will be able to put a 120mm fan in its place to improve airflow. Stay away from eraser mods, ventilation/case mods as they will disrupt the flow of air and will make overall cooling even worse. There is a reason Sony designed the PS3 this way. PSU Guide: https://www.psx-place.com/threads/powering-launch-ps3-w-external-power-brick-d220p.21818/
Update: I had go back in my Delidded PS3 as it was running warm. I decided to instead use the spread method over the peasize method when applying thermal paste and replaced the thermal pads using 1.5 and 2mm Thermal Right pads. Thanks to this. It made a 10 Degrees C difference in cooling. I was able to turn the fan speed down to 35%. Post on that is here:
Dellidding: Always use a Peasize amount and spread the thermal paste, not too much not too little.
Good news though i also repeat it here. Screwing up a delid is not the end, for those that are interested in delliding. Since the Syscon has been hacked, there is now a way to swap the Cell and Remarry it to the motherboard. https://www.psdevwiki.com/ps3/Remarry_Syscon the BD Board can also be swapped and remarried and the RSX can be swapped too, no need for remarrying.
Delidding guide (NOTE VERY RISKY). Never try to force in your tool. If if it’s not thin enough to slide underneath the ihs then don’t bother, you will just scratch the chips. Be gentle, plan ahead and get the knife underneath the ihs. It should almost be effortless. Tools i recommend. Paint knife, 32 Gauge Knife, or a Fishing Wire/LCD Separator wire or a ripped can will need to make the tool your using the ripped can method. Which i hear is even better for removing the IHS. I also highly recommend practicing on an old cheap CPU or an 80gb model PS3. Experience really does make a huge difference. Especially if you can manually Delid a Desktop CPU which is even more difficult than the PS3. And there are many dirt-cheap CPU’s out there for you to practice on. I use this technique for Delidding. Make sure it goes in and not all the way in. But just enough to cut the adhesive, with little to no effort. It is supposed to slide in like cutting butter. And be aware that the paint knife is not a one fits all solution. Other systems may require thinner tools like lcd separator wire and something like the 32 Gauge knife which comes in many different sizes.

Since the Paint Knife is too thick. I had to trim it down with a file.

I also bent my paint knife. But whether you prefer it bent or not. Is up to you. I recommending watching the videos, with which technique is more fitting for you.


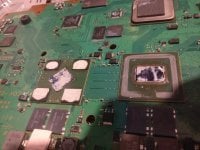
I started with the RSX GPU Chip and used my rework station to soften the adhesive.

Pushing upwards away from the PCB, and not too far in, away from the dye with a dental tool, as well as heating up the IHS on the RSX with a rework station. Eventually, it popped off with little to no effort.

Now for the most difficult part which is the CELL CPU. But i made a mistake by trying to cram it in through the corner at the bottom side and ended up scratching 2 traces on the CELL. Remember to never rush this. Take your time, be very careful and it should slide in without scratching the PCB with little to no effort. I may be repairing those damaged traces which won’t be easy. I highly recommend starting from the top corners. Since it’s easier to slide the knife into. The bottom side has no traces but unfortunately. It is inaccessible due to some of the components being in the way. Overall don't rush this and never force it in.

The temps on my A012 Unit Delidded with MX4, after an hour of gameplay in Skyrim.Set up in my bedroom underneath my tv. Not much ventilation and space in UK homes and it would be roughly around 4 Degrees Celsius more on 37% fan speed which is much quieter. It would run cooler if i went with Thermal Grizzly/Thermal Right Paste and Pads.


Y
Introduction:
I picked up this Backwards Compatible NTSC J PS3 CECHA12 an A01 console. That i imported from Japan, not only does this PS3 play PS1 games natively, but it can also play PS2 games flawlessly due to the hardware of the PS1/PS2 being included. The Phat PS3 is an easy system to softmod which allows for region-free support. The use of emulators and other applications like Webman, which allows for the ability to back up your games and play them off the harddrive putting less wear on the BluRay Drive, a temperature monitor, as well the ability to increase the fan speed. I also replaced the old 60gb hard drive with an SSD. This should improve load times. As well as a Delid to replace the old thermal paste with Arctic MX4 or Grizzly underneath the IHS and i recommend spreading the paste over the point method. Thermal Right also sells 1.5 and 2mm thermal pads with a performance rating of 12.5 W/Mk. If you want to replace the old thermal pads aswell. Thermal Grizzly Pads are great too but cost more and you get less. Aeronaught is designed for standard air based cooling systems like on the PS3 and also includes a thermal paste spreader.
Dellidding is very difficult to do and one little slip or a scratch that is deep enough can be the end of your PS3, unless the trace is repairable, you can also replace both the Cell by remarrying it aswell as the RSX which doesn't need to be remarried, thanks to the Syscon hacking community, such chips are able to be replaced.
As for Delidding i recommend practicing on an old computer CPU or the cheaper 80gb PS3 before trying to dellid the more expensive 60gb model. If you aren’t comfortable, find a pro who has experience along with a great method of delidding it.
If you have a non working stock PS3. Using the Syscon is the best way to know what the fault of your PS3 is usually a YLOD means you have a bad RSX chip. Sometimes though rare Nec Tokins can fail and getting a hold of the Tantelizer board from OSH Park and populating will be the best replacing for non working Nec Tokin caps. But don’t those caps to fail. In most cases they are in fully working order, but can rarely fail due to heat stress. If you have bad Tokin caps and do not want to use the Tantalizer board 32x 330uf Tantalum Capacitors and 470uf for the Phat models should work as replacements too. I recommend looking into a way of removing the caps and they will likely have to be broken off. But overall i recommend not bothering as the caps are likely to be fine.
The best form of repair is preventative delid, repaste/ repad. As for the repair replacement of the RSX by find someone that has and can use a BGA machine. You can put a 40nm Slim RSX into a Fat PS3 drastically improving it’s reliability from 90nm to 40nm.
Beside the RSX gpu, Other components can be at fault aswell, such as a failing HDMI ic chip. The Syscon is great tooltool to diagnose what the other fault can be. This link goes more into detail with this method https://www.psx-place.com/threads/f...syscon-first-steps-and-error-reporting.30100/
Other riskless ways to improve cooling
Other than Dellidding another way to improve cooling is to replace the thermal pads and replace the 15 blade fan with a 19 blade fan. There is also the cooler and more power-efficient CECHG PSU for the 40gb PS3, an APS 227 PSU for the 60gb PS3 or a Power Brick mod to your PS3 bringing a PSU outside of the PS3 which can reduce heat. People use PC PSU's which looks awful. This person instead used a readily available Dell Power Brick that's the same size as a laptop charger. And since there is extra space available after doing the mod. You will be able to put a 120mm fan in its place to improve airflow. Stay away from eraser mods, ventilation/case mods as they will disrupt the flow of air and will make overall cooling even worse. There is a reason Sony designed the PS3 this way. PSU Guide: https://www.psx-place.com/threads/powering-launch-ps3-w-external-power-brick-d220p.21818/
Update: I had go back in my Delidded PS3 as it was running warm. I decided to instead use the spread method over the peasize method when applying thermal paste and replaced the thermal pads using 1.5 and 2mm Thermal Right pads. Thanks to this. It made a 10 Degrees C difference in cooling. I was able to turn the fan speed down to 35%. Post on that is here:
Dellidding: Always use a Peasize amount and spread the thermal paste, not too much not too little.
Good news though i also repeat it here. Screwing up a delid is not the end, for those that are interested in delliding. Since the Syscon has been hacked, there is now a way to swap the Cell and Remarry it to the motherboard. https://www.psdevwiki.com/ps3/Remarry_Syscon the BD Board can also be swapped and remarried and the RSX can be swapped too, no need for remarrying.
Delidding guide (NOTE VERY RISKY). Never try to force in your tool. If if it’s not thin enough to slide underneath the ihs then don’t bother, you will just scratch the chips. Be gentle, plan ahead and get the knife underneath the ihs. It should almost be effortless. Tools i recommend. Paint knife, 32 Gauge Knife, or a Fishing Wire/LCD Separator wire or a ripped can will need to make the tool your using the ripped can method. Which i hear is even better for removing the IHS. I also highly recommend practicing on an old cheap CPU or an 80gb model PS3. Experience really does make a huge difference. Especially if you can manually Delid a Desktop CPU which is even more difficult than the PS3. And there are many dirt-cheap CPU’s out there for you to practice on. I use this technique for Delidding. Make sure it goes in and not all the way in. But just enough to cut the adhesive, with little to no effort. It is supposed to slide in like cutting butter. And be aware that the paint knife is not a one fits all solution. Other systems may require thinner tools like lcd separator wire and something like the 32 Gauge knife which comes in many different sizes.
Since the Paint Knife is too thick. I had to trim it down with a file.
I also bent my paint knife. But whether you prefer it bent or not. Is up to you. I recommending watching the videos, with which technique is more fitting for you.
I started with the RSX GPU Chip and used my rework station to soften the adhesive.
Pushing upwards away from the PCB, and not too far in, away from the dye with a dental tool, as well as heating up the IHS on the RSX with a rework station. Eventually, it popped off with little to no effort.
Now for the most difficult part which is the CELL CPU. But i made a mistake by trying to cram it in through the corner at the bottom side and ended up scratching 2 traces on the CELL. Remember to never rush this. Take your time, be very careful and it should slide in without scratching the PCB with little to no effort. I may be repairing those damaged traces which won’t be easy. I highly recommend starting from the top corners. Since it’s easier to slide the knife into. The bottom side has no traces but unfortunately. It is inaccessible due to some of the components being in the way. Overall don't rush this and never force it in.
The temps on my A012 Unit Delidded with MX4, after an hour of gameplay in Skyrim.Set up in my bedroom underneath my tv. Not much ventilation and space in UK homes and it would be roughly around 4 Degrees Celsius more on 37% fan speed which is much quieter. It would run cooler if i went with Thermal Grizzly/Thermal Right Paste and Pads.
Y
Last edited by iVirtualPlays,