


Well, it's no secret that lots of us here have DS Lites. I'm sure most of us have also had their L and/or R buttons stop working. We all know that trick where you blow into the DS, and it gets the job done. But after a while, it stops working. My L button had reached that point, making some games absolutely unplayable (I'm looking at YOU MegaMan Zero Collection).
So, that makes one think, why do these buttons stop working, and how does blowing on them help? Well, I'm still not sure how blowing on them helps, but I do understand how they work after disassembling them. I started with my L button and I've decided to write a guide while doing my R button. This is not recommended for someone who does not have considerable skills with a soldering iron and a steady hand. I take no responsibility if you muck up, blah blah blah. So, here we go.
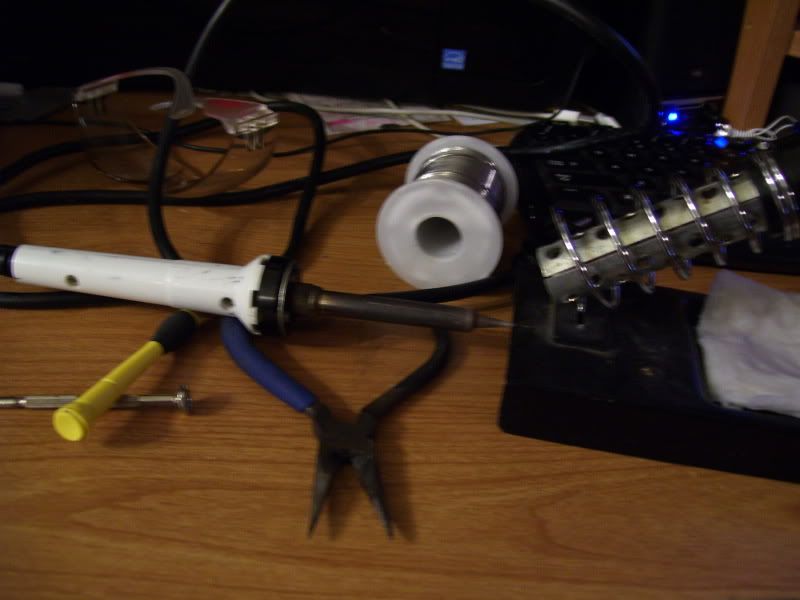
Soldering Iron+Solder: Most would recommend a 15 watt iron, I did this with my el cheapo Elenco 25W. I also recommend standard 60/40, but I understand lead solder isn't available in some countries. Leaded solder flows better. Now that I think about it, Nintendo probably uses lead free at the factories.
The model I used: http://tinyurl.com/23ujtx4
The model I wish I had: http://tinyurl.com/2aocw43
Needle Nose Pliers Self explanatory. I do prefer pliers WITH ridges for this type of work.
Screwdriver I use a 1.4mm flathead to unscrew my triwing screws, gotta get a proper triwing one of these days
This set is what I used, it'll get the job done: http://tinyurl.com/299adhr
Parts Bin Hard drive magnets work excellent

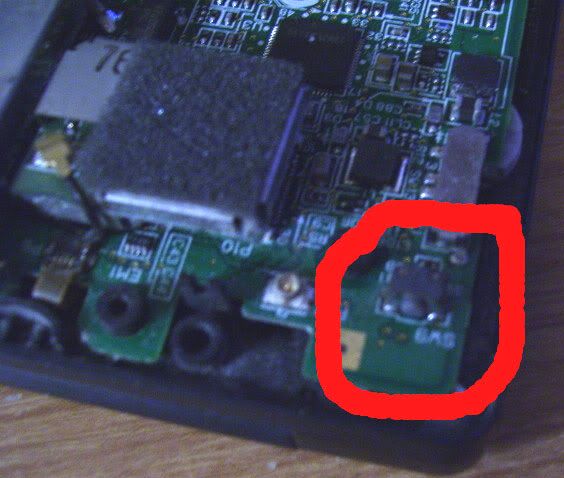
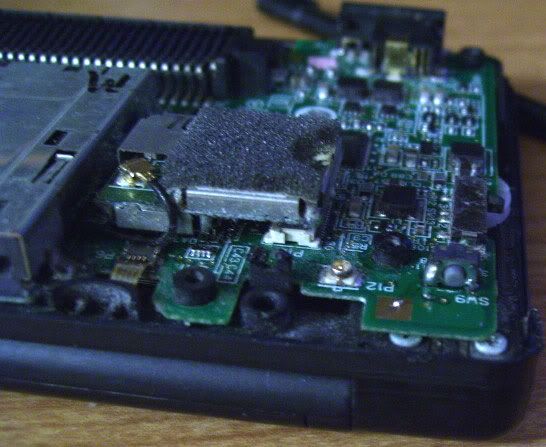
I'm not gonna tell you how to open your DS lite, chances are you know how to do this already. All you need to do is remove the bottom cover. If you wish, feel free to remove the motherboard. I opted not to, and I did meet some minor consequences because if it. Now, in case you couldn't figure it out, I have circled the R button switch in red. Take note of the small, surface mount resistor just below the 3 solder pads. Take care not to desolder or burn that resistor, chances are your DS won't even power on without it.
I recommend you do the L button first, it's far more accessible and doesn't have a resistor to worry about. This guide covers the R button.
This is the same button, now take note of the 2 solder pads. These two are not essential to the button's function. They do, however, provide structural stability. These two pads are what takes the downward stress of Samus's lasers and Zero's swords.
It's time to desolder the button. This is not easy. What you need to do, is hold the iron in one hand, heating up all three of the lower solder pads simultaneously. While that's happening, you need to use your fingernail to provide GENTLE upward force to the switch itself. Notice the key word gentle. You do not want to rip a solderpad off the board. Then you get to make some pretty jumper wires! Stripped cat5 cable works well, I've used it on other applications.
Take your time, let the switch cool off. You don't want to melt it. A good rule of thumb is to never leave your soldering iron on the solder for more then 5 consecutive seconds. Watch out for the resistor if you're working on the R button.
Once you get the three leads of the switch to cleanly separate from the board, you can now take a sigh of relief. The front two pads are far easier and you don't have to worry as much about ripping the pads off the board.
Good work, we got the switch off the board. Take some time to study it.

Now, look at the bottom of the switch. You'll see that it is made of black plastic and has a metal cover on it. This cover does not extend all the way around the switch, and this is good new for us. We can gently pry that cover off. Using your pliers and your thinnest flat head, take that metal cover off. It won't put up much of a fight. Now, be very careful. Before taking the cover all the way off, keep the switch upright. You don't want all the tiny components to fall out.
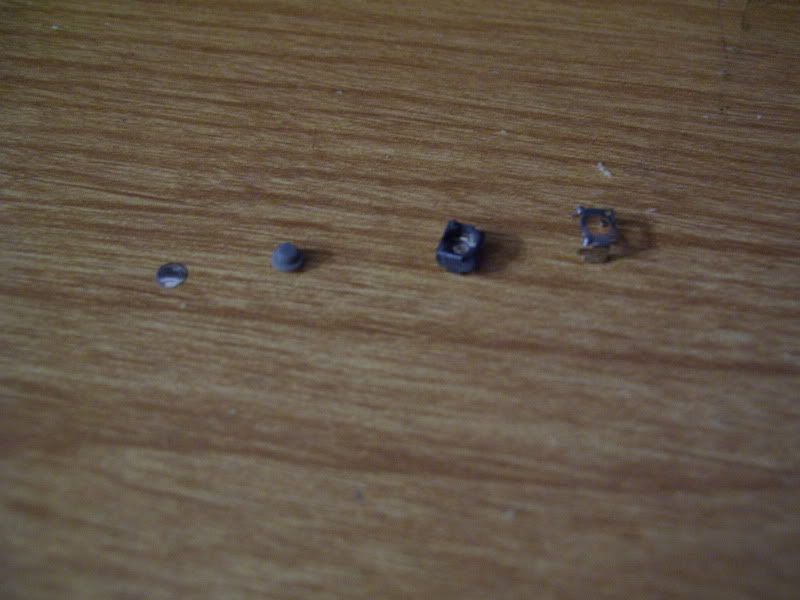
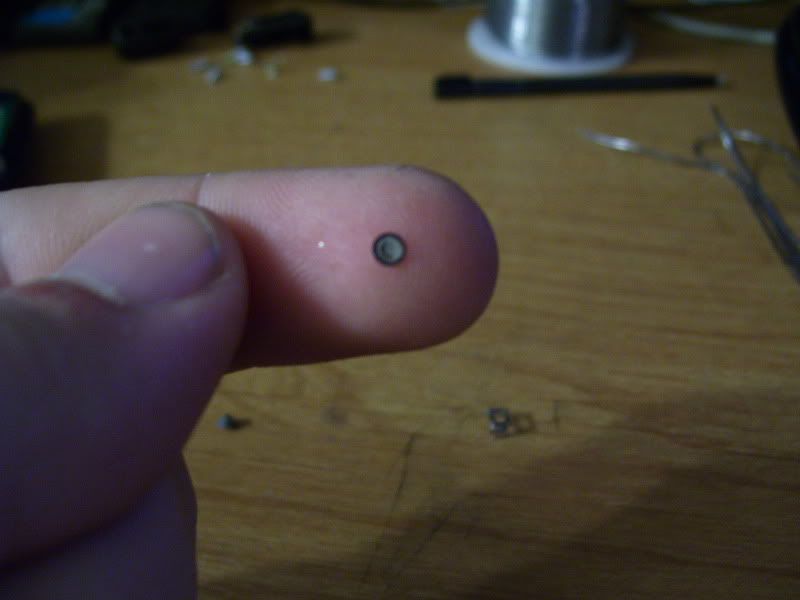
There we go. As you can see, this is what our switch is all taken apart. You'll see that ever familiar rubber dome and a small metal disk. This metal disk is what causes our buttons to fail. Yes indeed, that's what we're here for. You see, take a look into the plastic shell of our switch. You'll see three traces, three traces that need to be connected. Take your flathead and clean up the contacts a bit. You don't need to press down too hard, you just want to scuff them up a little. The traces each have a small bump on them, that's what contacts the metal disk, and those are what need to be cleaned.
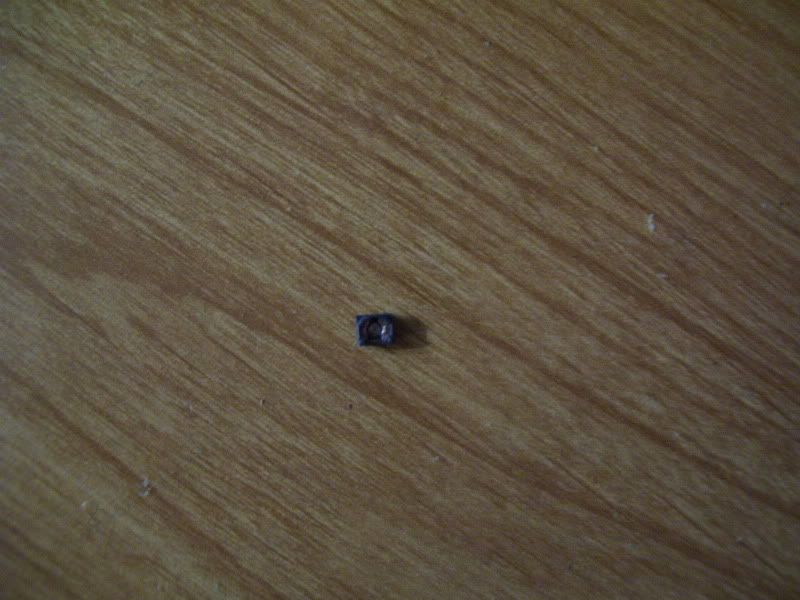
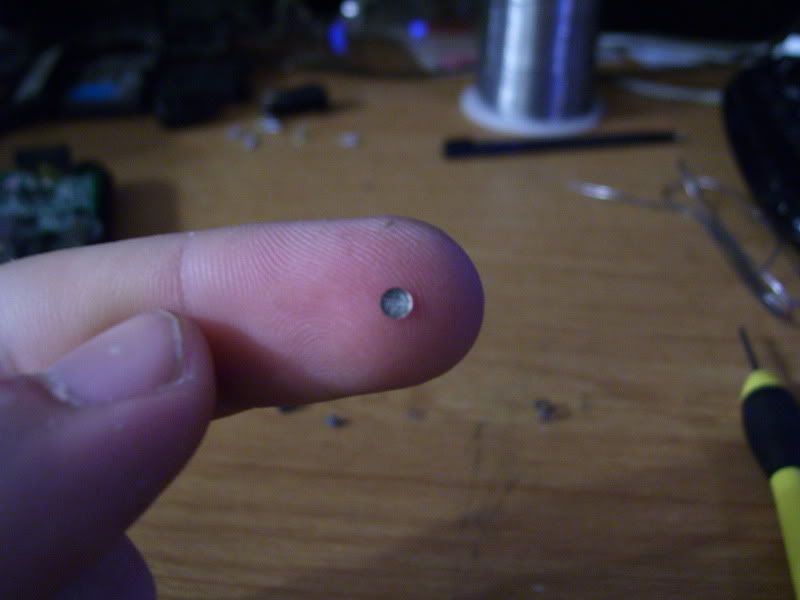
But even more important is the disk itself. Look at the concave back of the disk. Immediately the reason why the button has failed will become apparent. Corrosion. That brownish ring is preventing a strong electrical path, and making our button not respond. Take your trusty screw driver again and clean off the ring. You want to see nice shiny metal gleaming back at you.
Before:
After:
Reassembly (This one's a word)
Now, put the newly cleaned disk back in the switch, put the rubber dome back on top of it. Now, pay attention to the metal cover. You'll need to make sure it goes on right. There are two prongs on the cover, the need to face down towards the board. Again, just take some time and visualize where is needs to go. You'll need to apply a little bit of pressure to squeeze the cover back on. Now take a second and press the button. You should hear a nice tactile "click click."
Time to solder the button back on. Easier said than done of course, be sure not to create a solder bridge. You'll likely cause the button to stay engaged all the time if you do. Make sure the button is close to the board, you need to provide some downforce while soldering. The button won't want to go back on, trust me. When you are satisfied with the three pads on the bottom, hit the top two with some extra solder. Not too much though, the one on the left is what you don't want to do. Whoops.
Moment of Truth
Go ahead and put the DS back together. Make sure all the screws are in the right places and boot it up.
If
 good work. It takes a fair amount of skill to pull off what you did, congrats!
If
 time to figure out what you did wrong. Double check your soldering, are the joints cold? Is there a short? Did you kill the resistor?
HEY LISTEN
Careful with that iron. I accidentally melted some plastic without even noticing until I went and made this guide. Removing the entire board would have prevented this.
Let me know if this guide has helped you at all, I know the majority of us suffer from this problem. If you think there's a better way to go about doing this, go ahead and post. Dealextreme offers replacement buttons, but I did it this way because I didn't feel like waiting 2 weeks for two bits of plastic. This way is free and I just love taking all my stuff apart and putting it back together.
So, that makes one think, why do these buttons stop working, and how does blowing on them help? Well, I'm still not sure how blowing on them helps, but I do understand how they work after disassembling them. I started with my L button and I've decided to write a guide while doing my R button. This is not recommended for someone who does not have considerable skills with a soldering iron and a steady hand. I take no responsibility if you muck up, blah blah blah. So, here we go.
Materials
Soldering Iron+Solder: Most would recommend a 15 watt iron, I did this with my el cheapo Elenco 25W. I also recommend standard 60/40, but I understand lead solder isn't available in some countries. Leaded solder flows better. Now that I think about it, Nintendo probably uses lead free at the factories.
The model I used: http://tinyurl.com/23ujtx4
The model I wish I had: http://tinyurl.com/2aocw43
Needle Nose Pliers Self explanatory. I do prefer pliers WITH ridges for this type of work.
Screwdriver I use a 1.4mm flathead to unscrew my triwing screws, gotta get a proper triwing one of these days
This set is what I used, it'll get the job done: http://tinyurl.com/299adhr
Parts Bin Hard drive magnets work excellent
Preparation
I'm not gonna tell you how to open your DS lite, chances are you know how to do this already. All you need to do is remove the bottom cover. If you wish, feel free to remove the motherboard. I opted not to, and I did meet some minor consequences because if it. Now, in case you couldn't figure it out, I have circled the R button switch in red. Take note of the small, surface mount resistor just below the 3 solder pads. Take care not to desolder or burn that resistor, chances are your DS won't even power on without it.
I recommend you do the L button first, it's far more accessible and doesn't have a resistor to worry about. This guide covers the R button.
This is the same button, now take note of the 2 solder pads. These two are not essential to the button's function. They do, however, provide structural stability. These two pads are what takes the downward stress of Samus's lasers and Zero's swords.
Removal
It's time to desolder the button. This is not easy. What you need to do, is hold the iron in one hand, heating up all three of the lower solder pads simultaneously. While that's happening, you need to use your fingernail to provide GENTLE upward force to the switch itself. Notice the key word gentle. You do not want to rip a solderpad off the board. Then you get to make some pretty jumper wires! Stripped cat5 cable works well, I've used it on other applications.
Take your time, let the switch cool off. You don't want to melt it. A good rule of thumb is to never leave your soldering iron on the solder for more then 5 consecutive seconds. Watch out for the resistor if you're working on the R button.
Once you get the three leads of the switch to cleanly separate from the board, you can now take a sigh of relief. The front two pads are far easier and you don't have to worry as much about ripping the pads off the board.
Disassembly
(GBAtemp says that's not a word)Good work, we got the switch off the board. Take some time to study it.
Now, look at the bottom of the switch. You'll see that it is made of black plastic and has a metal cover on it. This cover does not extend all the way around the switch, and this is good new for us. We can gently pry that cover off. Using your pliers and your thinnest flat head, take that metal cover off. It won't put up much of a fight. Now, be very careful. Before taking the cover all the way off, keep the switch upright. You don't want all the tiny components to fall out.
There we go. As you can see, this is what our switch is all taken apart. You'll see that ever familiar rubber dome and a small metal disk. This metal disk is what causes our buttons to fail. Yes indeed, that's what we're here for. You see, take a look into the plastic shell of our switch. You'll see three traces, three traces that need to be connected. Take your flathead and clean up the contacts a bit. You don't need to press down too hard, you just want to scuff them up a little. The traces each have a small bump on them, that's what contacts the metal disk, and those are what need to be cleaned.
But even more important is the disk itself. Look at the concave back of the disk. Immediately the reason why the button has failed will become apparent. Corrosion. That brownish ring is preventing a strong electrical path, and making our button not respond. Take your trusty screw driver again and clean off the ring. You want to see nice shiny metal gleaming back at you.
Before:
After:
Reassembly (This one's a word)
Now, put the newly cleaned disk back in the switch, put the rubber dome back on top of it. Now, pay attention to the metal cover. You'll need to make sure it goes on right. There are two prongs on the cover, the need to face down towards the board. Again, just take some time and visualize where is needs to go. You'll need to apply a little bit of pressure to squeeze the cover back on. Now take a second and press the button. You should hear a nice tactile "click click."
Time to solder the button back on. Easier said than done of course, be sure not to create a solder bridge. You'll likely cause the button to stay engaged all the time if you do. Make sure the button is close to the board, you need to provide some downforce while soldering. The button won't want to go back on, trust me. When you are satisfied with the three pads on the bottom, hit the top two with some extra solder. Not too much though, the one on the left is what you don't want to do. Whoops.
Moment of Truth
Go ahead and put the DS back together. Make sure all the screws are in the right places and boot it up.
If
If
HEY LISTEN
Careful with that iron. I accidentally melted some plastic without even noticing until I went and made this guide. Removing the entire board would have prevented this.
Let me know if this guide has helped you at all, I know the majority of us suffer from this problem. If you think there's a better way to go about doing this, go ahead and post. Dealextreme offers replacement buttons, but I did it this way because I didn't feel like waiting 2 weeks for two bits of plastic. This way is free and I just love taking all my stuff apart and putting it back together.


