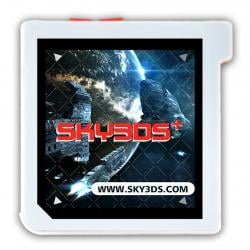
 Sky3DS+ (Hardware)
Official GBAtemp Review
Product Information:
Review Approach:
GBATemp review of the...
Sky3DS+
Developed by: Sky3DS Team
Available at: List of Official Resellers
Review by Foxi4 – Completed 11/12/2015
Introduction
Team Sky3DS' video demonstration of the new product
There are many ways of running backups of your favourite games on your N3DS/3DS - some users choose to invest in the famous Gateway 3DS flashcart, others run full-blown custom firmwares. Unfortunately, both of these methods require the system to run an exploitable (9.2.X-X or lower) version of firmware, and finding a system like that can be quite a chore, not to mention a substantial expense. Not only that, in order to stay on said exploitable firmware users have to jump through hoops - avoiding constant update nags is just one of the many problems one has to deal with. Running EmuNAND (emulated NAND) is a good solution here, but Nintendo diligently fights against this practice with each new firmware update, forcing developers to come up with work-arounds for their pesky patches. Want to play an exciting, brand-new title or access the eShop? Well, you can't, because Nintendo's just rolled out a new update, and it's not working on EmuNAND yet. But it will. Soon. Annoying. As far as custom firmware is concerned, at present it's neither very robust nor fully compatible with all backups - huge strides were made since the very first CFW graced our Nintendo handhelds, but it's just "not quite there" yet, no matter how you look at it. All in all, in a lot of cases running backups can be more trouble than it's worth, especially for users who aren't well-versed in the subject... now, if only there was a Plug & Play method that was built for one thing and one thing only - running ROMs...
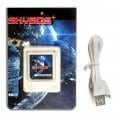
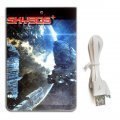
Front and back of the packaging
Enter Team Sky3DS and their unorthodox flashcarts which, instead of relying on exploits like the Gateway 3DS or CFW, closely emulate an original Nintendo N3DS/3DS cartridge. Firmware-independent, simple to use, fully compatible - it was a dream-come-true for many users. Sure, the cartridges weren't perfect (the Red Button had a 10 games limit until a workaround was devised, allowing for 31 games at a time. The Blue Button had a 31 games at a time limit until the SD structure was divided into sections, allowing for storing 95 games at a time), but they both had an incredible advantage - they were completely firmware-independent, which meant that they could run on latest firmware available, no fuss. Unfortunately, Nintendo found a way to prevent their latest games from running on the Sky3DS via an AP patch to their latest games... what to do, what to do... Fear not! Team Sky3DS has a new product for you guys, a brand-new Sky3DS revision! A flashcart to end all flashcarts, the Sky3DS+!
A Quick Look
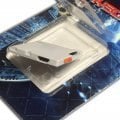
Close-up of the new cartridge, showing the Micro USB port on the side and the Forwards/Backwards buttons
Even on first glance this new revision of the Sky3DS flashcart is different to its predecessors. There are four major changes to the design. The first improves comfort of use. Previous revisions had a single game-changing button, making game-browsing a rather lengthy process if you had a large amount of games on your SD card. This button was replaced with a pair of Forwards/Backwards buttons, allowing you to switch games in both directions. This change, alongside a more optimized firmware which decreased game-switching time (to approx. 3 seconds, as tested on a Class 8 SD card), allows users to find the games they are looking for much faster than previously.
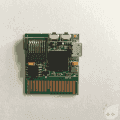
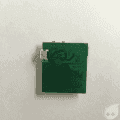
Front and back of the new PCB, courtesy of Team Sky3DS
The second change is the inclusion of a Micro USB connector on the side of the unit. This allows the flashcart to work as a portable SD card reader - all you have to do to transfer or modify your SD's contents is connect the cart to your PC via the Micro USB cable provided with the unit. This connector was added specifically to allow users to easily update the on-board firmware, which in turn would allow for circumvention of any future AP checks Nintendo might implement. Keep in mind that the transfer rate of the connector is rather slow - during testing it peaked at 355kb/s - it was not designed to transfer large files such as ROMs, so using an external SD card reader is recommended for anything other than quick settings modifications or firmware installation.
The third change involves the filesystem used. The previous Sky3DS flashcarts used RAW data, requiring the user to use their DiskWriter utility and templates to write games onto their SD cards. The Sky3DS+ no longer requires the use of DiskWriter, as the filesystem was switched to standard FAT32. This means that in most cases all you'll have to do to put your ROMs onto the SD card is just drag & drop - it doesn't get any simpler than that. Remember all the game limits imposed by the Sky3DS Red and Blue? Gone without a trace - pack that SD to the brim because Sky3DS+ can handle it. The few games that have filesizes larger than 4GB (maximum filesize supported by FAT32) can be very easily trimmed, so it's not a huge obstacle to overcome.
The fourth change is possibly the most ground-breaking - the Sky3DS+ now uses a rewritable firmware chip. This means that in the event of Nintendo introducing any more Anti-Piracy measures in their games, Team Sky3DS will be able to roll out an update circumventing them. Sweet! So far, so good!
Usage
As expected, using the Sky3DS+ is incredibly simple and comes down to dragging and dropping whatever you need onto your SD card. Before we start playing around with ROMs though, we'll make sure that our cartridge is properly set up, starting with preparing the SD for optimal operation. To do so, we'll be using the popular SD Formatter 4.0 which can be downloaded by following the link in the Useful Downloads section.
Begin by putting your SD card into an SD card reader. If you're in a pinch, you can use the Micro USB connector on the cartridge itself and the supplied Micro USB cable, however due to low transfer rates doing so is not recommended. Once your SD is detected, start SD Formatter 4.0, click on Options, set Format Type to Full (OverWrite), enable Format Size Adjustment, apply the new settings and click Format. This will Zero-Fill the entirety of the SD card and adjust its declared size to the actual space available, doing so will ensure that the card will operate at peak efficiency. I don't think I need to remind anyone that formatting the card will erase all data stored on it, so if there's anything on the SD card, back it up.

Formatting SD cards with SD Formatter tends to give better results than using the standard Windows utility
SD Formatter tends to give faster and better results than the standard formatting tool built into Windows, and it comes recommended by the SD Association, so I prefer to use it over anything else. If for whatever reason SD Formatter doesn't work well for you, using any other formatting tool that will allow you to format your SD to FAT32 is also acceptable.

Putting the "firmware.bin" file onto the SD card and re-connecting the kit to the Micro USB
cable to provide power is all that's required for the Sky3DS+ to update its firmware
Once the SD card is correctly formatted, we can proceed to update the Sky3DS+ firmware to the latest revision. The first batch of Sky3DS+ carts rolled out to the market will be flashed with Firmware V4 - right now, the latest version is V10, so we might as well update it before we start using the flashcart. Slide your freshly-formatted SD card into your Sky3DS+ and connect it to your PC with the provided Micro USB cable. At this point, Windows should install a new driver - Wario Mass Storage (Ha! Pun intended?). Once the driver is installed, you're ready to update your firmware. To do so, place the "firmware.bin" file from Sky3DS' website onto the root of your FAT32-formatted SD card. Once the file is in the root directory of your SD card, disconnect and re-connect it to your PC's USB slot to supply it with power.
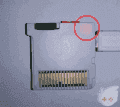
By default the Sky3DS+ LED has three colours - Red, indicating EEPROM use, Green, indicating IC activity and White, indicating SD access
The Sky3DS+ LED should start flashing red - this means that the EEPROM is currently being written into. Do not disconnect the cartridge while this LED is lit - it may cause damage to your cartridge. Once the light is off, the firmware update is complete - you can now remove the "firmware.bin" file and put the latest "gamelist.bin" file available on Team Sky's website onto the root of the SD card. The "gamelist.bin" file is the equivalent of old Sky3DS' templates, it contains all the information necessary to boot your backups. Once this file is copied over, basic setup is complete - you can now fill your Sky3DS+ up with ROMs and enjoy them to your heart's content!
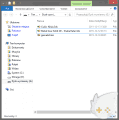
With the setup complete, it's try to play some games! SNAAAAAKE!
When properly set up, the root of your SD card should look like the one in the screenshot above.
Advanced Setup: A Quick Look at the Settings and Config Files
Upon the first boot, the Sky3DS+ will create a "settings.txt" file with its default settings. This file can be edited at will in order to squeeze more out of your flashcart. In this section, we'll take a closer look at all the advanced features this flashcart has to offer.
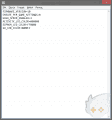
This is how the default "settings.txt" file looks like
At present, the "settings.txt" file is composed of 6 lines:
- FIRMWARE_VERSION=X - this line informs the user which version of "firmware.bin" is currently flashed to the flashcart's chip
- CREATE_PER_GAME_SETTINGS=X - this line is used to create game-specific config files, set this option to 0 for default settings and 1 for custom config files. Config files supersede "gamelist.bin" and allow users to input their own Private ID's which are necessary for safe Online play. Config files will be covered in detal in the next section.
- HIGH_SPEED_ENABLED=X - this line is most likely used to toggle the transfer rate.
- ACTIVITY_LED_COLOR=RGB - this line is set to select the colour of the activity LED. This allows you to personalize your cartridge's notifications to your liking or disable them altogether. The syntax here is simple - XXYYZZ, XX for Red, YY for Green and ZZ for Blue, 00 for Disabled, FF for Enabled. You can mix and match colours, too! For instance, FF00FF will make the LED shine Pink, FFFFFF will make it shine White or FFFF00 will make it shine Orange.
- EEPROM_LED_COLOR=RGB - see above, but for EEPROM R/W.
- SD_LED_COLOR=RGB - see above, but for SD access.
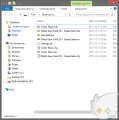
Once the cartridge is set to create individual config files, the root of your SD card should look like this.
Once the CREATE_PER_GAME_SETTINGS option is Enabled (1), the Sky3DS+ will start creating "GameName.cfg" files for each individual game, allowing you to modify its settings.
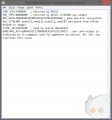
This is how a sample config file looks like.
At present, the config files are composed as follows:
- CART_ID - this value represents the cartridge ID of the ROM.
- ENC_TYPE - this value represents the encryption type used for the binary.
- ENC_SEED - this value represents the previously "Unknown ID" which turns out to be the encryption seed used. The config file gives a hint as to how users should go about obtaining this value, should they wish to boot software not available in the latest "gamelist.bin".
- FLASH_ID - this value represents the Flash ID of the ROM.
- GAMESAVE_KEY - this value represents the cartridge-specific unique key used for save file encryption and online play. If a save file for the game is already present, this value is overridden by the Sky3DS+.
Useful Downloads
While using the Sky3DS+ is pretty self-explanatory, Power Users who wish to squeeze the most out of their cartridge by trimming ROMs, using Private ID's or running Out-of-Region ROMs will have to download additional software. Here's a list of things you might want to consider downloading:
- 3DS ROM Tool - This PC utility will allow you to Trim your .3ds files, allowing you to squeeze more games onto your SD cards as well as play games which surpass the 4GB filesize limit of the FAT32 system. It's a command line tool, so if you're more of a GUI person, check out the link below instead.
- 3DSExplorer - This PC utility is a robust 3DS ROM explorer, it will allow you to read lots of relevant ROM data as well as Trim and Untrim your ROMs.
- NINJHAX 2.5 - This 3DS utility by @smealum is your gateway to the wonderful world of 3DS homebrew, Region-Free gaming, performance modifications and more! This Beta build is compatible with the latest (10.3.0-X) firmware, too!
- SD Formatter 4.0 - This PC utility is the ultimate SD cleaner. For best possible performance, stick your SD cart into your reader and give this bad boy a spin - you won't regret it!
Compatibility Table
By default, the Sky3DS+ only boots ROMs from the native region of the 3DS system in use, much like the previous two Sky3DS cartridges. This is due to the fact that the flashcart operates as a cartridge emulator and has no means of circumventing the region lock. Fortunately, the Sky3DS+ is compatible with NINJHAX and other similar homebrew solutions, allowing users to boot Out-of-Region ROMs with relative ease. Below you will find a list of games tested during the writing of this review. Games were tested on an Old 3DS running 10.3.0-28E firmware and NINJHAX 2.5.
In-Region ROMs Tested:
- Devil Survivor: Overclocked (EUR) - PASS
- Cubic Ninja (EUR) - PASS
- Luigi's Mansion 2 (EUR) - PASS
- Animal Crossing: Happy Home Designer (EUR) - PASS
- Animal Crossing: New Leaf (EUR) - PASS
- Kingdom Hearts 3D: Dream Drop Distance (EUR) - PASS
- Dead or Alive: Dimensions (EUR) - PASS
- Castlevania: Mirror of Fate (EUR) - PASS
- The Legend of Zelda: A Link Between Worlds (EUR) - PASS
- Tales of the Abyss (EUR) - PASS
- Resident Evil: Mercenaries 3D (EUR) - PASS,
- Pokemon Art Academy (EUR) - PASS
- Paper Mario: Sticker Star (EUR) - PASS
- Mario Party: Island Tour (EUR) - PASS
- Mario Kart 7 (EUR) - PASS
- Harvest Moon: Tale of Two Towns (EUR) - PASS
- Fire Emblem: Awakening (EUR) - PASS
- Super Mario Land 3D (EUR) - PASS
- Mario & Luigi: Paper Jam Bros. (EUR) - PASS
- Naruto: Powerful Shippuden (EUR) - PASS
- Rhythm Thief: The Emperor's Treasure (EUR) - PASS
- Super Pokemon Rumble (EUR) - PASS
- Resident Evil: Revelations (EUR) - PASS
- Bravely Default (EUR) - PASS
- Monster Hunter 4 (EUR) - PASS
- Pokemon Omega Ruby (EUR) - PASS
- Zero Escape: Virtue's Last Reward - PASS
- Scribblenauts Unlimited (EUR) - PASS
- Metal Gear Solid 3D - Snake Eater (EUR) - PASS
Out-of-Region ROMs can only be played on the Sky3DS+ via NINJHAX and its built-in Region-Free Launcher, RegionTHREE/FOUR and other compatible Regionlock-disabling solutions. Bear in mind that the Launcher is not 100% compatible, so some Out-of-Region games may fail to boot, freeze or hang on Error/Warning screens.
Out-of-Region Games Tested:
- Project X Zone 2: Brave New World (JAP) - PASS
- Mario & Luigi RPG - Paper Mario MIX (JAP) - FAIL (Hangs on an Error screen after creating/loading a save file, possible NINJHAX Region-Free Loader issue)
- Monster Hunter X (JAP) - PASS
- Shin Megami Tensei IV (USA) - PASS
- Pokemon Super Mystery Dungeon (USA) - PASS
- Hatsune Miku: Project Mirai DX (USA) - PASS
- The Legend of Zelda: Tri Force Heroes (USA) - PASS
Conclusions
Leonardo Da Vinci once said that "simplicity is the ultimate sophistication", and there's a lot of truth to that statement. It's hard not to like the Sky3DS+ - it does everything it was designed to do and it does so great. It's a massive improvement over the previous Sky3DS designs and, honestly, considering the fact that it's firmware-independent, it's just about the perfect flashcart for users who are not interested in overly complicated setups and want a flashcart that "just works". Its only drawbacks are the slow transfer rate of the micro USB connector, which isn't a big deal considering the fact that it wasn't designed for high speed in the first place, and the lack of native Homebrew support or Region-Free launching which, as seen above, can be easily mitigated with NINJHAX. If you were ever interested in getting a Sky3DS cartridge, this is the time to get one - it doesn't get much better than this.
Verdict
- Good build quality - an improvement over the previous revisions
- Ease of use, the cartridge is almost entirely operated by drag & drop. The use of the FAT32 file system instead of DiskWriter's RAW SD structure allows for file management on just about any device that accepts SD cards
- Replacing the single button with a Forwards/Backwards button pair greatly improved navigation of the ROMs on the SD card
- The optimized firmware greatly reduced the time it takes to switch games
- The Micro USB port allows for quickly modifying the SD contents without carrying any extra hardware other than a USB cable
- The generated game-specific Config files make using Private headers substantially easier than on the previous revisions which required modifying or generating private templates
- Updatable firmware makes this project much more future-proof than its predecessors
- The cartridge is fully compatible with NINJHAX 2.5, allowing for the use of Homebrew and booting Out-of-Region ROMs
- The micro USB port's transfer rate is currently highly restrictive, peaking at 355kbps, making it unsuitable for large file transfers
- The firmware can be temperamental and picky when it comes to SD cards - always format the SD with SD Formatter before using it in the flashcart to ensure optimal operation
- The 4GB filesize limitation forces you to trim large roms - implementing exFAT would've solved that issue
- Due to the nature of how this flashcart operates, it doesn't support Homebrew or Region-Free launching natively