Tutorial  Updated

How to flash the HWFLY Clone chips

See below for updates.

IF YOU BREAK YOUR BOOT0 PIN. DO NOT DM ME ASKING FOR HELP. THAT'S IT. YOU BREAK THAT PIN AND YOU CANT FLASH. YOUR CHIP IS STUCK WITH WHATEVER HWFLY PUT ON IT


Pre-requisites:


  • Raspberry Pi Zero W
    • You may use another flasher if you desire.
  • Pinout Diagram
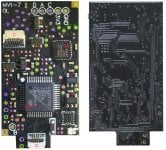
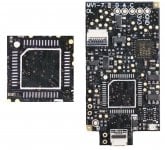
  • Modchip Diagram
  • FULL_CHIP_STOCK.bin
  • Modchip Diagram, find the PA9(TX) and the PA10(RX) pins on your modchip, and do the following:
    • Connect GPIO14(TX) on your Raspberry Pi Zero W to the PA10(RX) pin on your modchip.
    • Connect GPIO15(RX) on your Raspberry Pi Zero W to the PA9(TX) pin on your modchip.

  1. Solder a wire to each of the following pinouts on the Raspberry Pi Zero W:
    • 3.3V
    • Ground
    • GPIO 14 (UART TX)
    • GPIO 15 (UART RX)
  2. Do the following to prepare the modchip:
    1. Lift pin 44 (also known as BOOT0).
    2. You will need a way to power the chip, so you need to find two 3.3v points. It can be on a MOSFET, but it will differ based on the revision of the modchip.
    3. Connect Ground on your Raspberry Pi Zero W to the Ground pin on your modchip.
    4. Check the Modchip Diagram, find the PA9(TX) and the PA10(RX) pins on your modchip, and do the following:
      • Connect GPIO14(TX) on your Raspberry Pi Zero W to the PA10(RX) pin on your modchip.
      • Connect GPIO15(RX) on your Raspberry Pi Zero W to the PA9(TX) pin on your modchip.
  3. Boot your Raspberry Pi Zero W and do the following:
    1. In the terminal, type the following command, and press enter:
      Bash:
      sudo nano /boot/config.txt
    2. Add the following line to the end of the file:
      INI:
      dtoverlay=pi3-miniuart-bt
    3. Press CTRL + X to save and exit the editor.
    4. In the terminal, type the following command, and press enter:
      Bash:
      sudo nano /boot/cmdline.txt
    5. Remove the following line from the file:
      INI:
      console=serial0,115200
    6. Press CTRL + X to save and exit the editor.
    7. Restart your Raspberry Pi with this command
      Bash:
      sudo /sbin/reboot
    8. In the terminal, type the following commands, and press enter after each command:

      Bash:
      git clone https://github.com/Pheeeeenom/stm32flash.git
      cd stm32flash
      sudo make install
  4. Now you will flash the modchip.
    Note: This will remove read protection, and the modchip will wipe itself (that is what we want).
    1. In the terminal, type the following command, and press enter:
      Bash:
      stm32flash -k /dev/serial0
    2. Now to flash Spacecraft-NX Version 0.2.0, type the following, and press enter:
      Bash:
      stm32flash -v -w ./FULL_CHIP_STOCK.bin /dev/serial0
  5. Once you're done flashing your modchip, remove the wiring from the modchip, and restore the 3.3v pin on the modchip to its original position.

Please post pictures of your work here to further the identification of the different board revisions!


UPDATE: So it seems like stitching the spacecraft bootloader and firmware together from the repo causes unstable glitching behaviors. For now, consistent glitching behavior works with this bootload/firmware combo.
This is the original file on the OLED variant chip which has 0.2.0 spacecraft. As for glitching, I'll figure it out, give me some time...unless someone else wants to hop in and reverse the differences.

For now, this at least solves the 0.1.0 HWFLY gen 3 issue. More to come.

UPDATE 2: This is only going to work on some HWFLY chips. Older ones use higher protection than the new revisions that seem to use the QFN FPGA.

UPDATE 3: This should fully work on OLED modchips with the QFN FPGA. https://github.com/Pheeeeenom/firmware
 
Last edited by Mena,

JBDZ

Active Member
Newcomer
Joined
Nov 11, 2021
Messages
28
Trophies
0
XP
286
Country
United States

Attachments

  • FaWMMGXaAAAXU8A.jpg
    FaWMMGXaAAAXU8A.jpg
    726.5 KB · Views: 143
  • FaWMMllaAAAtONX.jpg
    FaWMMllaAAAtONX.jpg
    440.9 KB · Views: 149

Bradle6

Well-Known Member
Member
Joined
Jan 7, 2020
Messages
223
Trophies
0
Age
29
XP
552
Country
United Kingdom
Just an update on what's happening now. My switch is running perfectly now, able to boot into hekate and CFW.

I de-soldered everything and re-solder again, but when I de-solder I accidentally pulled out the SP1 and SP2 capacitors 🤦‍♂️🤦‍♂️ then I tried to solder the chip on the board directly without the SP1 and SP2 caps and it works perfectly!

Will it be any problem in the long run?

Any one replied as this might be an option for one of the switches I have been working on.
 

sin89rus

Member
Newcomer
Joined
Aug 19, 2022
Messages
7
Trophies
0
Age
23
Location
228
XP
61
Country
Russia
Is anyone can explain to me simple thing? SWD via ST-Link / UART via USB TTL (like manual describe) - both do same thing? Or UART do with exta and can do what SWD can't?
I flashed my SX Core 1-6 via USB and its bricked, i flashed it via SWD with Spacecraft-NX second release and it's boot in STOK, if i connect via USB - windows make reconnect sound endless and COM DFU non show as before flashing.

I tried to flash "full chip stock.bin" 128kb and its have different light (was yellow-red, now aqua-blue), but light when connect via USB same green with endless reconnect.

Is that my ST-Link bad, or just maybe this SX Clone? But when it was installed logn time ago i even get licence file from sx site and used SXOS, can it be clone? Can it be flashed correct?
Is that important what bootloader+firmware you firmwared? I though that all the same gd32f350, or they have different frequency to glitch or something on another firmware level, i don't know.
-----------
Ok. I used TTL with Cube Programmer, flashed "full chip stock.bin" - blue light, no start. Chip defective. If so, why there is no any protection, its bricked via USB
 
Last edited by sin89rus,

sin89rus

Member
Newcomer
Joined
Aug 19, 2022
Messages
7
Trophies
0
Age
23
Location
228
XP
61
Country
Russia
Replacing the MCU helped me
yep, already thought about. Ordered 2pcs (1.5$ each) and will try to flash, hope its not dummy for 1$.
i suppose its my fault, when i tried to flash via USB its stuck, and i cant wait some s... like this cause life is so short and just unpluged.
 

k28

Well-Known Member
Member
Joined
Apr 21, 2020
Messages
154
Trophies
0
Age
34
XP
809
Country
Germany
i installed the hw_fly v4.1. bought from official store on ali. looks like a lite chip. after everthing is soldered the led only blinks yellow. im a right that i just need to wait, so the chip can find a proper timing? thx
 

juanvlc

Well-Known Member
Newcomer
Joined
Jan 7, 2022
Messages
96
Trophies
0
XP
886
Country
Spain
i installed the hw_fly v4.1. bought from official store on ali. looks like a lite chip. after everthing is soldered the led only blinks yellow. im a right that i just need to wait, so the chip can find a proper timing? thx
If you don't see greenlight, check your sp1 sp2 solder points
 

sherilyn

New Member
Newbie
Joined
Oct 7, 2022
Messages
4
Trophies
0
Age
35
Location
Praha
XP
27
Country
Czech Republic
Hi guys. I got hwfly oled v4, I decided to update firmware before installation into switch. I downloaded latetest firmware from hwfly-nx github. The version is 0.7.1. Plugged modchip into PC, the modchip started to flashing slowly with blue led and I ran flash.bat. After that modchip turned on white led constantly (DFU mode still availible). So I decided to use ST-LINK to flash it. I soldered pins and connected to ST-LINK and tried again to flash both firmware.bin at 0x08003000, bootloader.bin at 0x08000000. Still got the same, but now DFU is not show up in Device Manager. I tried different versions, on some firmwares it's just turns on red light for 30 or 15s and then turns off.
 
Last edited by sherilyn,

sin89rus

Member
Newcomer
Joined
Aug 19, 2022
Messages
7
Trophies
0
Age
23
Location
228
XP
61
Country
Russia
Hi guys. I got hwfly oled v4, I decided to update firmware before installation into switch. I downloaded latetest firmware from hwfly-nx github. The version is 0.7.1. Plugged modchip into PC, the modchip started to flashing slowly with blue led and I ran flash.bat. After that modchip turned on white led constantly (DFU mode still availible). So I decided to use ST-LINK to flash it. I soldered pins and connected to ST-LINK and tried again to flash both firmware.bin at 0x08003000, bootloader.bin at 0x08000000. Still got the same, but now DFU is not show up in Device Manager. I tried different versions, on some firmwares it's just turns on red light for 30 or 15s and then turns off.
main ic probably, i will wright here if replace and flash via swd help. still waiting mcu
like i said update with usb sucks. Should use update payload on NYX instead.
Yesterday i was flash OLED chip via update payload succesfully.

REMEMBER, forget about USB update of chinesy chips, however i brocked original SX via USB and it sucked))
 

sherilyn

New Member
Newbie
Joined
Oct 7, 2022
Messages
4
Trophies
0
Age
35
Location
Praha
XP
27
Country
Czech Republic
main ic probably, i will wright here if replace and flash via swd help. still waiting mcu
like i said update with usb sucks. Should use update payload on NYX instead.
Yesterday i was flash OLED chip via update payload succesfully.

REMEMBER, forget about USB update of chinesy chips, however i brocked original SX via USB and it sucked))
Hello there. Thanks for your reply. I think I found the thing. I use ST-LINK to flash the chip and I decided to flash firmware and then read it from the device. I found that these 2 files are NOT the same, so something happens when I use ST-LINK programmer. I'll try to find GD-LINK and come back to here with the results. Thank you.
 

kingsgab

New Member
Newbie
Joined
Oct 9, 2022
Messages
1
Trophies
0
Age
33
XP
23
Country
Brazil
Hey everyone.

I have an erista V1 patched which I successfully installed hwfly on it. I got the no sd screen, successfully booted into hekate, but I can't enter switch os it seems. I can't boot OFW also, I get a black screen when I try, and when I try to boot into atmosphere it freezes in the atmosphere screen (as you can see in the video attached). I've been looking for a solution for hours but can't find anything. Can anyone help me?

Thank you in advance.
 

Attachments

  • 20221009_013253~2.mp4
    38.5 MB

sin89rus

Member
Newcomer
Joined
Aug 19, 2022
Messages
7
Trophies
0
Age
23
Location
228
XP
61
Country
Russia
I replaced my original SX Core MCU with new cheap 1.5$ gd32f350
Flashed Spacecraft-NX, bootloader to 0x08000000 firmware to 0x08003000 with GDLink (stlink work too)
And now USB detected my SX Core and it work good.
So, MCU is problem, its very cheap to replace it and get fully working chip.
 

sherilyn

New Member
Newbie
Joined
Oct 7, 2022
Messages
4
Trophies
0
Age
35
Location
Praha
XP
27
Country
Czech Republic
I replaced my original SX Core MCU with new cheap 1.5$ gd32f350
Flashed Spacecraft-NX, bootloader to 0x08000000 firmware to 0x08003000 with GDLink (stlink work too)
And now USB detected my SX Core and it work good.
So, MCU is problem, its very cheap to replace it and get fully working chip.
Could you, please, share a full dump of the chip? I mean from 0x00000000 until 0x08030000. Thank you.
 
Last edited by sherilyn,

sin89rus

Member
Newcomer
Joined
Aug 19, 2022
Messages
7
Trophies
0
Age
23
Location
228
XP
61
Country
Russia
Could you, please, share a full dump of the chip? I mean from 0x00000000 until 0x08030000. Thank you.
why? just google "space craft nx github" and flash it with gdlink programmer or st-link utility.
I don't know nothing about clones HWFly, but know that: when its trained, its can't start another switch, so you need to delete trained parameters with toolbox payload, or short two contacts before start (only OLED ver. tested). Another thing: chinesy seller (light chip ver) says: you need flash chip only with our firmware. Dont't know why.

We can answer this questions only if somebody tell us: Why exist Space Craft and HWFLY firmwares, space craft start training too? Can we flash HWFLY-NX to SX org chips? I can test it little late, cause don't have any switch now. Only original sx core chip with replaced MCU and Space Craft firmware.
 

sherilyn

New Member
Newbie
Joined
Oct 7, 2022
Messages
4
Trophies
0
Age
35
Location
Praha
XP
27
Country
Czech Republic
why? just google "space craft nx github" and flash it with gdlink programmer or st-link utility.
I don't know nothing about clones HWFly, but know that: when its trained, its can't start another switch, so you need to delete trained parameters with toolbox payload, or short two contacts before start (only OLED ver. tested). Another thing: chinesy seller (light chip ver) says: you need flash chip only with our firmware. Dont't know why.

We can answer this questions only if somebody tell us: Why exist Space Craft and HWFLY firmwares, space craft start training too? Can we flash HWFLY-NX to SX org chips? I can test it little late, cause don't have any switch now. Only original sx core chip with replaced MCU and Space Craft firmware.
I flashed 0.7.1. According to documentation, it's blinking like "trying to gliching". If i connect it to PC, the same situation. I going to install it into switch and see what happens. "short two contacts before start", which contacts, where did you find this information?
 

sin89rus

Member
Newcomer
Joined
Aug 19, 2022
Messages
7
Trophies
0
Age
23
Location
228
XP
61
Country
Russia
I replaced my original SX Core MCU with new cheap 1.5$ gd32f350
Flashed Spacecraft-NX, bootloader to 0x08000000 firmware to 0x08003000 with GDLink (stlink work too)
And now USB detected my SX Core and it work good.
So, MCU is problem, its very cheap to replace it and get fully working chip.
Just few moments ago tested with new switch v2 - all ok. Put 0.7.1 firmware of HWFLY-NX to SD and after start it's run immediately update. After - retrain again - and now i have SpaceCraft-nx bootloader with HWFLY-NX firmware. All perfect, can reset trainings with hwfly-toolbox.

So what better spacecraft-nx firmware or hwfly firmware? Why exist both?
-----
Ok, i get it. HWFLY-NX lead from SpaceCraft-NX (open-source), so 1st one definetly better, still updating, its support microSDs that SpaceCraft-NX can't recognize.
Bootloader seems like doesn't care, the main thing that non SX bootloader, but SX firmware has better picture on loading, HWFLY looks like chinesy crap for now, rocket was better)
 
Last edited by sin89rus,

Linkgod

Member
Newcomer
Joined
Nov 6, 2022
Messages
5
Trophies
0
Age
31
XP
71
Country
Portugal
If you don't see greenlight, check your sp1 sp2 solder points
hi i have the same issue on my oled switch
checked sp1 and sp2 and it gives 0.17 on both on diode.
the rest of the values on A,B,C,D,3.3 and ground all all correct and the emmc adaptor is solder on the emmc .
i tried with stock software, spacecraft and hwfly-nx none do anything.
any tips?
thanks
 

juanvlc

Well-Known Member
Newcomer
Joined
Jan 7, 2022
Messages
96
Trophies
0
XP
886
Country
Spain
hi i have the same issue on my oled switch
checked sp1 and sp2 and it gives 0.17 on both on diode.
the rest of the values on A,B,C,D,3.3 and ground all all correct and the emmc adaptor is solder on the emmc .
i tried with stock software, spacecraft and hwfly-nx none do anything.
any tips?
thanks
Check resistance between those caps and gnd, 20 ohm and -+0 is ok.
Also, detailed pictures of your abc solder points will help.
With the 0.71, does it try to glitch showing green light anytime?
 

Site & Scene News

Popular threads in this forum

General chit-chat
Help Users
  • No one is chatting at the moment.
    Veho @ Veho: The cybertruck is a death trap.