Things you have fixed/modded recently

Sicklyboy

#JOYCONBOYZFOREVER
Global Moderator
Joined
Jul 15, 2009
Messages
6,312
Trophies
2
Location
[̲̅$̲̅(̲̅ ͡° ͜ʖ ͡°̲̅)̲̅$̲̅]
XP
8,065
Country
United States
I was bored one day a couple weeks ago, and built a car stereo boombox. No CD Player, but it has USB, Aux in, has Bluetooth, reads MP3, WAV, M4A/AAC, and FLAC formats. Everything I could ever need for music. I still need to add speaker isolation chambers with foam and airholes, but even without all that it sounds phenominal. I'll be adding some rubber feet to it later this week.

View attachment 242361

Wow that's a great idea. I should build something like that for when I'm working on my car.
 
  • Like
Reactions: Jayro

Sicklyboy

#JOYCONBOYZFOREVER
Global Moderator
Joined
Jul 15, 2009
Messages
6,312
Trophies
2
Location
[̲̅$̲̅(̲̅ ͡° ͜ʖ ͡°̲̅)̲̅$̲̅]
XP
8,065
Country
United States
I forget, car stuff counts here, right?

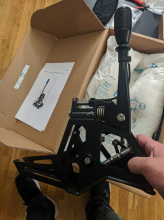
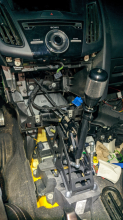
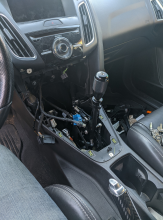
I installed a Coolerworx short shifter in my Focus ST and finally took it out for a test drive today. It's a beautiful piece of hardware, way overkill for what I need, and awesome as hell. And only set me back a cool $750 :wacko:

upload_2021-1-19_0-13-52.png upload_2021-1-19_0-12-34.png upload_2021-1-19_0-13-36.png
 

Jayro

MediCat USB Dev
Developer
Joined
Jul 23, 2012
Messages
12,964
Trophies
4
Location
WA State
Website
ko-fi.com
XP
16,973
Country
United States
  • Like
Reactions: Sicklyboy

Sicklyboy

#JOYCONBOYZFOREVER
Global Moderator
Joined
Jul 15, 2009
Messages
6,312
Trophies
2
Location
[̲̅$̲̅(̲̅ ͡° ͜ʖ ͡°̲̅)̲̅$̲̅]
XP
8,065
Country
United States
Needs a custom boot, but looks dope as hell.

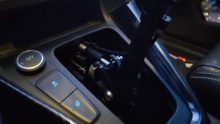
I'm actually thinking of modeling and resin printing a solid cover plate to go in there. It's not going to cover the entire thing, just probably the lower 1/3 of the hole, and maybe bring the edges in a tiny bit where possible. But I'd still like some of the mechanism itself to be visible (for the clout).

Not quite experienced with modeling so that'll take some trial and error. I'll get around to it some day.

Actually, I guess this'd be helpful, a pic (still from a video I took) showing what the finished product looks like.

upload_2021-1-19_1-3-34.png
 

Jayro

MediCat USB Dev
Developer
Joined
Jul 23, 2012
Messages
12,964
Trophies
4
Location
WA State
Website
ko-fi.com
XP
16,973
Country
United States
I'm actually thinking of modeling and resin printing a solid cover plate to go in there. It's not going to cover the entire thing, just probably the lower 1/3 of the hole, and maybe bring the edges in a tiny bit where possible. But I'd still like some of the mechanism itself to be visible (for the clout).

Not quite experienced with modeling so that'll take some trial and error. I'll get around to it some day.

Actually, I guess this'd be helpful, a pic (still from a video I took) showing what the finished product looks like.

View attachment 242427
Still sounds like a very fun mod.
 
  • Like
Reactions: Sicklyboy

Jokey_Carrot

G̶B̶A̶T̶e̶m̶p̶ ̶A̶d̶d̶i̶c̶t̶ Heroin Addict.
Member
Joined
Oct 23, 2017
Messages
799
Trophies
1
Location
Smethwick
XP
3,029
Country
United Kingdom
Yep a lovely breadbin after all the repairs!
It had several problems, like a bad SID chip, broken case, keyboard having few unresponsive key (repaired now, but swapped before I figured it out for a VIC20 keyboard in perfect condition, but said VIC20 currently doesn't work properly lol), now it's fully operational and works great.

I've got some other breadbins I have yet to figure out. They all turn on but half of them don't even display the BASIC prompt :(

Gonna be fun to try and match chips I can replace, assuming nothing else was damaged.

I do know few of them do work but have issues, like bad SID, bad keyboard, bad video chip, and one also displays in random colours due to a bad Color RAM chip lol.
To fix unresponsive keys you wanna to take the board off the back and rub the gold button contacts a few times with an eraser and then said the contacts with alcohol. And you should spray the carbon pad on the bottom of the plunger with alcohol as well, in extreme cases the pad is worn and you need to paint over it with conductive lacquer.
 

Alexander1970

XP not matters.
Member
Joined
Nov 8, 2018
Messages
14,973
Trophies
3
Location
Austria
XP
2,495
Country
Austria
Hello.:)

Today finally fixed my Video PC.
I mainly transfer/capture VHS / Hi8 analog Videos.
Correspondingly I use an older Hardware Equipment and PC.

As Operating System is only Windows 7 possible (due the Lack of newer/working Drivers).
A few Weeks ago I have changed from an very old Pentium 4 System (with 2 Gb RAM)
to a "newer" Xeon PC with 4 Gb RAM.
My only left License was an Windows 7 Professional 64bit Version.

That was not a Problem,Drivers and Software are also working with that System.
For the Video Capture Devices I use an
Pinnacle Studio 700 PCI with Breakout Box and a No Name USB 2.0 Video Grabber.

The USB Grabber and the Software is very easy to use:
- connect
- VHS Tape in and play
- record in MPEG2

No Issues,perfect easy for VHS Tapes with Child Movies/Series.
But not for the "famous" Disney VHS Tapes - Copyprotected.

For this I need the Pinnacle Device.And there is starts....
During the Capture Process the Program freezes...
After 5 Minutes,sometimes after 50 Minutes....

Days of trying and testing different Tools/Programs follows...

A few Days ago I thought,I fixed it...nope.......

After reading and reading and trying and trying (maybe some People here now my "Test Endurance"...)
I found a little Hint:

http://cdn.pinnaclesys.com/SupportFiles/Hardware_Installer/readmeHW10.htm

Exactly in this Size:
Important Note: MovieBoard 500-PCI/700PCI has an issue on Windows 64 bit systems when the computer has 2GB or more system RAM. In this case Studio will crash during capture.


What I have learned today:
Scroll DOWN and READ on every Page !!!!:teach:

Thank you.:)
 

WiiHomebrew+Snes

Member of GBAtemp's shadow district
Member
Joined
May 4, 2016
Messages
640
Trophies
1
Age
39
Location
Floridia
Website
www.lucar.io
XP
2,777
Country
United States
I changed the battery for a Donkey Kong Land Gameboy Cartridge.
I melted a plastic pen to fit into the security bit.
Then changed the battery for a new one.
Hopefully with a soldering iron! And get yourself a nice set of bits too, you deserve it :)
 

emcintosh

On the internet, everyone knows I'm a cat
Member
Joined
Dec 4, 2016
Messages
444
Trophies
0
XP
2,333
Country
United Kingdom
A bicycle brake/indicator light. Repaired the arm that presses down on the switch when you pull the brake, fixed the circuit inside so the indicators on both sides work, modded so the LEDs on the front are yellow (indicators) and white (minimal front light mostly to tell you when the rear light is on) rather than red.

Yes, for a pedal cycle. I got a light like this in my teens and soldered the wires connecting the control box at the front to the lights at the back to a TRRRS headphone plug/socket so the two parts could be removed individually for maintenance. I can't remember whether I damaged something else in the circuit, but for whatever reason I never fitted it. Several years later I got one of the tiny brake lights where the whole unit attaches to your brake cable, but it's not actually visible behind my pannier rack. I took it apart to see whether I could wire its switch to an LED elsewhere, but the circuit is literally an LED with one leg that gets pushed down to contact the button battery when you squeeze the brakes - it's relying on the internal resistance of the battery to limit the current.

I recently got a similar model to my original project, but it's quite cheaply made and several parts stopped working. I've reconstructed the brake sensor's arm with lolly sticks and duct tape, where the original plastic hinge failed. The right indicator lights (really the more important side to indicate, as here in the UK we drive on the left, so a right turn crosses the oncoming lane) stopped working too, but it turned out all I needed to do to fix this was reflow the solder on one joint that didn't look right. Though it took me a while to work out which traces I would need to follow.

The modification to the LED colours was really for safety - having a red light at the front of the bike is a really bad idea. The white LED is unsurprisingly not very bright as the circuit is expecting a lower-voltage red one, but I was not expecting to use this as my main front light anyway.
s-l1600.jpg
bike brake indicator.jpg
 
Last edited by emcintosh,

redmagejosh

Well-Known Member
Member
Joined
Jan 9, 2015
Messages
381
Trophies
0
Location
Panama City, Panama
XP
1,958
Country
Panama
I fixed my wife's SNES. She has been looking forward to replaying Super Mario World in the original SNES from her childhood, which had been stored since we moved togethers several years ago, but it wasn't turning on. I recapped it and changed the fuse, gave it a new DC input since the original one was damaged, same with the AC Adapter. Cleaned the whole thing with IPA and also washed the shell.
Now it is working better than ever and she is planning on spending the weekend playing Mario World with me. She is over the moon about getting her SNES in working shape and I got to play with old broken hardware, win-win.

And remember kids... Happy wife, happy life!
 

godreborn

Welcome to the Machine
Member
Joined
Oct 10, 2009
Messages
38,471
Trophies
3
XP
29,136
Country
United States
haven't fixed it yet, but I plan to buy a new shell housing for my adjustable dpad, 360 controller. I've fixed many 360 controllers, mostly the dpad itself or replacing damaged shells. this one has a jagged scratch on it. it's not large, but it's noticeable.

--------------------- MERGED ---------------------------

the last thing I fixed was either the adjustable dpad itself/replacing it or changing the shell to my turbo mod 360 controller. it's red, but it was red and white when I used part of another shell. it's all red again though. when you press the sync button, two quadrants light up on the controller, it has seven degrees of turbo, so each time you press the sync button one of the quadrants flashes. that's the controller I use with my 360, the one I used when showing that stuff with Bean.

--------------------- MERGED ---------------------------

the adjustable dpad controller is what I used to use with my pc. I now use a wii u pro controller.
 
  • Like
Reactions: Alexander1970

emcintosh

On the internet, everyone knows I'm a cat
Member
Joined
Dec 4, 2016
Messages
444
Trophies
0
XP
2,333
Country
United Kingdom
A sticky key on my Unicomp Spacesaver M (the Mac layout version of the Unicomp revival of the famously loud but satisfying IBM Model M buckling-spring keyboard).

When I took the keyboard apart to do the floss mod (a short length of dental floss in each spring dampens the clacking a bit so my wife won't hate me typing as much), I managed to stretch / bend the spring on my numpad-3 key. This meant that the key got held down anytime I had the keycap on. For a while I disabled the key using Karabiner Elements (the remapping program I use to make caps lock toggle between Latin and Cyrillic layouts, and shift-capslock actually give capitals). But the keyboard sometimes managed to ignore this, and I got fed up enough that I unplugg33333d it.

I have now fixed the issue by cutting the bent section off with a wire stripper/cutter. The rest of the spring has stretched to about the original length, so they key sits only slightly low. It doesn't spring back as satisfyingly as all the other keys, but my clicky keyboard is now usable again : ).

I've still got about half the melted-plastic rivets intact, so I haven't had to do the bolt mod yet to hold the membrane layers rigidly together.
 
Last edited by emcintosh,
  • Like
Reactions: Alexander1970

Site & Scene News

Popular threads in this forum

General chit-chat
Help Users
  • No one is chatting at the moment.
    Psionic Roshambo @ Psionic Roshambo: @SylverReZ, Indeed lol