Tutorial
Updated
L4T Ubuntu Applcation Install guides.
So, instead of clogging up poor @bylaws L4T thread (sorry buddy!) with emulators apps, I figured it might be a good idea to try and make a separate thread for quick guides, and leave his one to troubleshooting actual L4T issues.
The intent for this thread is to leave behind quickshot guides for others to install applications we know works for Tegra Linux, so here's the one's I've managed so far, with the help of some folks in the L4T OS thread.
If others are going to add to this thread with their own little guides, try to keep each seperate command on it's own line, and if the command is too big for 1 line, seperate it as I have done in the Vulkan Dolphin guide. Little comments should go into square brackets and have the color changed to red. Try to keep it in a format that people can copy/paste each line as they're needed.
(It is advised to make a Swapfile, so please follow that guide first!)
sudo apt install nano
[You can change 1G to whatever size you want, I used 2G]
sudo fallocate -l 1G /swapfile
[If fallocate throws an error, you want to run the]
[next command, if it doesn't, skip it]
sudo dd if=/dev/zero of=/swapfile bs=1024 count=1048576
sudo chmod 600 /swapfile
sudo mkswap /swapfile
sudo swapon /swapfile
sudo nano /etc/fstab
[You need to add this entry to the file you just opened]
[to make the change permanent:]
/swapfile swap swap defaults 0 0
[To verify that it installed correctly:]
sudo free -h
[Something like this should be the output:]
       [total        used         free       shared  buff/cache  available]

[Mem:     488M        158M         83M        2.3M        246M        217M]

[Swap:    1.0G        506M        517M]
echo performance | sudo tee /sys/devices/system/cpu/cpufreq/policy0/scaling_governor
sudo add-apt-repository ppa:dolphin-emu/ppa
sudo apt-get update
git clone https://github.com/Tinob/Ishiiruka.git
cd Ishiiruka
mkdir build
cd build
[This next line is all in one, so copy/paste]
sudo apt install git cmake ffmpeg libavcodec-dev libevdev-dev libusb-1.0-0-dev libavformat-dev libswscale-dev libsfml-dev libminiupnpc-dev libmbedtls-dev curl libhidapi-dev libwxbase3.0-dev libwxgtk3.0-dev libpangocairo-1.0-0 libgtk2.0-dev libbluetooth-dev qt5-default qtbase5-private-dev libudev-dev libxi-dev
cmake ..
make -j4
sudo make install
[Once installed, execute with]
ishiiruka
[Then lock it to the sidebar for easy access]
sudo add-apt-repository ppa:libretro/testing
sudo apt-get install retroarch* libretro*
sudo apt-get update && sudo apt-get upgrade
[Easy enough to install]
sudo apt-get install retroarch* libretro*
sudo apt-get update && sudo apt-get upgrade
[Easy enough to install]
sudo apt-get install xserver-xorg-input-joystick
[To use your joycons as a mouse, press the sync buttons on the rail of each joycon, then use the bluetooth app to connect to them both. Once both are connected, hold them like you normally do, and press L+R (L1, R1 in Playstation terms), and that should be it!]
[Another easy install, to change sensitivity, go to system settings, mouse, and make your changes]
sudo apt-get install kodi
[After installing Kodi, you will need to logout. Do not shut down or reboot, but if you did, follow the same instructions.]
[Log out, and you'll be at the login menu. Click the account, and it'll ask you for your password.]
[Underneath the password box, is a cog. Click the cog, and click Unity.]
[From now on, Kodi will not automatically start upon booting up linux.]
[Yet another easy one, but this is a very powerful media box program]
[Original Post https://gbatemp.net/threads/tutoria...ling-moonlight-embedded-on-l4t-ubuntu.537429/ ]
sudo apt-get update
[Next line is all 1 command]
sudo apt-get install libopus0 libexpat1 libasound2 libudev1 libavahi-client3 libcurl3 libevdev2 libenet7 -y && sudo apt-get install libssl-dev libopus-dev libasound2-dev libudev-dev libavahi-client-dev libcurl4-openssl-dev libevdev-dev libexpat1-dev libpulse-dev uuid-dev libenet-dev cmake gcc g++ fakeroot debhelper
libavcodec-dev libsdl2-dev -y
git clone https://github.com/irtimmer/moonlight-embedded.git
cd moonlight-embedded
git submodule update --init
mkdir build
cd build/
cmake ../
make
sudo make install
sudo ldconfig
[Now reboot your switch]
moonlight pair <pc local ip>
moonlight stream <pc local ip>
[Where pc local ip, you must put in your pc's ip address. To find that, on windows, open Win+r, in the dialog box, put in cmd.exe. In the new window, type in ipconfg, then look for your systems ip address. if you computer is wired to your network, it'll fall under "Ethernet adapter Ethernet".
If it is Wireless, then it'll fall under "Wireless LAN adapter WiFi"
Either way, you'll want the IPv4 Address.]
[In linux, just open terminal, the command "ifconfig" and look for IPv4]
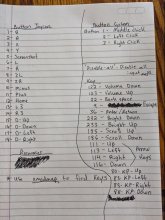
[To configure your joycons to work with Moonlight]
sudo gedit /usr/local/share/moonlight/gamecontroller.txt
[Scroll to the bottom and copy/paste one of these style codes into the file]
[For Nintendo Style:] 050000007e0500000620000001000000,Nintendo Switch Joy-Cons,a:b1,b:b0,back:b9,dpdown:b15,dpleft:b16,dpright:b17,dpup:b14,guide:b11,leftshoulder:b5,leftstick:b12,lefttrigger:b7,leftx:a0,lefty:a1,rightshoulder:b6,rightstick:b13,righttrigger:b8,rightx:a2,righty:a3,start:b10,x:b2,y:b3,
[For Microsoft Style:] 050000007e0500000620000001000000,Nintendo Switch Joy-Cons,a:b0,b:b1,back:b9,dpdown:b15,dpleft:b16,dpright:b17,dpup:b14,guide:b11,leftshoulder:b5,leftstick:b12,lefttrigger:b7,leftx:a0,lefty:a1,rightshoulder:b6,rightstick:b13,righttrigger:b8,rightx:a2,righty:a3,start:b10,x:b3,y:b2,
[Then,press CTRL + X. Then press Y. Then close terminal and reboot your switch.]
sudo apt-get update
[Next line is all 1 command]
sudo apt-get install libopus0 libexpat1 libasound2 libudev1 libavahi-client3 libcurl3 libevdev2 libenet7 -y && sudo apt-get install libssl-dev libopus-dev libasound2-dev libudev-dev libavahi-client-dev libcurl4-openssl-dev libevdev-dev libexpat1-dev libpulse-dev uuid-dev libenet-dev cmake gcc g++ fakeroot debhelper
libavcodec-dev libsdl2-dev -y
git clone https://github.com/irtimmer/moonlight-embedded.git
cd moonlight-embedded
git submodule update --init
mkdir build
cd build/
cmake ../
make
sudo make install
sudo ldconfig
[Now reboot your switch]
moonlight pair <pc local ip>
moonlight stream <pc local ip>
[Where pc local ip, you must put in your pc's ip address. To find that, on windows, open Win+r, in the dialog box, put in cmd.exe. In the new window, type in ipconfg, then look for your systems ip address. if you computer is wired to your network, it'll fall under "Ethernet adapter Ethernet".
If it is Wireless, then it'll fall under "Wireless LAN adapter WiFi"
Either way, you'll want the IPv4 Address.]
[In linux, just open terminal, the command "ifconfig" and look for IPv4]
[To configure your joycons to work with Moonlight]
sudo gedit /usr/local/share/moonlight/gamecontroller.txt
[Scroll to the bottom and copy/paste one of these style codes into the file]
[For Nintendo Style:] 050000007e0500000620000001000000,Nintendo Switch Joy-Cons,a:b1,b:b0,back:b9,dpdown:b15,dpleft:b16,dpright:b17,dpup:b14,guide:b11,leftshoulder:b5,leftstick:b12,lefttrigger:b7,leftx:a0,lefty:a1,rightshoulder:b6,rightstick:b13,righttrigger:b8,rightx:a2,righty:a3,start:b10,x:b2,y:b3,
[For Microsoft Style:] 050000007e0500000620000001000000,Nintendo Switch Joy-Cons,a:b0,b:b1,back:b9,dpdown:b15,dpleft:b16,dpright:b17,dpup:b14,guide:b11,leftshoulder:b5,leftstick:b12,lefttrigger:b7,leftx:a0,lefty:a1,rightshoulder:b6,rightstick:b13,righttrigger:b8,rightx:a2,righty:a3,start:b10,x:b3,y:b2,
[Then,press CTRL + X. Then press Y. Then close terminal and reboot your switch.]
Last edited by ,