Tutorial
Updated
Setting up No$gba for DSiWare emulation
This is the first time for me trying to write some tutorial. As always when I have finished a text: I tried my best but I am no satisfied with my work. If there is something missing, wrong, can be done better…
Please tell me how I can improve this!
Why this tutorial?
I did not find anything like this online. 3DS emulation is quite easy to use for the end user. Install Citra → load ROM. DSiWare emulation seems to be not widely used and currently depends on having the complete DSi NAND image. For the few good titles it would be a real shame not to have them (optionally) on a big screen.
What this tutorial covers:
Enough with the preface. Let’s get started.
What you will need:
The actual guide:
A big “Thank you!!” to:
@ReyVGM for asking me about this topic. → A fine question that lead to many interesting things to learn. I had thought about this topic before but never got to looking into it.
@edo9300 for adding some very valuable pieces of information. → I still feel terribly dumb for not figuring these things out. I could not have done this without your help.
@alexander1970 for reading through this tutorial in advance and enduring my frustration in PMs about this (and totally different topics) for the last few days.
NoCash for emulator and unlaunch. This emulator is some fine piece of software. The .exe file has only about 220KB. That’s what I call efficient!
@Robz8 and everybody involved in creating HiyaCFW (Helper) and TWiLight Menu++
@ihaveamac → For the awesome ninfs.
@shutterbug2000 → For the Memory Pit exploit allowing me to get CFW on my DSi [as well as @zoogie who provided Memory Pit for different regions/versions]
I have deep respect for all homebrew developers investing their free time into making our consoles more versatile. I’m not a coder and not capable of developing useful software… but I hope this tutorial may be useful for someone.
Please tell me how I can improve this!
Why this tutorial?
I did not find anything like this online. 3DS emulation is quite easy to use for the end user. Install Citra → load ROM. DSiWare emulation seems to be not widely used and currently depends on having the complete DSi NAND image. For the few good titles it would be a real shame not to have them (optionally) on a big screen.
What this tutorial covers:
- Setting up No$gba so that it boots to the DSi main menu (Launcher) instead of simply starting a ROM
- Adding unlaunch to the emulated NAND.
- Adding HiyaCFW/SDNAND and TWiLight Menu++ to the virtual SD
- DSiWare can be either started from .nds files with TWiLight Menu++ … or …
- Installed to the SDNAND following existing tutorials. I will link to those instead of just repeating or even plagiarizing.
- DSiWare can be either started from .nds files with TWiLight Menu++ … or …
- Second method: Installing DSiWare on SysNAND / DSI-1.MMC (not finished yet – missing in this version)
- Can be used on the emulator
- Can be used on a real DSi as well; However… restoring NAND images to the actual DSi NAND chip is generally frowned upon. I will comment this a little in the next version when the section is finished.
Enough with the preface. Let’s get started.
What you will need:
- A DSi NAND image. Use the guide https://dsi.cfw.guide/ in order to backup your NAND. If you don’t want to actually modify your DSi just stop following the guide after creating the backup. This is just reading from the NAND. Of course everything exists online. Linking it here is obviously against the rules as a NAND dump contains Nintendo copyrighted material. I highly recommend getting a DSi and obtaining the NAND dump legally.
- DSi and DS Firmware Files. In fact not firmware… the files are DSIBIOS7.ROM, DSIBIOS9.ROM, biosnds7.rom and biosnds9.rom. But “DSi Firmware Files” is a nice search term, don’t you think?
- A Windows computer being able to run No$gba.
- No$gba, Windows gaming version. I did not try the DOS version. Really should do this some time… Pentium 1 computer (or older) + FreeDOS + No$gba = ?
- OSFMount because Windows does not seem to be able to mount virtual disk images on it’s own. My comment on this: HÄ?!
- ninfs (only if you intend to modify the DSi NAND backup). Ninfs requires WinFsp. Everything for setting up ninfs is explained on the readme.md on Github.
- A virtual SD card.I’ve attached a .zip file containing various sizes. These files just contain an empty(!) file system. No copyrighted material! The files are ready to be used with OSFMount.
- DSiWare. Sadly the DSi Shop is no more… but many games are still available on the 3DS eShop. Dumping the titles can be easily done with GodMode9 on any 2|3DS system with Luma3DS.
- Time and patience. Depending on where you have to start getting all prerequisites mentioned under “What you will need” is tedious.
Because of @ReyVGM suggestion I moved some not so important information into this spoiler to clear the main guide up a bit.
- Seems it’s currently not possible to dump the complete DSi BIOS files with software only methods. Fwtool can dump the lower 32K of the 64K BIOS files. The upper half is zeroed out. No$gba crashes when trying to launch software with the incomplete BIOS files. I really would have preferred to provide a legal way to get these files – but unfortunately downloading the two files seems to be the only method at the moment. I have no idea how these files were obtained. Here is room for improvement! Any help and/or information about DSi BIOS dumping would be appreciated!
- The DS BIOS file can be fully dumped with a DS-(Lite|Phat) and a flashcart using fwtool.
- Normally I’m pure Linux user. For this experiment I went with Windows. appdb.winehq.org suggests the emulator somewhat works on Wine. However dealing with possible problems because of the Wine compatibility layer was out of scope for this project. No idea if Linux or MacOS are an option.
- The virtual SD is just a file containing an MBR partition table and one FAT16 or FAT32 formatted partition. Just like a real SD.
- For whatever reason I had to use Windows for creating the virtual SDs. No$gba did not like partitions created with Linux fdisk and RAW dumps of some real SDs. One of these real SDs is used on daily basis in a real DSi and has no problems working with unlaunch, HiyaCFW and TWilight Menu++. I was not able to pinpoint the issue.
- The files in the attached zip (partitions created with Windows 8.1 diskpart) did work on a quick test but I can't guarantee they are perfectly compatible. I copied my setup into each one, started HiyaCFW and TWiLight Menu++ and one DSiWare game.
Part 1: Getting the emulator to boot the DSi Home Menu (“Launcher”)
Last comments:
1. Download and unpack No$GBA to an empty directory.
2. Copy the BIOS files into the same directory.
3. Put your NAND backup there as well. The NAND image has to be renamed to DSI-1.MMC for the emulator to use it.
4. Any commercial DS(i) ROM or homebrew app. I used UNLAUNCH.DSI (reason: see later)
Your directory should look like this:
 5. Start the emulator and set it to DSi emulation:
 6. File, Cartridge Menu (FileName) (F12)


Part 2: Adding more DSiWare.2. Copy the BIOS files into the same directory.
3. Put your NAND backup there as well. The NAND image has to be renamed to DSI-1.MMC for the emulator to use it.
4. Any commercial DS(i) ROM or homebrew app. I used UNLAUNCH.DSI (reason: see later)
Your directory should look like this:
- Open Options, Emulation Setup (F11)
- Reset/Startup Entrypoint → GBA/NDS BIOS (Nintendo logo)
- NDS Mode/Colors → DSi (retail/16MB)
- Save Now
- Select your ROM file
- The emulator should boot your NAND with the selected ROM in the virtual cartridge slot.
There two options to get additional DSiWare into your emulated DSi. I recommend the first one. The second is more complicated and limited to 40 titles at a time and to the small size of the main partition on the NAND.
A) Using HiyaCFW/SDNAND and/or TWiLight Menu++ on a virtual SD
A) Using HiyaCFW/SDNAND and/or TWiLight Menu++ on a virtual SD
1. Download the .zip file attached to this tutorial and choose one of the virtual SDs inside. DSiWare is not very big so a smaller size might be okay. Unpack the desired virtual SD size and rename it to DSI-1.SD. Now put the DSI-1.SD inside file in your No$gba directory. Let me emphasize this once again: The files inside the attached zip do not contain an SDNAND – no Nintendo stuff included!
2. Install OSFMount on your Windows computer.
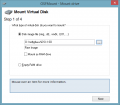
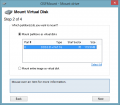
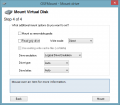
3. Open OSFMount and mount the virtual SD (in this example the small one that comes with the emulator):


4. Install HiyaCFW and/or TWiLight Menu++ on this virtual SD using HiyaCFW helper.
6. Adding DSiWare to HiyaCFW/SDNAND without TWilight Menu++ can be done by existing guides (The “40 titles at a time” limit applies to the “Launcher” on SDNAND as well) :
The result in HiyaCFW/SDNAND:


 The result in TWiLight Menu++

B) Adding DSiWare right to your DSI-1.MMC using ninfs2. Install OSFMount on your Windows computer.
3. Open OSFMount and mount the virtual SD (in this example the small one that comes with the emulator):


4. Install HiyaCFW and/or TWiLight Menu++ on this virtual SD using HiyaCFW helper.
- I will not do a step-by-step guide here – this would be just repeating existing guides.
- I will also not provide detailed information about “How to configure and use unlaunch?” and “How to configure and use TWiLight Menu++").
- https://dsi.cfw.guide/ is the best source if you are completely new to DSi homebrew / custom firmware.
- If your SysNAND image does not already have unlaunch installed you can install it by starting UNLAUNCH.DSI as “cartridge”. This is why I chose it as a ROM in the first part. (Thanks to @edo9000 for this idea! I assumed this was impossible because cartridges normally don’t have NAND and/or SD access on a real DSi.)
- In case you have an existing HiyaCFW and/or TWiLight Menu++ setup on your real SD you can just copy the contents to the virtual SD. Don’t copy your non-DSiWare ROMs (or only some for testing). I could not get nds-bootstrap to work. But I did not really try anyway. Maybe somebody else has more luck. Having a large number of cartridge based DS games on the virtual SD is a waste of space because No$gba can simply load them from anywhere on your computer without nds-bootstrap.
Once HiyaCFW is on your virtual SD you will find it in unlaunch:

5. Adding DSiWare for TWiLight Menu++ is just copy and paste .nds ROMs on the virtual SD – like on a real SD/DSi.6. Adding DSiWare to HiyaCFW/SDNAND without TWilight Menu++ can be done by existing guides (The “40 titles at a time” limit applies to the “Launcher” on SDNAND as well) :
- https://dsi.cfw.guide/installing-dsiware (manual method)
- https://gbatemp.net/threads/release-dsi-title-manager-for-hiyacfw.518053/ (Title Manager for HiyaCFW – works on the emulator, can be started with unlaunch easily)
The result in HiyaCFW/SDNAND:
(Second method not done yet – will edit this post in a few days)
[…]
[…]
- Touch input may be a little bit off when booting your NAND the first time in the emulator. Running the calibration tool in System Settings fixes this. Thanks @Trash_Bandatcoot for this information. You might have to adjust touch settings two times – for SysNAND and for SDNAND
- Touch input may not work when booting straight to TWiLight Menu++. Workarounds:
- Start to Launcher either SysNAND or SDNAND first and then reset the emulator without closing it. Touchscreen should work in TWiLight Menu++ now
- Do not start TWiLight Menu++ from unlaunch but HiyaCFW and set it to "autoboot title". Loading TWiLight Menu++ through HiyaCFW takes slightly longer but has no touch issues.
- Using Windows is hard for me. I don't really know how to use it and don't understand it. Sometimes the emulator slowed down extremely. For example when using Title Manager for HiyaCFW. Windows Task manager showed one of my CPU cores used a 100% by Microsoft Antimalware Service or something. After turning off real time protection in Windows Defender (Windows 8.1) the slowdowns stopped… Hä?!
- Not all DSiWare works on the emulator. "A Little Bit of Brain Training – Arts Edition" crashes the emulator with "notyet16"
A big “Thank you!!” to:
@ReyVGM for asking me about this topic. → A fine question that lead to many interesting things to learn. I had thought about this topic before but never got to looking into it.
@edo9300 for adding some very valuable pieces of information. → I still feel terribly dumb for not figuring these things out. I could not have done this without your help.
@alexander1970 for reading through this tutorial in advance and enduring my frustration in PMs about this (and totally different topics) for the last few days.
NoCash for emulator and unlaunch. This emulator is some fine piece of software. The .exe file has only about 220KB. That’s what I call efficient!
@Robz8 and everybody involved in creating HiyaCFW (Helper) and TWiLight Menu++
@ihaveamac → For the awesome ninfs.
@shutterbug2000 → For the Memory Pit exploit allowing me to get CFW on my DSi [as well as @zoogie who provided Memory Pit for different regions/versions]
I have deep respect for all homebrew developers investing their free time into making our consoles more versatile. I’m not a coder and not capable of developing useful software… but I hope this tutorial may be useful for someone.
Attachments
Last edited by KleinesSinchen,
, Reason: Clean up a little – still missing the major additon


