


I think I fixed that now on the OP.There's still some weird img code in there that shows up but I can't find it when trying to edit the OP.
You are using an out of date browser. It may not display this or other websites correctly.
You should upgrade or use an alternative browser.
You should upgrade or use an alternative browser.

As I said before, I don't have experience with this, so I feel I am doing just administrative work here, anyway perhaps it helps.I did everything by your tutorial.
First, @n00b2015 I would like if you could read, verify, and answer each of these questions based on the OP: (almost a checklist)
1. Is your Teensy++ a Teensy++ 2.0?
2. Did you cut the track between the 3.3V and 5V pads?
3. Did you check there is no continuity between those pads?
4. Did you solder the 3.3V voltage regulator?
5. Did you check you get 3.3V between the regulator output and GND while it is powered?
6. Did you flash the appropriate HEX file to the Teensy? (NANDway_SignalBoosterEdition.hex)
7. Did you check all the "solder together" points in the Teensy have continuity, checking from the board side, pin to pin?
8. Did you connect *RB and *CE points to the appropriate solder point in the Wii U board, according to the NAND you want to dump? (see pictures in section 2. SOLDER THE TEENSY TO THE WII U BOARD)
=> I guess it is RB2 and CE2 if you are trying to dump the WiiU NAND.
9. Did you check continuity between each solder point on the Teensy PCB, and the corresponding pin of the NAND chip directly? (that is, check between the Teensy board and the pins from PINOUT picture in section 2. SOLDER...)
10. Did you solder the ground cable to the same point as the it is in the corresponding picture in Section 2? (marked as GND with a red circle in that picture)
11. In a previous post you said:
"When i connect Teensy to PC and reassemble Wii U and press power button on, the light blinks blue and fan doesn't start."
But according to the guide on the OP, you must:
1. Start out with the Teensy disconnected from the PC.
2. Make sure that your optical drive, power button and your fan are all connected to the Wii U.
3. Plug in your Wii U power connector.
4. Turn on your Wii U. The power LED should turn blue and your fan should spin.
5. Plug in the Teensy to the PC via USB cable.
6. Open a command prompt from within the folder that you created above.
7. Type this command: "NANDway.py COM3 0 info"
Did you check actually following this sequence? That is, first with the Teensy disconnected from the PC (and the Wii U disconnected from power), plug your Wii U to power and turn it on, only then plug the Teensy to the PC via USB cable.
@Kafluke or anybody else with experience on this:
1. Point 4 in section 3 of the OP states:
"Turn on your Wii U. The power LED should turn blue and your fan should spin."
But as @n00b2015 states, for him:
"When i connect Teensy to PC and reassemble Wii U and press power button on, the light blinks blue and fan doesn't start."
I suppose this is not the expected behavior, is there some reason this could happen, and a suggested way to fix this?
2. When @n00b2015 runs NANDway.py, he gets a weird "0xff 0xff 0xff 0xff 0xff" reading from the NAND, and subsequently an error message. This reading suggests to me either bad power voltage on the Teensy, bad initialization of the NAND chip (due perhaps to point 11 in the checklist above), bad cabling, or (less probable) a very damaged NAND chip.
Do you know what could actually be a common cause for this, and a suitable solution?
@n00b2015's NANDway.py output below:
NANDway.py COM3 0 dump slc.bin
Pinging Teensy...
Available memory: 3776 bytes
NAND0 information:
Raw ID data: 0xff 0xff 0xff 0xff 0xff
Error reading size of NAND! Exiting...
Last edited by sarkwalvein,

1. yes
2. yes
3. yes
4. yes
5. yes
6. yes
7. yes
8. yes
9. not but i checked connections several times
10. yes
11. yes blue light blinking and fan wont start
Are the optical drive and fan connected to the Wii U board?
There are a couple of clues that make me see you have the correct HEX file flashed, the correct COM port selected, and that the communication between PC and Teensy is correct (i.e. you get 3776 bytes RAM free as the result from the ping).
So, the problem is not on the PC->Teensy side, but on the Teensy->Wii U side, or on the Wii U itself.
The websites I've read report similar problems (0xff 0xff 0xff 0xff 0xff readings) when there are power problems in the NAND chip, so I would suggest you to 10x check all connections from the Teensy to the pins from the NAND chip directly, and specially check if there are no shorts in the Wii U board, around the points you have soldered.
I can't think of anything else.
PS: Another possibility would be some of the Teensy pins used for serial communication shorted.
Last edited by sarkwalvein,
Yeah. I did the same to the first one I tried. That's some delicate soldering there. I used the alternate solder points on the nand itself and it worked after destroying the main solder points. Had to buy a really fine tip for my iron thoughRIP Wii U
I overheated connectors on board. I’m done.
At least I tried. Can you solder directly on chip? I tried, but even 40 AWG Kynar wire si too thick.
And yes, I had connected optical drive and fan to the WII U board.
I’m not great at soldering, but I have managed to solder QSB to ps3 super slim, Modbo to Ps2 slim, and other like ONEchip to PSone, but this is on the other level.
And yes, I had connected optical drive and fan to the WII U board.
I’m not great at soldering, but I have managed to solder QSB to ps3 super slim, Modbo to Ps2 slim, and other like ONEchip to PSone, but this is on the other level.
Last edited by n00b2015,
Yes you can. Instructions are in the OP. You need very very tiny wireAt least I tried. Can you solder directly on chip? I tried, but even 40 AWG Kynar wire si too thick.
And yes, I had connected optical drive and fan to the WII U board.
I’m not great at soldering, but I have managed to solder QSB to ps3 super slim, Modbo to Ps2 slim, and other like ONEchip to PSone, but this is on the other level.

Hi Dudes,
Any idea for a result like that for the vwrite phase:
I:\WIIUIMG\NORway-master>NANDway.py COM3 0 vwrite fix2.slc.ORI.full.img
NANDway v0.65 - Teensy++ 2.0 NAND Flasher for PS3/Xbox/Wii
Pinging Teensy...
Available memory: 3776 bytes
NAND0 information:
Raw ID data: 0xad 0xdc 0x90 0x95 0x54
NAND chip manufacturer: Hynix (0xad)
NAND chip type: H27U4G8F2D (0xdc)
NAND size: 512 MB
NAND plus RAS size: 528 MB
Page size: 2048 bytes
Page plus RAS size: 2112 bytes
Block size: 131072 bytes
Block plus RAS size: 135168 bytes
RAS size: 64 bytes
Plane size: 268435456 bytes
Pages per block: 64
Number of blocks: 4096
Number of pages: 262144
Number of planes: 2
Bus width: 8-bit
Writing...
Writing 1000 blocks to device (starting at offset 0)...
Device is write-protected!
Block 0 - error erasing block
132 KB / 540672 KB Device is write-protected!
Block 1 - error erasing block
264 KB / 540672 KB Device is write-protected!
Block 2 - error erasing block
396 KB / 540672 KB Device is write-protected!
Block 3 - error erasing block
528 KB / 540672 KB Device is write-protected!
Block 4 - error erasing block
I've just put in place my 3.3v regulator, i ve check the output, dump & info command is ok.
Before sold the regulator I was able to vwrite without and error. But when I redump to check it nothing was write really.
It why I add the 3.3v regulator, but now I get this error of write-protected device
(ps I use Signal Booster Edition)
br,
BsP
Last edited by d41u5,

Hi, I ended up with one of the Wii U units that bricked around the time the Wii U launched, do you know if it is possible for me to revive this using someone elses backup?
Hi, I ended up with one of the Wii U units that bricked around the time the Wii U launched, do you know if it is possible for me to revive this using someone elses backup?
unfortunately, you can't.
Hi all,
in this tutorial: after soldering everithing, and connecting optical drive, fan and front cover, and plug to AC the red LED goes on. But pressing the ON/OFF button has no effect (keeps red). Has anyone expirienced this problem ass well resp. knows what might be the problem?
cheers,
Edizius
--------------------- MERGED ---------------------------
HDMI output stays black as well. Would a overheated NAND show such a behaviour? Because I have seen that the text from the NAND has partially dissapeared. Maybe I destroyed it by overheating it by soldering the 2nd row (closer one to the chip)?

Hi all,
in this tutorial: after soldering everithing, and connecting optical drive, fan and front cover, and plug to AC the red LED goes on. But pressing the ON/OFF button has no effect (keeps red). Has anyone expirienced this problem ass well resp. knows what might be the problem?
cheers,
Edizius
--------------------- MERGED ---------------------------
HDMI output stays black as well. Would a overheated NAND show such a behaviour? Because I have seen that the text from the NAND has partially dissapeared. Maybe I destroyed it by overheating it by soldering the 2nd row (closer one to the chip)?
If I recall that exact behaviour occured when I accidentially removed some solderpads where you attatch the wires.
OK, thank you. I'll have a check If they are all still connected.
Have you had the problem although the teensy was not yet connected to the PC? Or has the compleate pad been removed from the PCB in your case?
Anyhow, thanks, first hint what i can check.
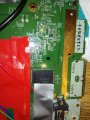
P.S. attached the picture of my nand. But I remember that i have had some flux on the chip. Maybe by removing the paste the text has been removed?
Have you had the problem although the teensy was not yet connected to the PC? Or has the compleate pad been removed from the PCB in your case?
Anyhow, thanks, first hint what i can check.
P.S. attached the picture of my nand. But I remember that i have had some flux on the chip. Maybe by removing the paste the text has been removed?
Attachments
Last edited by edizius2,
OK, thank you. I'll have a check If they are all still connected.
Have you had the problem although the teensy was not yet connected to the PC? Or has the compleate pad been removed from the PCB in your case?
Anyhow, thanks, first hint what i can check.
P.S. attached the picture of my nand. But I remember that i have had some flux on the chip. Maybe by removing the paste the text has been removed?
Well, it was a harder project than I could handle, and in so I messed up. So the entire pad got desoldered, and that was before finishing up the solderjob and connecting the teensy
Regarding the text on the chip, I would say it is possible it was removed by flux/cleaning, but someone might correct me.
Yes, I am also strugeling more than expected. I thought the soldering to the board is the hardest part, but the whole project consists of critical parts. So I am not wondering if it is compleately dead now. I have bought already a new one, but using all my games installed to the external HDD and the game saves would be really appriciated. So I hope I can revive it.
Similar threads
- Replies
- 7
- Views
- 3K
-
- Article
- Replies
- 50
- Views
- 16K
- Replies
- 0
- Views
- 1K
Site & Scene News
New Hot Discussed
-
-
62K views
Nintendo Switch firmware 18.0.0 has been released
It's the first Nintendo Switch firmware update of 2024. Made available as of today is system software version 18.0.0, marking a new milestone. According to the patch... -
23K views
Atmosphere CFW for Switch updated to pre-release version 1.7.0, adds support for firmware 18.0.0
After a couple days of Nintendo releasing their 18.0.0 firmware update, @SciresM releases a brand new update to his Atmosphere NX custom firmware for the Nintendo...by ShadowOne333 96 -
20K views
Wii U and 3DS online services shutting down today, but Pretendo is here to save the day
Today, April 8th, 2024, at 4PM PT, marks the day in which Nintendo permanently ends support for both the 3DS and the Wii U online services, which include co-op play...by ShadowOne333 179 -
16K views
GBAtemp Exclusive Introducing tempBOT AI - your new virtual GBAtemp companion and aide (April Fools)
Hello, GBAtemp members! After a prolonged absence, I am delighted to announce my return and upgraded form to you today... Introducing tempBOT AI 🤖 As the embodiment... -
13K views
Pokemon fangame hosting website "Relic Castle" taken down by The Pokemon Company
Yet another casualty goes down in the never-ending battle of copyright enforcement, and this time, it hit a big website which was the host for many fangames based and...by ShadowOne333 66 -
12K views
The first retro emulator hits Apple's App Store, but you should probably avoid it
With Apple having recently updated their guidelines for the App Store, iOS users have been left to speculate on specific wording and whether retro emulators as we... -
12K views
MisterFPGA has been updated to include an official release for its Nintendo 64 core
The highly popular and accurate FPGA hardware, MisterFGPA, has received today a brand new update with a long-awaited feature, or rather, a new core for hardcore...by ShadowOne333 54 -
12K views
Delta emulator now available on the App Store for iOS
The time has finally come, and after many, many years (if not decades) of Apple users having to side load emulator apps into their iOS devices through unofficial...by ShadowOne333 95 -
10K views
"TMNT: The Hyperstone Heist" for the SEGA Genesis / Mega Drive gets a brand new DX romhack with new features
The romhacking community is always a source for new ways to play retro games, from completely new levels or stages, characters, quality of life improvements, to flat...by ShadowOne333 36 -
9K views
Anbernic announces RG35XX 2024 Edition retro handheld
Retro handheld manufacturer Anbernic is releasing a refreshed model of its RG35XX handheld line. This new model, named RG35XX 2024 Edition, features the same...
-
-
-
225 replies
Nintendo Switch firmware 18.0.0 has been released
It's the first Nintendo Switch firmware update of 2024. Made available as of today is system software version 18.0.0, marking a new milestone. According to the patch...by Chary -
179 replies
Wii U and 3DS online services shutting down today, but Pretendo is here to save the day
Today, April 8th, 2024, at 4PM PT, marks the day in which Nintendo permanently ends support for both the 3DS and the Wii U online services, which include co-op play...by ShadowOne333 -
169 replies
GBAtemp Exclusive Introducing tempBOT AI - your new virtual GBAtemp companion and aide (April Fools)
Hello, GBAtemp members! After a prolonged absence, I am delighted to announce my return and upgraded form to you today... Introducing tempBOT AI 🤖 As the embodiment...by tempBOT -
96 replies
Atmosphere CFW for Switch updated to pre-release version 1.7.0, adds support for firmware 18.0.0
After a couple days of Nintendo releasing their 18.0.0 firmware update, @SciresM releases a brand new update to his Atmosphere NX custom firmware for the Nintendo...by ShadowOne333 -
96 replies
The first retro emulator hits Apple's App Store, but you should probably avoid it
With Apple having recently updated their guidelines for the App Store, iOS users have been left to speculate on specific wording and whether retro emulators as we...by Scarlet -
95 replies
Delta emulator now available on the App Store for iOS
The time has finally come, and after many, many years (if not decades) of Apple users having to side load emulator apps into their iOS devices through unofficial...by ShadowOne333 -
66 replies
Pokemon fangame hosting website "Relic Castle" taken down by The Pokemon Company
Yet another casualty goes down in the never-ending battle of copyright enforcement, and this time, it hit a big website which was the host for many fangames based and...by ShadowOne333 -
57 replies
Nintendo Switch firmware update 18.0.1 has been released
A new Nintendo Switch firmware update is here. System software version 18.0.1 has been released. This update offers the typical stability features as all other...by Chary -
54 replies
MisterFPGA has been updated to include an official release for its Nintendo 64 core
The highly popular and accurate FPGA hardware, MisterFGPA, has received today a brand new update with a long-awaited feature, or rather, a new core for hardcore...by ShadowOne333 -
53 replies
Nintendo "Indie World" stream announced for April 17th, 2024
Nintendo has recently announced through their social media accounts that a new Indie World stream will be airing tomorrow, scheduled for April 17th, 2024 at 7 a.m. PT...by ShadowOne333
-