Hacking SNEEK+DI quick guide

W hat

Rhythm Heaven Fan
Member
Joined
Feb 28, 2007
Messages
632
Trophies
1
XP
697
Country
United States
I knew that much - the U[SB] vs. D. I was wondering if there was any other differences.

How can I run SNEEK+DI? I followed the first post. I used Sneek installer and "
How To Achieve a NAND for use with SNEEK", but with mrplowdan's suggestions on better wads to use. Now what? Looks like I should compile SNEEK, then put the files I need on SD*. I also need a FST dump of a game at USB:\games\xxxx01\. Then do I boot my Wii with the SD card + USB drive inside?

*Or do I? My guess is I'm going to need to compile Sneek...
longtom1 said:
Are you using the sneekinstaller or compiling from svn???
Sorry for all of the questions, I really appreciate the help. [Well, I sure hope JCPenney's accepts really appreciate it's.]
 

ChokeD

The Contributor
OP
Member
Joined
Jul 18, 2009
Messages
968
Trophies
0
XP
168
Country
United States
To get the cheater menu you will have to alter the smenu.c in the es module where pune showed you and compile your own SNEEK+DI OR UNEEK+DI, but to do that you need to do this,

<!--sizeo:4--><span style="font-size:14pt;line-height:100%"><!--/sizeo--><b><!--coloro:#0000FF--><span style="color:#0000FF"><!--/coloro-->How to compile SNEEK2+DI (SNEEK)(UNEEK)(UNEEK+DI) source on Windows for 4.2 SM<!--colorc--></span><!--/colorc--></b>.<!--sizec--></span><!--/sizec-->
<!--coloro:#0000FF--><span style="color:#0000FF"><!--/coloro--><!--sizeo:3--><span style="font-size:12pt;line-height:100%"><!--/sizeo--><u>Programs needed to compile SNEEK</u><!--sizec--></span><!--/sizec--><!--colorc--></span><!--/colorc-->:
<b>Install to C:\</b>
<a href="http://www.sliksvn.com/en/download/" target="_blank">sliksvn</a>
<a href="http://sourceforge.net/projects/devkitpro/files/Automated%20Installer/" target="_blank">devkitProUpdater-1.5.0</a>
<a href="http://www.python.org/download/" target="_blank">Latest build of Python</a>
<a href="http://www.microsoft.com/downloads/details.aspx?FamilyID=a7b7a05e-6de6-4d3a-a423-37bf0912db84&displaylang=en" target="_blank">Microsoft Visual C++ 2010 Redistributable Package</a>
<a href="http://wiibrew.org/wiki/NUS_Downloader" target="_blank">NUS Downloader</a>
<a href="http://www.mediafire.com/?sharekey=46c3ba21fc211ac40c814df2efeadc50bf7220439206af8579b5ba589d1986ba" target="_blank">MakeKeyBin1.1</a>(use this with NUS Downloader)
====================================
<a href="http://www.mediafire.com/?sharekey=46c3ba21fc211ac40c814df2efeadc50bf7220439206af8579b5ba589d1986ba" target="_blank">Mirror for all legal files. Check here if any links are broken in this thread, I may have a backup of it stored here.</a>
====================================
<!--coloro:#0000FF--><span style="color:#0000FF"><!--/coloro--><!--sizeo:3--><span style="font-size:12pt;line-height:100%"><!--/sizeo--><u>Acquiring the IOS80-v6943 0000000e.app and IOS60-v6174 00000001.app files using NUS Downloader and the key.bin file</u><!--sizec--></span><!--/sizec--><!--colorc--></span><!--/colorc-->
use MakeKeyBin to generate a key.bin and place it in the same directory as NUS Downloader.
<img src="http://i128.photobucket.com/albums/p169/ChokeDYou/makekeybin.jpg" border="0" class="linked-image" /><img src="http://i128.photobucket.com/albums/p169/ChokeDYou/makekeybindone.jpg" border="0" class="linked-image" />
make sure in NUS you have the <b>Decrypt box checked</b> (if it does not give you a decrypt box you do not have a proper key.bin or the key.bin is not in the proper directory with NUSD)
<b>go to the Database box to find the specific IOS you need.</b>
<img src="http://i128.photobucket.com/albums/p169/ChokeDYou/ios80.jpg" border="0" class="linked-image" /><img src="http://i128.photobucket.com/albums/p169/ChokeDYou/ios60-1.jpg" border="0" class="linked-image" />
<img src="http://i128.photobucket.com/albums/p169/ChokeDYou/ios80_eapp.jpg" border="0" class="linked-image" /><img src="http://i128.photobucket.com/albums/p169/ChokeDYou/ios60_1app.jpg" border="0" class="linked-image" />
<b><!--sizeo:3--><span style="font-size:12pt;line-height:100%"><!--/sizeo-->place the 0000000e.app and 00000001.app files located here,
in the c:\sneek folder before attempting to compile SNEEK.<!--sizec--></span><!--/sizec--></b>
===================================
<!--coloro:#0000FF--><span style="color:#0000FF"><!--/coloro--><!--sizeo:3--><span style="font-size:12pt;line-height:100%"><!--/sizeo--><u>This is <!--coloro:#FF0000--><span style="color:#FF0000"><!--/coloro-->Not<!--colorc--></span><!--/colorc--> a requirement</u><!--sizec--></span><!--/sizec--><!--colorc--></span><!--/colorc-->
However, if you would like to compile your own armboot.bin, follow these directions:
Go to your Control Panel
click System
click Advanced system settings
click Environment Variables
scroll down to Path
highlight Path and click Edit
being careful not to delete anything
enter in the list after any <b>;</b> <b>(my install directory happens to be)</b>
<b>c:\Python26;</b>
example:
<!--c1--><div class='codetop'>CODE</div><div class='codemain'><!--ec1-->c:\devkitPro\msys\bin;c:\Python26;C:\Program Files\SlikSvn\bin\<!--c2--></div><!--ec2-->
the armboot.bin can now be found in the \sneek\mini-tree-mod folder
after compiling sneek
if you choose not to do this you can proceed below
<img src="http://i128.photobucket.com/albums/p169/ChokeDYou/EnvironmentVariables.jpg" border="0" class="linked-image" />
<!--coloro:#0000FF--><span style="color:#0000FF"><!--/coloro--><!--sizeo:3--><span style="font-size:12pt;line-height:100%"><!--/sizeo--><u>grab the armboot.bin from here if you chose not to do the above</u><!--sizec--></span><!--/sizec--><!--colorc--></span><!--/colorc-->:
<a href="http://code.google.com/p/sneek/" target="_blank">armboot.bin</a>
place it in your x:/bootmii folder
===================================
<!--coloro:#0000FF--><span style="color:#0000FF"><!--/coloro--><!--sizeo:3--><span style="font-size:12pt;line-height:100%"><!--/sizeo--><u>Finding a command prompt</u><!--sizec--></span><!--/sizec--><!--colorc--></span><!--/colorc-->
go to your start button and click run and type cmd and hit enter
this will bring up a command prompt
it should read c:\user\nameofurcpu>
===================================
<!--coloro:#FF0000--><span style="color:#FF0000"><!--/coloro-->If it has a different letter there<!--colorc--></span><!--/colorc-->, just type in <!--sizeo:2--><span style="font-size:10pt;line-height:100%"><!--/sizeo-->c:<!--sizec--></span><!--/sizec--> and hit enter
===================================
<!--coloro:#0000FF--><span style="color:#0000FF"><!--/coloro--><u><!--sizeo:3--><span style="font-size:12pt;line-height:100%"><!--/sizeo-->type this in the command prompt<!--sizec--></span><!--/sizec--></u><!--colorc--></span><!--/colorc-->:
<!--c1--><div class='codetop'>CODE</div><div class='codemain'><!--ec1-->cd c:\<!--c2--></div><!--ec2-->
then hit enter
your command prompt should read:
c:\>
===================================
<!--coloro:#0000FF--><span style="color:#0000FF"><!--/coloro--><!--sizeo:3--><span style="font-size:12pt;line-height:100%"><!--/sizeo--><u>Downloading SNEEK source</u><!--sizec--></span><!--/sizec--><!--colorc--></span><!--/colorc-->
type in the command prompt or copy and paste this in the window:
<!--c1--><div class='codetop'>CODE</div><div class='codemain'><!--ec1-->svn checkout http://sneek.googlecode.com/svn/trunk/ sneek<!--c2--></div><!--ec2-->
hit enter
You will now have a copy of SNEEK2 source located at c:/sneek
===================================
<!--coloro:#0000FF--><span style="color:#0000FF"><!--/coloro--><!--sizeo:3--><span style="font-size:12pt;line-height:100%"><!--/sizeo--><u>Compiling SNEEK</u><!--sizec--></span><!--/sizec--><!--colorc--></span><!--/colorc-->
now type in the command prompt:
<!--c1--><div class='codetop'>CODE</div><div class='codemain'><!--ec1-->cd sneek<!--c2--></div><!--ec2-->
hit enter,
your command prompt should now read
c:\sneek>
Now type in the command prompt
<!--c1--><div class='codetop'>CODE</div><div class='codemain'><!--ec1-->build_boot2.cmd<!--c2--></div><!--ec2-->
hit enter,
wait patiently and if all goes well you should have your SNEEK2 files in the c:\sneek folder
===================================
<!--coloro:#0000FF--><span style="color:#0000FF"><!--/coloro--><!--sizeo:3--><span style="font-size:12pt;line-height:100%"><!--/sizeo--><u>Files created in the c:\sneek folder</u><!--sizec--></span><!--/sizec--><!--colorc--></span><!--/colorc-->
boot2_di.bin = sdcard as nand (with DI module)(NO DVD DRIVE SUPPORT) SNEEK+DI
boot2_sd.bin = sdcard as nand (no DI)(DVD DRIVE SUPPORT) SNEEK
boot2_usb.bin = USB as nand (no DI) UNEEK
boot2_usb.bin = USB as nand (with DI module) UNEEK+DI
di.bin = (usb module)

and this

<!--sizeo:3--><span style="font-size:12pt;line-height:100%"><!--/sizeo--><!--coloro:#0000FF--><span style="color:#0000FF"><!--/coloro--><u>How To Achieve a NAND for use with SNEEK</u><!--colorc--></span><!--/colorc--><!--sizec--></span><!--/sizec-->
<!--coloro:#FF0000--><span style="color:#FF0000"><!--/coloro-->UPDATED<!--colorc--></span><!--/colorc-->: For now this is the simplest way I know how people can build a 4.2 NAND for SNEEK.
<!--coloro:#0000FF--><span style="color:#0000FF"><!--/coloro--><!--sizeo:3--><span style="font-size:12pt;line-height:100%"><!--/sizeo--><u>How to get a virgin NAND using NUSAD and showmiiwads</u><!--sizec--></span><!--/sizec--><!--colorc--></span><!--/colorc-->:
1. Download "<a href="http://www.tinyurl.com/NusAuto" target="_blank">NUSAD</a>" and <a href="http://www.mediafire.com/?izx6xhag96frhji" target="_blank">NUSAD_Download_Cues_for_Sneek</a>.
2. Place your region cue in the NUSAD program folder.
3. Open NUSAD and type "I Agree" and hit enter.
4. Type "L" and hit enter.
5. Type "Y" hit enter.
6. All the IOS .wads you need will be found in the /COPY_TO_SD/WAD folder.
7. Open <a href="http://code.google.com/p/showmiiwads/" target="_blank">ShowMiiWads</a>
8. Create a blank folder on desktop (I named mine "Scratch 4.2U NAND")
9. Click on Options -> Change NAND backup path. Select the folder you just created.
10. Click View -> ShowMiiNAND (the program is now called "ShowMiiNand")
11. Drag all .wad files from COPY_TO_SD/WAD to ShowMiiNand.
12. At the bottom click install
13. copy your setting.txt from an actual dump to the title/00000001/00000002/data folder that was created in your "Scratch 4.2U NAND"
14. copy the four folders: title, ticket, sys, shared1 to the root of whatever device you are going to be using to host your NAND.
15. Launch SNEEK/UNEEK and it will be as if it is the first time you started your wii (in reality it is, and you may have to wait a couple minutes the first time you boot it up this time only)
(Thanks <!--coloro:#800080--><span style="color:#800080"><!--/coloro-->xFlak<!--colorc--></span><!--/colorc-->)
-------------------------------------------------------------------------------
or
-------------------------------------------------------------------------------
<!--coloro:#0000FF--><span style="color:#0000FF"><!--/coloro--><u><!--sizeo:3--><span style="font-size:12pt;line-height:100%"><!--/sizeo-->IOS and NAND Extraction Tools<!--sizec--></span><!--/sizec--></u><!--colorc--></span><!--/colorc-->
<a href="http://wiibrew.org/wiki/NUS_Downloader" target="_blank">NUS Downloader</a> (used to download the 000000XX.app files required for compiling SNEEK)
<a href="http://www.mediafire.com/?sharekey=46c3ba21fc211ac40c814df2efeadc50bf7220439206af8579b5ba589d1986ba" target="_blank">MakeKeyBin1.1</a>(use this with NUS Downloader)
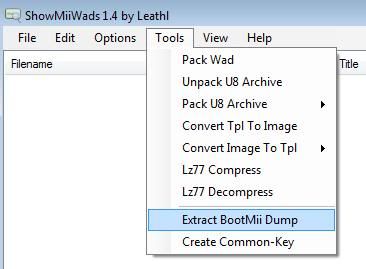
<a href="http://code.google.com/p/showmiiwads/" target="_blank">ShowMiiWads</a>(used to extract a Bootmii NAND.bin (backup of your Wii NAND) to be used with SNEEK)
<img src="http://i128.photobucket.com/albums/p169/ChokeDYou/showmiinand.jpg" border="0" class="linked-image" /><img src="http://i128.photobucket.com/albums/p169/ChokeDYou/extractbootmiinand.jpg" border="0" class="linked-image" />

and maybe this depending on which 1 you want SNEEK+DI or UNEEK+DI,

and this will tell you where to put all the files,

<!--sizeo:3--><span style="font-size:12pt;line-height:100%"><!--/sizeo--><!--coloro:#0000FF--><span style="color:#0000FF"><!--/coloro--><u>File Structure for SNEEK, SNEEK+DI, UNEEK and UNEEK+DI</u><!--colorc--></span><!--/colorc--><!--sizec--></span><!--/sizec-->.
<!--coloro:#0000FF--><span style="color:#0000FF"><!--/coloro--><!--sizeo:3--><span style="font-size:12pt;line-height:100%"><!--/sizeo--><u>Filestructure for SNEEK DI</u><!--sizec--></span><!--/sizec--><!--colorc--></span><!--/colorc-->:
sd:\bootmii\armboot.bin
sd:\sneek\di.bin
sd:\sneek\kernel.bin (renamed boot2_di.bin)
sd:\sneek\font.bin
NAND
sd:\import
sd:\meta
sd:\shared1
sd:\shared2
sd:\temp
sd:\title
sd:\ticket
sd:\sys

usb:\games\a_game example: usb:\games\RMGE01
----------------------------------------------------------------
<!--coloro:#0000FF--><span style="color:#0000FF"><!--/coloro--><!--sizeo:3--><span style="font-size:12pt;line-height:100%"><!--/sizeo--><u>Filestructure for SNEEK</u><!--sizec--></span><!--/sizec--><!--colorc--></span><!--/colorc-->:
sd:\bootmii\armboot.bin
sd:\sneek\kernel.bin (boot2_sd.bin)
NAND
sd:\import
sd:\meta
sd:\shared1
sd:\shared2
sd:\temp
sd:\title
sd:\ticket
sd:\sys

usb:\games\a_game example: usb:\games\RMGE01
-----------------------------------------------------------------
<!--coloro:#0000FF--><span style="color:#0000FF"><!--/coloro--><!--sizeo:3--><span style="font-size:12pt;line-height:100%"><!--/sizeo--><u>Filestructure for UNEEK</u><!--sizec--></span><!--/sizec--><!--colorc--></span><!--/colorc-->:
sd:\bootmii\armboot.bin
sd:\sneek\kernel.bin (boot2_usb.bin)

usb:\sneek\kernel.bin (boot2_usb.bin)
NAND
usb:\import
usb:\meta
usb:\shared1
usb:\shared2
usb:\temp
usb:\title
usb:\ticket
usb:\sys

usb:\games\a_game example: usb:\games\RMGE01
-----------------------------------------------------------------
<!--coloro:#0000FF--><span style="color:#0000FF"><!--/coloro--><!--sizeo:3--><span style="font-size:12pt;line-height:100%"><!--/sizeo--><u>Filestructure for UNEEK+DI</u><!--sizec--></span><!--/sizec--><!--colorc--></span><!--/colorc-->:
sd:/bootmii/armboot.bin
sd:/sneek/kernel.bin (renamed boot2_usb.bin)

usb:/sneek/di.bin
usb:/sneek/kernel.bin (renamed boot2_usb.bin)
usb:/sneek/font.bin
NAND
usb:\import
usb:\meta
usb:\shared1
usb:\shared2
usb:\temp
usb:\title
usb:\ticket
usb:\sys

usb:\games\a_game example: usb:\games\RMGE01

Place files respectively and <!--sizeo:3--><span style="font-size:12pt;line-height:100%"><!--/sizeo--><!--coloro:#0000FF--><span style="color:#0000FF"><!--/coloro-->boot your wii<!--colorc--></span><!--/colorc--><!--sizec--></span><!--/sizec-->

and this will help you prepare a Wii.iso for SNEEK+DI or UNEEK+DI.

<!--sizeo:3--><span style="font-size:12pt;line-height:100%"><!--/sizeo--><!--coloro:#0000FF--><span style="color:#0000FF"><!--/coloro--><u>Wii Game File and Folder Structure & Identifying required IOS. </u><!--colorc--></span><!--/colorc--><!--sizec--></span><!--/sizec-->
<!--sizeo:3--><span style="font-size:12pt;line-height:100%"><!--/sizeo--><!--coloro:#0000FF--><span style="color:#0000FF"><!--/coloro--><u>Wii Game File and Folder Structure</u><!--colorc--></span><!--/colorc--><!--sizec--></span><!--/sizec-->

1.) Download <a href="http://code.google.com/p/sneek/downloads/list" target="_blank">DiscEX-v0.5-cred.rar</a> or the latest DiscEX by crediar and extract to c:/DiscEX

2.) Find a command prompt (Start --> Run --> Type: <b>cmd</b> and press enter.

3.) Change the directory to where DiscEX is located. (For me it is on the root of my "C" drive) Therefore, I would type this:

<!--c1--><div class='codetop'>CODE</div><div class='codemain'><!--ec1-->cd c:\<!--c2--></div><!--ec2-->

4.) Then type this to change the directory to DiscEx,

<!--c1--><div class='codetop'>CODE</div><div class='codemain'><!--ec1-->cd DiscEX<!--c2--></div><!--ec2-->

5.) Make sure you have a game, example: ssbb.iso in the same folder as /DiscEX and type,

<!--c1--><div class='codetop'>CODE</div><div class='codemain'><!--ec1-->DiscEx ssbb.iso<!--c2--></div><!--ec2-->

6.) Hit enter and wait.

7.) When complete copy the folder to where your games will be and place it in the /games folder.

On a <b>FAT32</b>, <b>32KB clusters</b>, <b>Primary</b>, <b>Active</b> USB:

usb:/games/CODMW2/files/ (a lot of files....)
usb:/games/CODMW2/sys/main.dol
usb:/games/CODMW2/sys/apploader.img
usb:/games/CODMW2/sys/fst.bin
usb:/games/CODMW2/sys/boot.bin
usb:/games/CODMW2/sys/bi2.bin
usb:/games/CODMW2/ticket.bin
usb:/games/CODMW2/cert.bin
usb:/games/CODMW2/tmd.bin
--------------------------------------------------------------------
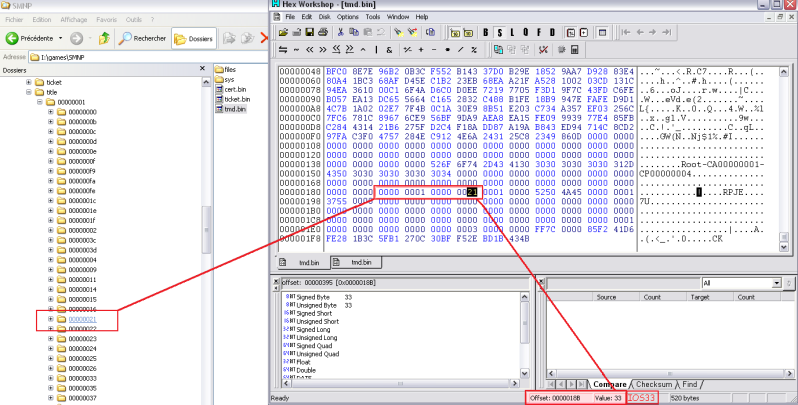
<!--sizeo:3--><span style="font-size:12pt;line-height:100%"><!--/sizeo--><!--coloro:#0000FF--><span style="color:#0000FF"><!--/coloro--><u> Identifying required IOS for sneek per Wii game.iso</u><!--colorc--></span><!--/colorc--><!--sizec--></span><!--/sizec-->

1.) Open tmd.bin in a hex editor

2.) Look at offset 0x018B.

3.)Convert the value from hexadecimal to decimal to obtain the IOS number.

You can verify in sneek nand, by looking at the same folder name 00000001/000000xx/

<img src="http://i128.photobucket.com/albums/p169/ChokeDYou/tmdbinIOSneededhexeditor.png" border="0" class="linked-image" />
======================================
<!--sizeo:5--><span style="font-size:18pt;line-height:100%"><!--/sizeo--><b><!--coloro:#FF0000--><span style="color:#FF0000"><!--/coloro-->NOT SUPPORTED AT THIS TIME<!--colorc--></span><!--/colorc--></b><!--sizec--></span><!--/sizec-->
<!--sizeo:3--><span style="font-size:12pt;line-height:100%"><!--/sizeo--><!--coloro:#0000FF--><span style="color:#0000FF"><!--/coloro--><u>GC Game File and Folder Structure</u><!--colorc--></span><!--/colorc--><!--sizec--></span><!--/sizec-->
Use <a href="http://wiki.gbatemp.net/wiki/index.php?title=GC-Tool" target="_blank">GC-Tool</a> to extract GC games.
"AppLoader.ldr" -> apploader.img
"Game.toc" -> fst.bin
"ISO.hdr" -> this file seems to be boot.bin with bi2.bin you have to devide it. first 0x440 bytes boot.bin, then the next 0x2000 bytes for the bi2.bin
"Start.dol" -> main.dol

Hope that helps
 

XFlak

Wiitired but still kicking
Member
Joined
Sep 12, 2009
Messages
13,794
Trophies
3
Age
38
Location
Cyprus, originally from Toronto
Website
modmii.github.io
XP
9,777
Country
Cyprus
Sup ChokeD, I just released the new NUSAD! You can update your SNEEK guides whenever you like! No more need to use the sneek download queues!
biggrin.gif
 

ChokeD

The Contributor
OP
Member
Joined
Jul 18, 2009
Messages
968
Trophies
0
XP
168
Country
United States
Nice, I'll get right on that. People are going to be AMAZED. Nice work as always XFlak.

EDIT: As 1 of the beta testers for NUSAD I can tell you people you better get this new release and explore all your options. RIGHT NOW !!!!
 

Wiimm

Developer
Member
Joined
Aug 11, 2009
Messages
2,292
Trophies
1
Location
Germany
Website
wiimmfi.de
XP
1,519
Country
Germany
ChokeD said:
Identifying required IOS for sneek per Wii game.iso

1.) Open tmd.bin in a hex editor

2.) Look at offset 0x018B.

3.)Convert the value from hexadecimal to decimal to obtain the IOS number.
Or use wit: wit dump tmd.bin
It prints something like:
CODEDump of file tmd.bin

ÂÂReal path:ÂÂÂÂÂÂ .../tmd.bin
ÂÂID & type:ÂÂÂÂÂÂ RTYP, TMD.BIN
ÂÂFile size:ÂÂÂÂÂÂÂÂÂÂÂÂ 208/hex =ÂÂÂÂÂÂÂÂ520 =ÂÂÂÂ0 MiB

ÂÂIssuer:ÂÂÂÂÂÂÂÂÂÂRoot-CA00000001-CP00000004
ÂÂSignature type:ÂÂÂÂÂÂ10001/hex =ÂÂÂÂÂÂ65537
ÂÂVersion:ÂÂÂÂÂÂÂÂÂÂÂÂÂÂÂÂ 0
ÂÂCA version:ÂÂÂÂÂÂÂÂÂÂÂÂÂÂ0
ÂÂSigner version:ÂÂÂÂÂÂÂÂÂÂ0
ÂÂSystem version:ÂÂ00000001 00000023 = IOS 35 = IOS 0x23
ÂÂTitle ID:ÂÂÂÂÂÂÂÂ00010000 52545950 = '....RTYP'
ÂÂTitle type:ÂÂÂÂÂÂÂÂÂÂÂÂÂÂ1/hex =ÂÂÂÂÂÂÂÂÂÂ1
ÂÂGroup ID:ÂÂÂÂÂÂÂÂÂÂÂÂ 3031/hex =ÂÂÂÂÂÂ12337
ÂÂAccess rights:ÂÂÂÂÂÂÂÂÂÂ 0/hex =ÂÂÂÂÂÂÂÂÂÂ0
ÂÂTitle version:ÂÂÂÂÂÂÂÂÂÂ 0/hex =ÂÂÂÂÂÂÂÂÂÂ0
ÂÂBoot index:ÂÂÂÂÂÂÂÂÂÂÂÂÂÂ0/hex =ÂÂÂÂÂÂÂÂÂÂ0
ÂÂN(content):ÂÂÂÂÂÂÂÂÂÂÂÂÂÂ1/hex =ÂÂÂÂÂÂÂÂÂÂ1
ÂÂContent #0, ID:ÂÂÂÂÂÂÂÂÂÂ0/hex =ÂÂÂÂÂÂÂÂÂÂ0
ÂÂContent #0, index:ÂÂÂÂÂÂ 0/hex =ÂÂÂÂÂÂÂÂÂÂ0
ÂÂContent #0, type:ÂÂÂÂÂÂÂÂ3/hex =ÂÂÂÂÂÂÂÂÂÂ3
ÂÂContent #0, size: ff7c0000/hex = 4286316544
ÂÂContent #0, hash: 144e3e81 47c6ab29 2190b5a8 c4b1ccc9 633ed047
 

ChokeD

The Contributor
OP
Member
Joined
Jul 18, 2009
Messages
968
Trophies
0
XP
168
Country
United States
Thanks for the reply wiimm, I might use that. I've been watching your tools progress along with Qt and I've used wit a few times but I got to admit I'm not so much a command line kind of guy. I really wish someone would make a fully featured GUI for your tools. I can't express how useful that would be to others and myself as I know I have stuff backed up as wbfs and iso and SNEEK format whatever people are calling that kind of file/folder structure. So I have a lot of different applications I could use a GUI for. I'm not lazy, I just have so much going on with real life AND cyber life I can't for the lifes of me remember any more commands.
smile.gif


Many props to ya though, you do good work and thanks for stopping by with info.
 

ChokeD

The Contributor
OP
Member
Joined
Jul 18, 2009
Messages
968
Trophies
0
XP
168
Country
United States
These spoilers have totally been revamped and there are more to follow in the near future.

The guide is getting a facelift. <img src="style_emoticons/<#EMO_DIR#>/smile.gif" style="vertical-align:middle" emoid=":)" border="0" alt="smile.gif" />

<!--sizeo:4--><span style="font-size:14pt;line-height:100%"><!--/sizeo--><b><!--coloro:#0000FF--><span style="color:#0000FF"><!--/coloro-->How to compile SNEEK2+DI (SNEEK)(UNEEK)(UNEEK+DI) source on Windows <!--colorc--></span><!--/colorc--></b>.<!--sizec--></span><!--/sizec-->
<u>Required:</u>
* sliksvn
* devkitProUpdater-1.5.0
* Latest build of Python
* Microsoft Visual C++ 2010 Redistributable Package (needed to avoid possible msvcr100.dll error)
* NUS Downloader
* MakeKeyBin1.1

<u>Links:</u>
sliksvn: <a href="http://www.sliksvn.com/en/download/" target="_blank">http://www.sliksvn.com/en/download/</a>
devkitProUpdater-1.5.0: <a href="http://sourceforge.net/projects/devkitpro/files/Automated%20Installer/" target="_blank">http://sourceforge.net/projects/devkitpro/...ed%20Installer/</a>
Latest build of Python: <a href="http://www.python.org/download/" target="_blank">http://www.python.org/download/</a>
Microsoft Visual C++ 2010 Redistributable Package: <a href="http://www.microsoft.com/downloads/details.aspx?FamilyID=a7b7a05e-6de6-4d3a-a423-37bf0912db84&displaylang=en" target="_blank">http://www.microsoft.com/downloads/details...;displaylang=en</a>
NUS Downloader: <a href="http://wiibrew.org/wiki/NUS_Downloader" target="_blank">http://wiibrew.org/wiki/NUS_Downloader</a>
MakeKeyBin1.1 <a href="http://www.mediafire.com/?tizymvwrkhm" target="_blank">http://www.mediafire.com/?tizymvwrkhm</a>

Install all the above programs to C:/

After installing all the programs above, Follow the guide below.

<u>Guide:</u>

<b>1.</b> Acquire the IOS80-v6943 0000000e.app and IOS60-v6174 00000001.app files using NUS Downloader and the key.bin file

<b>1a.</b> Use MakeKeyBin to generate a key.bin and place it in the same directory as NUS Downloader.

<img src="http://i128.photobucket.com/albums/p169/ChokeDYou/makekeybin.jpg" border="0" class="linked-image" /><img src="http://i128.photobucket.com/albums/p169/ChokeDYou/makekeybindone.jpg" border="0" class="linked-image" />

<b>1b.</b> Place the key.bin in the same directory as NUSD

<b>2.</b> Open NUSD

<b>2a.</b> Make sure in NUSD you have the Decrypt box checked, (if it does not give you a decrypt box you do not have a proper key.bin or the key.bin is not in the
proper directory with NUSD)

<b>2b.</b> Go to the Database box to find the specific IOS you need as stated above or as in the pics below.

<b>2c.</b> Click "Start NUS Download"

<img src="http://i128.photobucket.com/albums/p169/ChokeDYou/ios80.jpg" border="0" class="linked-image" /><img src="http://i128.photobucket.com/albums/p169/ChokeDYou/ios60-1.jpg" border="0" class="linked-image" />

<b>3.</b> Place the 0000000e.app and 00000001.app files located below, in the c:\sneek folder before attempting to compile SNEEK.

<img src="http://i128.photobucket.com/albums/p169/ChokeDYou/ios80_eapp.jpg" border="0" class="linked-image" /><img src="http://i128.photobucket.com/albums/p169/ChokeDYou/ios60_1app.jpg" border="0" class="linked-image" />

<b>4.</b> Find a command prompt

<b>4a.</b> Go to start --> Run --> Type: <b>cmd</b> and hit enter, this will bring up a command prompt it should read:

c:\user\nameofurcpu> <!--coloro:#FF0000--><span style="color:#FF0000"><!--/coloro-->NOTE<!--colorc--></span><!--/colorc-->: If it has a different letter there, just type in <b>c:</b> and hit enter

<b>5.</b> Type this in the command prompt

<b>cd c:\</b>

<b>5a.</b> Hit enter,

your command prompt should read:

c:\>

<b>6.</b> Downloading SNEEK source

<b>6a.</b> Type in the command prompt or copy and paste this in the window:

<!--c1--><div class='codetop'>CODE</div><div class='codemain'><!--ec1-->svn checkout http://sneek.googlecode.com/svn/trunk/ sneek<!--c2--></div><!--ec2-->

<b>6b.</b> Hit enter and wait.

You will now have a copy of SNEEK2 source located at c:/sneek
-----------------------------------------------------------------------------------------------------------------
<!--coloro:#FF0000--><span style="color:#FF0000"><!--/coloro--><b><u>This is Not a requirement</u></b><!--colorc--></span><!--/colorc-->

If you choose not to do this you can <b>proceed to step 8</b>. found below.

However, if you would like to compile your own armboot.bin proceed to <b>step 7.</b>
-----------------------------------------------------------------------------------------------------------------
<b>7.</b> Go to your Control Panel --> System --> Advanced System Settings --> Environment Variables

<b>7a.</b> Scroll down and highlight "Path", then click "Edit".

<b>7b.</b> Enter in the list after any "<b>;</b>"

<b>c:\Python26;</b>

example:

c:\devkitPro\msys\bin;<b>c:\Python26;</b>C:\Program Files\SlikSvn\bin\

<b>7c.</b> The armboot.bin will now be found in the \sneek\mini-tree-mod folder after compiling sneek

<img src="http://i128.photobucket.com/albums/p169/ChokeDYou/EnvironmentVariables.jpg" border="0" class="linked-image" />

<b>8.</b> Grab the armboot.bin from here if you didn't perform the above steps

Download armboot.bin: <a href="http://code.google.com/p/sneek/downloads/list" target="_blank">http://code.google.com/p/sneek/downloads/list</a>

<b>8a.</b> Place it in the x:/bootmii folder

<b>9.</b> Compiling SNEEK

<b>9a.</b> Type in the command prompt:

<b>cd sneek</b>

<b>9b.</b> Hit enter,

your command prompt should now read c:\sneek>

<b>10.</b> Type in the command prompt

<b>build_boot2.cmd</b>

<b>10a.</b> Hit enter and wait patiently .

If all goes well you should have your SNEEK2 files in the c:\sneek folder

<!--sizeo:4--><span style="font-size:14pt;line-height:100%"><!--/sizeo--><!--coloro:#DDA0DD--><span style="color:#DDA0DD"><!--/coloro-->Cong<!--colorc--></span><!--/colorc--><!--coloro:#FFFF00--><span style="color:#FFFF00"><!--/coloro-->radu<!--colorc--></span><!--/colorc--><!--coloro:#FF8C00--><span style="color:#FF8C00"><!--/coloro-->lati<!--colorc--></span><!--/colorc--><!--coloro:#FF0000--><span style="color:#FF0000"><!--/coloro-->ons<!--colorc--></span><!--/colorc--><!--sizec--></span><!--/sizec--> <img src="style_emoticons/<#EMO_DIR#>/smile.gif" style="vertical-align:middle" emoid=":)" border="0" alt="smile.gif" />


Files created in the c:\sneek folder:
boot2_di.bin = sdcard as nand (with DI module)(NO DVD DRIVE SUPPORT)(165KB) SNEEK+DI
boot2_sd.bin = sdcard as nand (no DI)(DVD DRIVE SUPPORT)(165KB) SNEEK
boot2_usb.bin = USB as nand (no DI)165KB) UNEEK
boot2_usb.bin = USB as nand (with DI module)(165KB) UNEEK+DI
di.bin = (usb module)(used for SNEEK+DI & UNEEK+DI)(33KB)

Files created in the c:\sneek\sneek\mini-tree-mod folder:
armboot.bin = All forms of SNEEK has same use in the same place with the same name.
<!--coloro:#0000FF--><span style="color:#0000FF"><!--/coloro--><u><!--sizeo:3--><span style="font-size:12pt;line-height:100%"><!--/sizeo-->How to use the SNEEKInstaller by crediar<!--sizec--></span><!--/sizec--></u><!--colorc--></span><!--/colorc-->
<u>Required:</u>
* Latest SNEEKInstaller by crediar: <a href="http://code.google.com/p/sneek/downloads/list" target="_blank">http://code.google.com/p/sneek/downloads/list</a>
* SD/USB which ever you are installing to.

<u>Guide:</u>

<b>1.</b> Download the latest SNEEKInstaller and extract the contents to your desktop.

<b>2.</b> Make a "New Folder" on your desktop.

<b>3.</b> Click on SNEEKInstaller, and when it opens,

<b>4.</b> Click the first "Browse" button and direct it to the "New Folder" you created.

<b>5.</b> Click the "Get Files" next to that "Browse" button on the left.

<b>6.</b> Click the 2nd "Browse" button below the first and direct it to the "New Folder" you created.

<b>7.</b> Click the "Get Files" next to that button.

<b>8.</b> Next, below that, you can either browse to the same "New Folder" or you can browse to where your SD is located, your choice.

<b>9.</b> Next, below that, if you are wanting to install UNEEK or UNEEK+DI, browse to the USB drive you will be using

<b>10.</b> On the right choose which SNEEK you would like to make

<b>11.</b> Next, click install.

SNEEK(DI)/UNEEK(DI) files can now be found in the "New Folder" or the SD/USB which ever you directed it to.

<img src="http://i128.photobucket.com/albums/p169/ChokeDYou/siv01b5.jpg" border="0" class="linked-image" />
<!--sizeo:3--><span style="font-size:12pt;line-height:100%"><!--/sizeo--><!--coloro:#0000FF--><span style="color:#0000FF"><!--/coloro--><u>How To Achieve a NAND for use with SNEEK</u><!--colorc--></span><!--/colorc--><!--sizec--></span><!--/sizec-->
<b>How to get a virgin NAND using NUSAD</b>

<u>Required:</u>
* NUSAD

<u>Links:</u>
NUSAD: <a href="http://gbatemp.net/t207126-nus-auto-downloader-for-windows" target="_blank">http://gbatemp.net/t207126-nus-auto-downloader-for-windows</a>

<u>Guide:</u>

<b>1.</b> Download "<a href="http://gbatemp.net/t207126-nus-auto-downloader-for-windows" target="_blank">NUSAD</a>" and extract to you desktop.

<b>2.</b> Click on NUSAD.exe and type "I Agree" and hit enter when it opens.

<b>3.</b> Type "S" and hit enter.

<b>4.</b> Type "2" hit enter.

<b>5.</b> Click "Enter"

<b>6.</b> Click "Enter"

<b>7.</b> Choose what region of NAND you would like to have "U" "E" "J" or "K" and click enter.

<b>8.</b> Choose which System Menu you would like to have "4.2" or "4.3" and click enter.

<b>9.</b> Type D and click enter (unless you would like to use your own setting.txt in which case either choice will work)

<b>10.</b> Choose whether to download Wii channels

<b>10a.</b> If you choose "Y" it will give you the option of which to download
<b>10b.</b> If you choose "N" none will be downloaded

<b>11.</b> After typing "N" in step "10" or after choosing which channels to download in step "10" type "Y" and hit enter.

<b>12.</b> When ShowMiiWads pops up, type "45e" and click "ok"

<b>13.</b> After NUSAD is done your brand new nand is built and in the NUSAD folder on your desktop.

<b>14.</b> Copy the four folders: title, ticket, sys, shared1 to the root of whatever device you are going to be using to host your NAND.

<b>15.</b> When you launch SNEEK/UNEEK it will be as if it is the first time you started your wii (you will have to wait a couple minutes the first time you boot it up this time only)

<!--coloro:#FF0000--><span style="color:#FF0000"><!--/coloro-->NOTE<!--colorc--></span><!--/colorc-->: You will be presented with a black screen for approximately 3-5 minutes upon first boot only.

(Thanks <!--coloro:#800080--><span style="color:#800080"><!--/coloro-->xFlak<!--colorc--></span><!--/colorc-->)
-------------------------------------------------------------------------------
or
-------------------------------------------------------------------------------
Alternative method below:

<b>Extracting a Bootmii NAND dump for use with SNEEK:</b>

<u>Required:</u>
* Bootmii NAND.bin
* ShowMiiWads

<u>Links:</u>
ShowMiiWads: <a href="http://code.google.com/p/showmiiwads/" target="_blank">http://code.google.com/p/showmiiwads/</a>

<u>Guide:</u>

<b>1.</b> Dump your Wii NAND with Bootmii.

<b>2.</b> Place the nand.bin in a folder on your desktop

<b>3.</b> Open "ShowMiiWads"

<b>4.</b> Select "Options" --> "Change NAND Backup Path"
<img src="http://i128.photobucket.com/albums/p169/ChokeDYou/showmiinand.jpg" border="0" class="linked-image" />

<b>5.</b> Select "Tools" --> "Extract Bootmii Dump" and browse to the nand.bin.

<img src="http://i128.photobucket.com/albums/p169/ChokeDYou/extractbootmiinand.jpg" border="0" class="linked-image" />

<b>6.</b> Copy all the folders in the nand-extracteda folder over to your SD/USB.
 

Cyan

GBATemp's lurking knight
Former Staff
Joined
Oct 27, 2002
Messages
23,749
Trophies
4
Age
45
Location
Engine room, learning
XP
15,648
Country
France
Much better looking with the spaces between section's number
smile.gif

Good work
yaywii.gif


About the GUI for Wit/wwt, there's already one (WiiJManager, Multi platform written in Java), but it's only for managing/transfering isos. It can even extract to Sneek format !
Maybe the developer could add more options later
wink.gif
 

ChokeD

The Contributor
OP
Member
Joined
Jul 18, 2009
Messages
968
Trophies
0
XP
168
Country
United States
Cyan said:
Much better looking with the spaces between section's number
smile.gif

Good work
yaywii.gif


About the GUI for Wit/wwt, there's already one (WiiJManager, Multi platform written in Java), but it's only for managing/transfering isos. It can even extract to Sneek format !
Maybe the developer could add more options later
wink.gif

Thanks for the comments about the guide, I've since got a few more done also.

Wii Game File and Folder Structure & Identifying required IOS.
Required:
* The Latest DiscEX by crediar
* Wii game in ISO format

Links:
Latest DiscEX by crediar: http://code.google.com/p/sneek/downloads/list

Guide:

1. Download DiscEX-v0.5-cred.rar or the latest DiscEX by crediar and extract to c:/DiscEX

2. Find a command prompt (Start --> Run --> Type: cmd and press enter.

3. Change the directory to where DiscEX is located. (For me it is on the root of my "C" drive) Therefore, I would type this:

cd c:\

4. Then type this to change the directory to DiscEx,

cd DiscEX

5. Make sure you have a game, example: ssbb.iso in the same folder as /DiscEX and type,

DiscEx ssbb.iso

6. Hit enter and wait.

7. When complete copy the folder to where your games will be and place it in the /games folder.

example: On a FAT32, 32KB clusters, Primary, Active SD/USB.

usb:/games/SSBB12/files/ (a lot of files....)
usb:/games/SSBB12/sys/main.dol
usb:/games/SSBB12/sys/apploader.img
usb:/games/SSBB12/sys/fst.bin
usb:/games/SSBB12/sys/boot.bin
usb:/games/SSBB12/sys/bi2.bin
usb:/games/SSBB12/ticket.bin
usb:/games/SSBB12/cert.bin
usb:/games/SSBB12/tmd.bin
--------------------------------------------------------------------
Identifying required IOS for sneek per Wii game.iso

1. Open tmd.bin in a hex editor

2. Look at offset 0x018B.

3. Convert the value from hexadecimal to decimal to obtain the IOS number.

You can verify in sneek nand, by looking at the same folder name 00000001/000000xx/

tmdbinIOSneededhexeditor.png
How to install HBC to SNEEK NAND

Required:
* WadCreator v1.1: http://www.mediafire.com/?n5yzmqjmwzd
* ShowMiiWads: http://code.google.com/p/showmiiwads/downloads/list

Guide:

1. Install HBC on your real nand 3.2x-4.3x

2. Use WadCreator v1.1 to extract HBC.wad from you Wii.

3. dump real nand using bootmii

4. Open showmiiwads, go to "tools/extract Bootmii nand" and select your nand.bin

extractbootmiinand-1.jpg


5. Go back to your VIRGIN Sneek nand, by selecting your sneek drive letter in "Options/Change NAND backup path"

6. Go to "View/ShowmiiNand"

showmiinand-2.jpg


7. Drag and Drop HBC.wad then at the bottom click "Install", and once installed close ShowmiiWads.

install.jpg


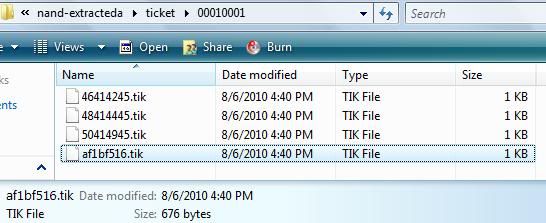
8. Then manually copy and replace your original Bootmii NAND/ticket/00010001/af1bf516.tik to Sneek NAND/ticket/00010001/af1bf516.tik

ticket.jpg


9. Your done. Test it on your Wii.

About Wiijmanager, it is outdated and zon7 (I believe is his name) has not updated it in a long time. There has been a lot of revisions to WIT since then. I'm following qt, the other gui for WIT, as giantpune is still building on it and makes commits to the source frequently.
 

W hat

Rhythm Heaven Fan
Member
Joined
Feb 28, 2007
Messages
632
Trophies
1
XP
697
Country
United States
Having trouble compiling SNEEK. What exactly do I do with NUSD?

"Acquiring the IOS80-v6943 0000000e.app and IOS60-v6174 00000001.app files using NUS Downloader and the key.bin file"

I don't know how to get these from NUSD (I have key.bin already).
 

ChokeD

The Contributor
OP
Member
Joined
Jul 18, 2009
Messages
968
Trophies
0
XP
168
Country
United States
W hat said:
Having trouble compiling SNEEK. What exactly do I do with NUSD?

"Acquiring the IOS80-v6943 0000000e.app and IOS60-v6174 00000001.app files using NUS Downloader and the key.bin file"

I don't know how to get these from NUSD (I have key.bin already).
Did you read the guide ??

It's the first 3 steps and the first 7-8 pictures of the guide, man if you can't figure that out on your own you are really going to have a hard time getting the cheater menu going.
 

fogbank

Well-Known Member
Member
Joined
Oct 28, 2008
Messages
413
Trophies
0
XP
56
Country
United States
W hat said:
Having trouble compiling SNEEK. What exactly do I do with NUSD?

"Acquiring the IOS80-v6943 0000000e.app and IOS60-v6174 00000001.app files using NUS Downloader and the key.bin file"

I don't know how to get these from NUSD (I have key.bin already).
Use NUSD to download the IOS files (IOS80v6943 and IOS60v6174). Make sure you select the option to decrypt them when downloading - this will result in the .app files being placed in the download folders.
 

W hat

Rhythm Heaven Fan
Member
Joined
Feb 28, 2007
Messages
632
Trophies
1
XP
697
Country
United States
ChokeD said:
W hat said:
Having trouble compiling SNEEK. What exactly do I do with NUSD?

"Acquiring the IOS80-v6943 0000000e.app and IOS60-v6174 00000001.app files using NUS Downloader and the key.bin file"

I don't know how to get these from NUSD (I have key.bin already).
Did you read the guide ??

It's the first 3 steps and the first 7-8 pictures of the guide, man if you can't figure that out on your own you are really going to have a hard time getting the cheater menu going.

I didn't know how to get .app files out of NUSD, having just used it to get .wad files. The guide's numbering sucks.

1. Acquire the IOS80-v6943 0000000e.app and IOS60-v6174 00000001.app files using NUS Downloader and the key.bin file
1a. Use MakeKeyBin to generate a key.bin and place it in the same directory as NUS Downloader.
1b. Place the key.bin in the same directory as NUSD
2. Open NUSD
2a. Make sure in NUSD you have the Decrypt box checked, (if it does not give you a decrypt box you do not have a proper key.bin or the key.bin is not in the
proper directory with NUSD)
2b. Go to the Database box to find the specific IOS you need as stated above or as in the pics below.
2c. Click "Start NUS Download"

Every one of those steps seems to be related to "Acquire the IOS80-v6943 0000000e.app and IOS60-v6174 00000001.app files using NUS Downloader and the key.bin file" and should be 1a-1f. A note about "decrypt" making .app files would be helpful as well.

fogbank said:
QUOTE(W hat @ Aug 13 2010, 12:08 PM)
Having trouble compiling SNEEK. What exactly do I do with NUSD?

"Acquiring the IOS80-v6943 0000000e.app and IOS60-v6174 00000001.app files using NUS Downloader and the key.bin file"

I don't know how to get these from NUSD (I have key.bin already).
Use NUSD to download the IOS files (IOS80v6943 and IOS60v6174). Make sure you select the option to decrypt them when downloading - this will result in the .app files being placed in the download folders.
Thank you.
 

ChokeD

The Contributor
OP
Member
Joined
Jul 18, 2009
Messages
968
Trophies
0
XP
168
Country
United States
W hat said:
A note about "decrypt" making .app files would be helpful as well.
DO YOU EVEN READ WHAT YOU COPY & PASTE ?????

2a. Make sure in NUSD you have the Decrypt box checked, (if it does not give you a decrypt box you do not have a proper key.bin or the key.bin is not in the
proper directory with NUSD)
 

g4jek8j54

Well-Known Member
Member
Joined
Aug 30, 2007
Messages
532
Trophies
0
Website
Visit site
XP
437
Country
United States
Just used this guide to set up UNEEK. I used SNEEK before, but UNEEK works much better for me.

One question that I have, which I don't see mentioned on the first post, is if it is possible to dump the Wii disc to USB using the Wii, and/or UNEEK/SNEEK, and if so, how? I do not have a DVD drive for my computer, so I doubt that I can dump them with that. Is it possible to use some other USB loader to dump Wii discs to my USB drive, and if so, could someone point me to some directions on this? Sorry if this has been asked before, but I am not too familiar with the various USB loaders for the Wii. Thanks in advance!

EDIT: Also, my USB drive was formatted from NTFS to FAT32. Will FAT32 be a suitable filesystem for storing Wii games?
 

Site & Scene News

Popular threads in this forum

General chit-chat
Help Users
  • BakerMan
    The snack that smiles back, Ballsack!
  • Psionic Roshambo @ Psionic Roshambo:
    I remember when the Atari 2600 was new and exciting lol
  • Psionic Roshambo @ Psionic Roshambo:
    It could get banned from PSN but you can change your ID I think?
  • Xdqwerty @ Xdqwerty:
    also gonna install twilight menu in my r4 flashcard
  • Psionic Roshambo @ Psionic Roshambo:
    One thing that just occurred to me.... The sound on the 2600 sucked less back then the harsh sound we hear now is from infinitely better speakers we have now, back when the 2600 was new speakers produced a almost muffled sound, like CRTs made old graphics look slightly better.
  • Psionic Roshambo @ Psionic Roshambo:
    I wonder if I could recommend that to some emulation devs that perhaps the sound could use some smoothing out to simulate those old TVs
  • Psionic Roshambo @ Psionic Roshambo:
    I think a few of the early systems could benefit from that, at least up to the 8 bit generation, by the 16 bit generation I think TVs had gotten a lot better in almost every way
  • Xdqwerty @ Xdqwerty:
    i dont have an sd card adapter but I have an usb sd card adapter
  • K3Nv2 @ K3Nv2:
    Old people games
  • Xdqwerty @ Xdqwerty:
    its not the one that comes with the r4
  • Xdqwerty @ Xdqwerty:
    doesnt work (my flashcard is from r4isdhc.com)
  • Xdqwerty @ Xdqwerty:
    might install ysmenu first
  • Psionic Roshambo @ Psionic Roshambo:
    Try Wood firmware
  • Psionic Roshambo @ Psionic Roshambo:
    For your R4
  • Psionic Roshambo @ Psionic Roshambo:
    It's old but it's the best firmware out for DS stuff
  • Xdqwerty @ Xdqwerty:
    it says it only works for the original R4, R4i Gold (r4ids.cn), R4iDSN (r4idsn.com) and Acekard R.P.G.
  • Xdqwerty @ Xdqwerty:
    nvm it does support mine
  • Xdqwerty @ Xdqwerty:
    but why choose it over ysmenu @Psionic Roshambo?
  • Xdqwerty @ Xdqwerty:
    bc im stupid?
  • Xdqwerty @ Xdqwerty:
    yea ik im stupid
  • Xdqwerty @ Xdqwerty:
    good night
  • Psionic Roshambo @ Psionic Roshambo:
    Just give it a try, but honestly if you have a 3DS you can play DS games without a card just off the internal SD card
  • Psionic Roshambo @ Psionic Roshambo:
    Slightly slower loading but a bit more convenient
  • BakerMan @ BakerMan:
    guys, my fuckin headphones have an out of place speaker
    BakerMan @ BakerMan: guys, my fuckin headphones have an out of place speaker