

Hardware Tutorial
Updated
Nintendo Switch EMMC nand upgrade guide
Originally written by Nathan Bunn
http://www.nathanbunn.com/NandUpgradeSteps/
archived version:
https://web.archive.org/web/20190310080832/http://www.nathanbunn.com/NandUpgradeSteps/
Paul’s guide did a great job on the hardware side, and in fact I ended up sending off to a pro to get the EMMC chipped switched over, so I wont go over that here. I will start this guide presuming you have a 256 EMMC already soldered onto your replacement daughter board.
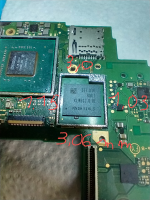
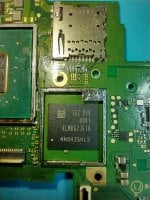
The 256GB chip I used is a sandisk model,sold as SDINBDA4-256G This was the only one I could find in stock, in single chip amounts.

I will also presume you understand switch CFM, RCM, payload sending etc, and have a working hekate SD card. There are great switch CFW setup guides out there already if not so I suggest you read them. I will also assume basic Linux Knowledge, I won’t go over making a Ubuntu Live USB, etc, but trust Google to help if anyone gets stuck.
Then put your switch back together again, following the iFixit guide in reverse.
Now remove your SD card and put it in your PC, copy boot0,1 and rawnand.bin into the backup/xxxx/restore folder. where xxxx is a random folder name for your switch.
The put the SD card back into the switch, and go to tools, restore, and restore boot0/1 and then restore rawnand.bin. This will take a while to copy over and then verify, get a cup of tea and come back later.
Once this process is finished, you can shutdown your switch, then try booting normally.
You should be able to load into the switch system, and all your data should be there, however the disk will still only show 26GB, like before, we need to expand the partition to fill the new drive. However since the drive is encrypted, we cannot just wipe it and remake it, we need to both expand the partition, and then format the partition inside the encryption to get the switch to see the new extended size.
For this process you need a linux PC/linux USB bootdisk (ubuntu recommended), and then a windows PC to open the encrypted partition and format it to FAT32.
You will also need the memloader payload, to make the switch emmc be seen over USB by the PC, and also later on hacdiskmount from the same site for windows.
First send the memloader payload to your switch as you normally would, the switch will show some text and offer options of what to mount.
to list all connected hardrives and storage media. Make a note of the letters available, /dev/sda, /dev/sdb etc.
Next connect your switch to the linux PC via USB, and using the volume keys on the switch highlight the EMMC option and press the power button to select and mount the EMMC partition on the linux machine.
Now run fdisk -l again to show all the hardrives connected to your PC, and notice which one of the same size as your new drive, was not there before. This is the drive you are working on, be very careful to get this right, as any mistake here can cause irreparable damage to your windows install. You are looking for the drive with 11 partitions, the first 9 being small, then one 2.5GB, then the final 11th being 26GB. All of type unknown. See a copy of my partition layout for the switch EMMC below.
For me this was /dev/sdb, for the rest of the guide i will write /dev/sdX to remind you to substitute whichever drive letter your switch was assigned.
this opens the gdisk application, and points it at your switch emmc. If you are offered the chance to correct the start position of the drive or the partition table, press y to accept.
Type i, enter, then 11 to show the information for the 11th partition on the drive. Including the GUID, and the unique GUID, we need to mirror all these fields exactly later. Copy all this information into a text editor for easier copy and pasting later.
Mine looked like this:
Next we need to delete the 11th partition, the user partition, don’t worry, this wont delete the data underneath (although remember you also have the backup of your nand anyway incase something goes wrong). In gdisk with your switch nand selected type:
to delete the partition. Then write these changes to the disk with
you will see the following warning: “Warning! Secondary header is placed too early on the disk! Do you want to correct this problem? (Y/N):” Enter y, then y again on the final check to write those changes to the disk.
We now need to refresh the partition layout with kpartx, so enter
*if you don't have kpartx you can install it by typing sudo apt install kpartx
which will refresh the partition layout, updating it with the new changes in size and layout.
Now re-enter gdisk, making sure to specify the switch emmc from before.
Now create a new partition, in the exact same place as the one we just deleted,
Command (? for help):
the tool will automatically use partition 11, and accept the default for start and end location, noting that the end location is now your new disk size, 6xxxxxx for 64gb, 11xxxxx for 128gb and 24xxxxxx for 240GB.
When prompted for the partition type, copy and paste the partition GUID we made a note of earlier. (not the one labeled unique GUID). The one that ends in (UNKNOWN). For me that was Partition GUID code: 2B777F63-E842-47AF-94C4-25A7F18B2280 (Unknown)
Now the new partition is created, we need to change the partitions unique GUID code back to the same as it was before, so the switch knows which partition to use. We do this by typing
x, to enter advanced mode, c for change partition GUID, and 11 for the USER partition we are working with. The prompt will change to
Enter the partition's new unique GUID ('R' to randomize):
and here we enter the unique GUID for the partition that we made a note of before. ( for me it is ‘Partition unique GUID: 5561E2C3-9B40-4D90-A546-20EB6C0151FC’)
*your actual number will be different, but in this example, it would be just 5561E2C3-9B40-4D90-A546-20EB6C0151FC
We also need to set the partition name, so press m for the main menu
then c for change partition name, 11 for the partition to change, and then set the name to USER in capital letters.
Finally we need to set the attributes for the partition, to set it back to system so that the switch won’t notice we were here. x for advanced, then a for attributes, and 11 to chose the partition, and then toggle attribute 0 to set the partition to system.
Toggle which attribute field (0-63, 64 or <Enter> to exit):
press enter to exit.
We are all done here, but finally we can print the partition information again with
and compare this with the values we saw originally, it should be identical except for the lat sector and partition size fields, which should represent the new size. If any of these are different go back now and double check your work until they match exactly. Once you are done enter w to write, and y that you are sure.
Now you can unplug your switch, press the power button for 5 seconds to exit memloader and then press the power button to boot your switch. It should boot normally into the switch OS, with all your saves and content preserved from before. ##If at this point you have any errors, or the switch won’t boot, go back and try the steps again right from restore your rawnand.bin, as if it wont boot correctly now, the next steps won’t fix that.
Now we need access to a windows PC with HacDiskMount and fat32format.exe.
In windows open HacDiskMount as administrator, click file and open physical drive.
Choose your switch drive, ignore the error that it does not seem like a full emmc dump.
You should see the 11 partitions listed here, click the USER partition we just remade, and you will see a prompt for encryption keys.
Take the bis_key_03 value from your prod.keys that you dumped earlier, and enter the left half on the top line, and the right half on the line below, then click test.
You should see a message that the was successful and the encryption was opened.
If you do not get a success message stop now, and double check/redump your prod.keys.
If you continue without opening the encryption you lose all your switch data.
Once the keys are verified, install the driver, and mount the drive to an empty drive letter.
In this example i will use the G: drive.
Open windows explorer and copy all the files from the G drive onto your local machine, this is a backup of your saves and settings, do not lose this.
Now we need to go to the location where fat32format.exe is located, run an administrator prompt and enter
This will wipe your switch user partition and reformat it, using the new partition data we created to give us the full size of the new USER partition.
Once this finished we now should see the new EMMC size in windows explorer for the G drive, and we can copy back our backup of the saves and settings we made before the format.
This copy is slow, and if it fails I recommend deleting all the files and re-copying folder by folder until it completes successfully.
Wait 30 seconds for any background file transfers to complete, then in HacDiskMount unmount the drive, and after a few seconds disconnect your switch.
Hold the power button on your switch for 5 seconds to exit memloader, then cross your fingers and press the power button, the switch should boot up normally, but in the settings menu, show your new EMMC size. Success!
If you get a black nintendo error screen, go back to the rawnand.bin stage and start the whole process again, it may take a couple of tries for the stars to align and every step to go flawlessly.
Enjoy your new switch storage space!
Originally Written on January 31, 2019
http://www.nathanbunn.com/NandUpgradeSteps/
archived version:
https://web.archive.org/web/20190310080832/http://www.nathanbunn.com/NandUpgradeSteps/
Nintendo Switch EMMC nand upgrade guide
First, Thanks to Paul for all his help and patience and the guide this is based and thanks to bnstemp from duowan for his additional work.Paul’s guide did a great job on the hardware side, and in fact I ended up sending off to a pro to get the EMMC chipped switched over, so I wont go over that here. I will start this guide presuming you have a 256 EMMC already soldered onto your replacement daughter board.
The 256GB chip I used is a sandisk model,sold as SDINBDA4-256G This was the only one I could find in stock, in single chip amounts.
I will also presume you understand switch CFM, RCM, payload sending etc, and have a working hekate SD card. There are great switch CFW setup guides out there already if not so I suggest you read them. I will also assume basic Linux Knowledge, I won’t go over making a Ubuntu Live USB, etc, but trust Google to help if anyone gets stuck.
Preparation
The first thing you need to do is make a full backup of your current EMMC. Boot into Hekate, and under tools - backup boot0/1 and raw nand onto your micro SD card. I recommend a 64GB+ micro SD here, so you get a nice single backup file, with plenty of space. You will also need to get your bis_key_03. This is a console specific key which you can get use lockpick, or biskeydump.bin from RCM mode and then opening the prod.keys file or similar on your PC. You need this to read the switch user partition from windows later on.Hardware
Open your switch, i followed the iFixit guide. Remove the back, then the SD card reader, and then the shiny metal shield under it, then you need simply need to use a plastic prying tool to lift up the EMMC board, careful as there is double sided tape holding it down, and replace it with your new board. I replaced the double sided tape too just incase.Then put your switch back together again, following the iFixit guide in reverse.
Software
Once you have it all back together, then boot Johns custom version of hakate, linked in the above guide, and under show hardware, check that EMMC is detected. This makes sure your soldering was good and the EMMC is working.Now remove your SD card and put it in your PC, copy boot0,1 and rawnand.bin into the backup/xxxx/restore folder. where xxxx is a random folder name for your switch.
The put the SD card back into the switch, and go to tools, restore, and restore boot0/1 and then restore rawnand.bin. This will take a while to copy over and then verify, get a cup of tea and come back later.
Once this process is finished, you can shutdown your switch, then try booting normally.
You should be able to load into the switch system, and all your data should be there, however the disk will still only show 26GB, like before, we need to expand the partition to fill the new drive. However since the drive is encrypted, we cannot just wipe it and remake it, we need to both expand the partition, and then format the partition inside the encryption to get the switch to see the new extended size.
For this process you need a linux PC/linux USB bootdisk (ubuntu recommended), and then a windows PC to open the encrypted partition and format it to FAT32.
You will also need the memloader payload, to make the switch emmc be seen over USB by the PC, and also later on hacdiskmount from the same site for windows.
First send the memloader payload to your switch as you normally would, the switch will show some text and offer options of what to mount.
On a Linux Machine.
Now boot into Linux, and open a root terminal. At the terminal typefdisk -l
to list all connected hardrives and storage media. Make a note of the letters available, /dev/sda, /dev/sdb etc.
Next connect your switch to the linux PC via USB, and using the volume keys on the switch highlight the EMMC option and press the power button to select and mount the EMMC partition on the linux machine.
Now run fdisk -l again to show all the hardrives connected to your PC, and notice which one of the same size as your new drive, was not there before. This is the drive you are working on, be very careful to get this right, as any mistake here can cause irreparable damage to your windows install. You are looking for the drive with 11 partitions, the first 9 being small, then one 2.5GB, then the final 11th being 26GB. All of type unknown. See a copy of my partition layout for the switch EMMC below.
Disk /dev/sdb: 233 GiB, 250148290560 bytes, 488570880 sectors
Units: sectors of 1 * 512 = 512 bytes
Sector size (logical/physical): 512 bytes / 512 bytes
I/O size (minimum/optimal): 512 bytes / 512 bytes
Disklabel type: gpt
Disk identifier: EDD7049E-B2D3-4067-B3D9-E5A8F398258F
Device Start End Sectors Size Type
/dev/sdb1 34 8191 8158 4M unknown
/dev/sdb2 8192 16383 8192 4M unknown
/dev/sdb3 16384 32767 16384 8M unknown
/dev/sdb4 32768 49151 16384 8M unknown
/dev/sdb5 49152 65535 16384 8M unknown
/dev/sdb6 65536 81919 16384 8M unknown
/dev/sdb7 81920 98303 16384 8M unknown
/dev/sdb8 98304 114687 16384 8M unknown
/dev/sdb9 114688 245759 131072 64M unknown
/dev/sdb10 245760 5488639 5242880 2.5G unknown
/dev/sdb11 5488640 60014591 54525952 26G unknown
For me this was /dev/sdb, for the rest of the guide i will write /dev/sdX to remind you to substitute whichever drive letter your switch was assigned.
gdisk /dev/sdX
this opens the gdisk application, and points it at your switch emmc. If you are offered the chance to correct the start position of the drive or the partition table, press y to accept.
i
11
Type i, enter, then 11 to show the information for the 11th partition on the drive. Including the GUID, and the unique GUID, we need to mirror all these fields exactly later. Copy all this information into a text editor for easier copy and pasting later.
Mine looked like this:
Partition number (1-11): 11
Partition GUID code: 2B777F63-E842-47AF-94C4-25A7F18B2280 (Unknown)
Partition unique GUID: 5561E2C3-9B40-4D90-A546-20EB6C0151FC
First sector: 5488640 (at 2.6 GiB)
Last sector: 60014591 (at 28.6 GiB)
Partition size: 54525952 sectors (26.0 GiB)
Attribute flags: 0000000000000001
Partition name: 'USER'
Next we need to delete the 11th partition, the user partition, don’t worry, this wont delete the data underneath (although remember you also have the backup of your nand anyway incase something goes wrong). In gdisk with your switch nand selected type:
d
11
to delete the partition. Then write these changes to the disk with
you will see the following warning: “Warning! Secondary header is placed too early on the disk! Do you want to correct this problem? (Y/N):” Enter y, then y again on the final check to write those changes to the disk.
We now need to refresh the partition layout with kpartx, so enter
kpartx /dev/sdX
*if you don't have kpartx you can install it by typing sudo apt install kpartx
which will refresh the partition layout, updating it with the new changes in size and layout.
Now re-enter gdisk, making sure to specify the switch emmc from before.
gdisk /dev/sdX
Now create a new partition, in the exact same place as the one we just deleted,
Command (? for help):
the tool will automatically use partition 11, and accept the default for start and end location, noting that the end location is now your new disk size, 6xxxxxx for 64gb, 11xxxxx for 128gb and 24xxxxxx for 240GB.
When prompted for the partition type, copy and paste the partition GUID we made a note of earlier. (not the one labeled unique GUID). The one that ends in (UNKNOWN). For me that was Partition GUID code: 2B777F63-E842-47AF-94C4-25A7F18B2280 (Unknown)
Now the new partition is created, we need to change the partitions unique GUID code back to the same as it was before, so the switch knows which partition to use. We do this by typing
x
c
11
x, to enter advanced mode, c for change partition GUID, and 11 for the USER partition we are working with. The prompt will change to
Enter the partition's new unique GUID ('R' to randomize):
and here we enter the unique GUID for the partition that we made a note of before. ( for me it is ‘Partition unique GUID: 5561E2C3-9B40-4D90-A546-20EB6C0151FC’)
*your actual number will be different, but in this example, it would be just 5561E2C3-9B40-4D90-A546-20EB6C0151FC
We also need to set the partition name, so press m for the main menu
then c for change partition name, 11 for the partition to change, and then set the name to USER in capital letters.
c
11
USER
Finally we need to set the attributes for the partition, to set it back to system so that the switch won’t notice we were here. x for advanced, then a for attributes, and 11 to chose the partition, and then toggle attribute 0 to set the partition to system.
Expert command (? for help): a
Partition number (1-11): 11
Known attributes are:
0: system partition
1: hide from EFI
2: legacy BIOS bootable
60: read-only
62: hidden
63: do not automount
Attribute value is 0000000000000000. Set fields are:
No fields set
Toggle which attribute field (0-63, 64 or <Enter> to exit): 0
Have enabled the 'system partition' attribute.
Attribute value is 0000000000000001. Set fields are:
0 (system partition)
Toggle which attribute field (0-63, 64 or <Enter> to exit):
press enter to exit.
We are all done here, but finally we can print the partition information again with
i
11
and compare this with the values we saw originally, it should be identical except for the lat sector and partition size fields, which should represent the new size. If any of these are different go back now and double check your work until they match exactly. Once you are done enter w to write, and y that you are sure.
Now you can unplug your switch, press the power button for 5 seconds to exit memloader and then press the power button to boot your switch. It should boot normally into the switch OS, with all your saves and content preserved from before. ##If at this point you have any errors, or the switch won’t boot, go back and try the steps again right from restore your rawnand.bin, as if it wont boot correctly now, the next steps won’t fix that.
Now we need access to a windows PC with HacDiskMount and fat32format.exe.
On a windows PC.
Shutdown your switch and reboot to RCM mode. Push the memloader payload again, connect the cable to your windows PC, and using volume and power mount the EMMC partition over USB.In windows open HacDiskMount as administrator, click file and open physical drive.
Choose your switch drive, ignore the error that it does not seem like a full emmc dump.
You should see the 11 partitions listed here, click the USER partition we just remade, and you will see a prompt for encryption keys.
Take the bis_key_03 value from your prod.keys that you dumped earlier, and enter the left half on the top line, and the right half on the line below, then click test.
You should see a message that the was successful and the encryption was opened.
If you do not get a success message stop now, and double check/redump your prod.keys.
If you continue without opening the encryption you lose all your switch data.
Once the keys are verified, install the driver, and mount the drive to an empty drive letter.
In this example i will use the G: drive.
Open windows explorer and copy all the files from the G drive onto your local machine, this is a backup of your saves and settings, do not lose this.
Now we need to go to the location where fat32format.exe is located, run an administrator prompt and enter
fat32format.exe G
This will wipe your switch user partition and reformat it, using the new partition data we created to give us the full size of the new USER partition.
Once this finished we now should see the new EMMC size in windows explorer for the G drive, and we can copy back our backup of the saves and settings we made before the format.
This copy is slow, and if it fails I recommend deleting all the files and re-copying folder by folder until it completes successfully.
Wait 30 seconds for any background file transfers to complete, then in HacDiskMount unmount the drive, and after a few seconds disconnect your switch.
Hold the power button on your switch for 5 seconds to exit memloader, then cross your fingers and press the power button, the switch should boot up normally, but in the settings menu, show your new EMMC size. Success!
If you get a black nintendo error screen, go back to the rawnand.bin stage and start the whole process again, it may take a couple of tries for the stars to align and every step to go flawlessly.
Enjoy your new switch storage space!
Originally Written on January 31, 2019
Last edited by binkinator,


 ]
] 