


I remember reading a bit back that it has to be specefic gauge for the wires, is that still correct? I have not encountered that before in any previous mods I have done.Cheaper than the hwfly that’s all I know
Post automatically merged:
A mosfet 3 47 ohm resistor and the raspberry pi zero (rp2040) so 15 or 20 usd
You are using an out of date browser. It may not display this or other websites correctly.
You should upgrade or use an alternative browser.
You should upgrade or use an alternative browser.
Staff Posts
Recent threadmarks
sharing files
Important Posts
Recent threadmarks
FirmwaresWait you say mosfet or flex is optional? Is install safe without it?Aliexpress
All models:
Rp2040 zero
47 ohm smd resistors
Wire
Optional all models:
Hwfly cpu flex cable
OR
Mosfet
Oled:
Dat0 adaptor

As always on micro electronics, you need keep the wires short as possible and use the thickest wire you can, on this case you should use AWG between 28-32 or enamel ones, they shouldn't be so thick they ripoff your test points or traces on the board.
Post automatically merged:
The flex cable for the CPU have the mosfet on it, you can use directly soldered mosfet or use one of the mods described two pages ago. the important post have some ideas for connecting it also.Wait you say mosfet or flex is optional? Is install safe without it?

Congratulations to all involved - Huge step forward in the scene. China not to happy right now.

i have hwfly V1/v2 cables. i saw only one wire going from it to the RP2040. Which point of the cable do I sodder to RP2040?As always on micro electronics, you need keep the wires short as possible and use the thickest wire you can, on this case you should use AWG between 28-32 or enamel ones, they shouldn't be so thick they ripoff your test points or traces on the board.
Post automatically merged:
The flex cable for the CPU have the mosfet on it, you can use directly soldered mosfet or use one of the mods described two pages ago. the important post have some ideas for connecting it also.

I am hesitating to buy hwfly today. I asked the official Chinese merchant about this news and the price of hwfly. The answer was disregard.Congratulations to all involved - Huge step forward in the scene. China not to happy right now.
swrew the fucking chinese merchantI am hesitating to buy hwfly today. I asked the official Chinese merchant about this news and the price of hwfly. The answer was disregard.

Is derped. Either one or the other is required. So either a) the flex or b) the mosfetWait you say mosfet or flex is optional? Is install safe without it?

You use PicoTool, there are some post at start of the thread.how do I flash the firmware to RP2040 zero? Somebody School me again, please.
Hold the bootsel button and copy the uf2 filehow do I flash the firmware to RP2040 zero? Somebody School me again, please.
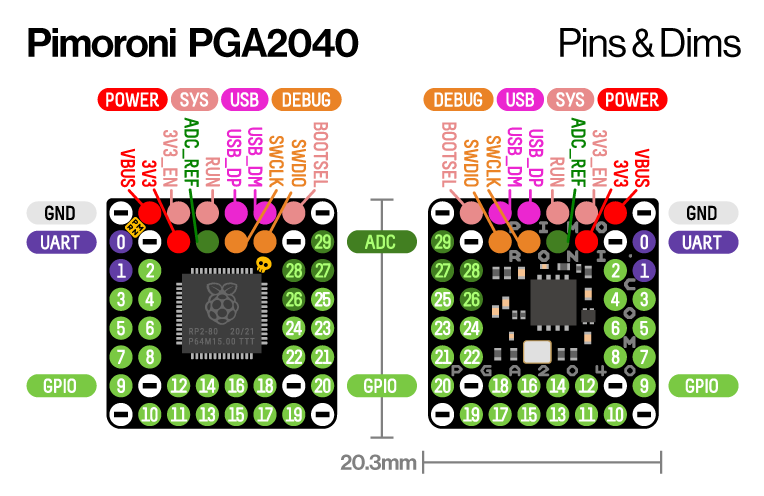
For those trying to save space and not wanting to remove buttons or the usb port - This should also work,
Pimoroni PGA2040
https://shop.pimoroni.com/products/pga2040
https://coolcomponents.co.uk/products/pga2040-an-rp2040-breakout-board
Pimoroni PGA2040
https://shop.pimoroni.com/products/pga2040
https://coolcomponents.co.uk/products/pga2040-an-rp2040-breakout-board
Last edited by mrdude,


Hi all! Help is needed. Somehow unsuccessfully put rp2040, blinked blue, then purple and stopped turning on. I checked all the soldering, I didn’t find any problems, I was busy half the night, it didn’t start. As a result, the chip was removed, but now, when turned on, the Nintendo logo appears for only a few seconds, then a black screen and no reaction. When charging is connected, the battery charge indicator also appears for a few seconds and also a black screen, the battery itself is 60% charged. What are the options and assumptions?

I have already designed one but final cost can't compare with widely available rp2040-zero. Just do it for fun and fit inside console easier.Now that the firmware is out (although not being OSS) I guess someone will create an own PCB for it, as you can make it even better integrated and still way cheaper than HWFLY.
Hi all! Help is needed. Somehow unsuccessfully put rp2040, blinked blue, then purple and stopped turning on. I checked all the soldering, I didn’t find any problems, I was busy half the night, it didn’t start. As a result, the chip was removed, but now, when turned on, the Nintendo logo appears for only a few seconds, then a black screen and no reaction. When charging is connected, the battery charge indicator also appears for a few seconds and also a black screen, the battery itself is 60% charged. What are the options and assumptions?
Sounds like something went wrong and you have bricked with I'm guessing a bad boot0 file.
Please post picture of your soldering work.
has anyone seen seeed XIAO rp2040, is this chip also compatible? - Seems it’s hard to buy RP2040-Zero in UK unless anyone has any best places to buy from?
I have already designed one but final cost can't compare with widely available rp2040-zero. Just do it for fun and fit inside console easier.
I'm about to create a new thread with information in one place including, firmware, images etc.
How could you easily program it?For those trying to save space and not wanting to remove buttons or the usb port - This should also work,
Pimoroni PGA2040
https://shop.pimoroni.com/products/pga2040
https://coolcomponents.co.uk/products/pga2040-an-rp2040-breakout-board
Similar threads
- Replies
- 3
- Views
- 717
- Replies
- 42
- Views
- 5K
- Replies
- 5
- Views
- 1K
- Replies
- 6
- Views
- 2K
- Replies
- 8
- Views
- 2K
Site & Scene News
New Hot Discussed
-
-
57K views
Nintendo Switch firmware 18.0.0 has been released
It's the first Nintendo Switch firmware update of 2024. Made available as of today is system software version 18.0.0, marking a new milestone. According to the patch... -
28K views
GitLab has taken down the Suyu Nintendo Switch emulator
Emulator takedowns continue. Not long after its first release, Suyu emulator has been removed from GitLab via a DMCA takedown. Suyu was a Nintendo Switch emulator... -
20K views
Atmosphere CFW for Switch updated to pre-release version 1.7.0, adds support for firmware 18.0.0
After a couple days of Nintendo releasing their 18.0.0 firmware update, @SciresM releases a brand new update to his Atmosphere NX custom firmware for the Nintendo...by ShadowOne333 94 -
17K views
Wii U and 3DS online services shutting down today, but Pretendo is here to save the day
Today, April 8th, 2024, at 4PM PT, marks the day in which Nintendo permanently ends support for both the 3DS and the Wii U online services, which include co-op play...by ShadowOne333 176 -
16K views
Denuvo unveils new technology "TraceMark" aimed to watermark and easily trace leaked games
Denuvo by Irdeto has unveiled at GDC (Game Developers Conference) this past March 18th their brand new anti-piracy technology named "TraceMark", specifically tailored...by ShadowOne333 101 -
15K views
GBAtemp Exclusive Introducing tempBOT AI - your new virtual GBAtemp companion and aide (April Fools)
Hello, GBAtemp members! After a prolonged absence, I am delighted to announce my return and upgraded form to you today... Introducing tempBOT AI 🤖 As the embodiment... -
11K views
Pokemon fangame hosting website "Relic Castle" taken down by The Pokemon Company
Yet another casualty goes down in the never-ending battle of copyright enforcement, and this time, it hit a big website which was the host for many fangames based and...by ShadowOne333 65 -
11K views
MisterFPGA has been updated to include an official release for its Nintendo 64 core
The highly popular and accurate FPGA hardware, MisterFGPA, has received today a brand new update with a long-awaited feature, or rather, a new core for hardcore...by ShadowOne333 51 -
10K views
Apple is being sued for antitrust violations by the Department of Justice of the US
The 2nd biggest technology company in the world, Apple, is being sued by none other than the Department of Justice of the United States, filed for antitrust...by ShadowOne333 80 -
10K views
Homebrew SpotPass Archival Project announced
With Nintendo ceasing online communication for Nintendo 3DS, 2DS and Wii U systems next month, SpotPass data distribution will be halted. This will in turn affect...
-
-
-
223 replies
Nintendo Switch firmware 18.0.0 has been released
It's the first Nintendo Switch firmware update of 2024. Made available as of today is system software version 18.0.0, marking a new milestone. According to the patch...by Chary -
176 replies
Wii U and 3DS online services shutting down today, but Pretendo is here to save the day
Today, April 8th, 2024, at 4PM PT, marks the day in which Nintendo permanently ends support for both the 3DS and the Wii U online services, which include co-op play...by ShadowOne333 -
169 replies
GBAtemp Exclusive Introducing tempBOT AI - your new virtual GBAtemp companion and aide (April Fools)
Hello, GBAtemp members! After a prolonged absence, I am delighted to announce my return and upgraded form to you today... Introducing tempBOT AI 🤖 As the embodiment...by tempBOT -
146 replies
GitLab has taken down the Suyu Nintendo Switch emulator
Emulator takedowns continue. Not long after its first release, Suyu emulator has been removed from GitLab via a DMCA takedown. Suyu was a Nintendo Switch emulator...by Chary -
101 replies
Denuvo unveils new technology "TraceMark" aimed to watermark and easily trace leaked games
Denuvo by Irdeto has unveiled at GDC (Game Developers Conference) this past March 18th their brand new anti-piracy technology named "TraceMark", specifically tailored...by ShadowOne333 -
95 replies
The first retro emulator hits Apple's App Store, but you should probably avoid it
With Apple having recently updated their guidelines for the App Store, iOS users have been left to speculate on specific wording and whether retro emulators as we...by Scarlet -
94 replies
Atmosphere CFW for Switch updated to pre-release version 1.7.0, adds support for firmware 18.0.0
After a couple days of Nintendo releasing their 18.0.0 firmware update, @SciresM releases a brand new update to his Atmosphere NX custom firmware for the Nintendo...by ShadowOne333 -
80 replies
Apple is being sued for antitrust violations by the Department of Justice of the US
The 2nd biggest technology company in the world, Apple, is being sued by none other than the Department of Justice of the United States, filed for antitrust...by ShadowOne333 -
65 replies
Pokemon fangame hosting website "Relic Castle" taken down by The Pokemon Company
Yet another casualty goes down in the never-ending battle of copyright enforcement, and this time, it hit a big website which was the host for many fangames based and...by ShadowOne333 -
51 replies
MisterFPGA has been updated to include an official release for its Nintendo 64 core
The highly popular and accurate FPGA hardware, MisterFGPA, has received today a brand new update with a long-awaited feature, or rather, a new core for hardcore...by ShadowOne333
-
Popular threads in this forum
General chit-chat
-
 Sonic Angel Knight
Loading…
Sonic Angel Knight
Loading… -
 K3Nv2
Loading…
K3Nv2
Loading…
-
 @
Xdqwerty:
something about ea reverse engineering the genesis so they could make their games there+1
@
Xdqwerty:
something about ea reverse engineering the genesis so they could make their games there+1 -
-
 @
BakerMan:
if they get permission from 4j (the studio who helped put minecraft on consoles), they could put the console edition tutorial worlds in the game, as seeds+1
@
BakerMan:
if they get permission from 4j (the studio who helped put minecraft on consoles), they could put the console edition tutorial worlds in the game, as seeds+1
and i mean all of them (if not, maybe a few highlights, like TU1, TU31, and TU69) -
-
-
-
-
-
-
-
-
-
-
-
-
-
-
-
-
-
-
-
-
-
