Hardware Tried to do a new 3ds xl Hardmod but have permanent blue screen

Medschidow

New Member
OP
Newbie
Joined
Dec 23, 2017
Messages
4
Trophies
0
Age
27
XP
69
Country
Austria
Hello, I hope this is the right place for my issue.
I have a new 3ds xl that I was going to do the Hardmod on, the version on it is 11.4
Now I am not even sure what I did wrong here.
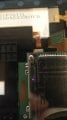
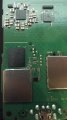
I soldered the wires in correctly into the new 3ds xl motherboard and soldered the wires to an opened microsd-to-SD Adapter that I was going to hook up to the Card Reader to read and write to the nand
When I got that far and connected the Adapter to the Reader and turned the 3DS on I got the blue error screen, which is good right.
So I hooked it up to my Reader but my PC did not recognize it so I thought okay, need to buy an ANKER Reader.
I unsoldered all the points and put the 3ds together so It be stock for the moment and I could use it but nope, the error screen still remains, I don't understand why?

my big fear is that I could have possibly fried the nand because I was reading somewhere that youre not supposed to solder wires directly to the points or something, but I was seing it done on tuts and yt videos so whats the problem?
I checked my soldering and everything seems fine, no bridges on anything. I am quite good at soldering too so I dont see the problem being that as I rgh'ed a few XBOX 360s and I try to do the work clean and neat.
Could someone guide me please?
 

urherenow

Well-Known Member
Member
Joined
Mar 8, 2009
Messages
4,778
Trophies
2
Age
48
Location
Japan
XP
3,674
Country
United States
not without hi-res pictures. How can we help you blindly? How exactly did you desolder? Some of those points have a micro-via under them and if you broke one while desoldering (using too much heat and/or pulling on the wire... I did that on the first N3DS I bought), you are screwed. There is no fixing that.
 
  • Like
Reactions: Medschidow

Medschidow

New Member
OP
Newbie
Joined
Dec 23, 2017
Messages
4
Trophies
0
Age
27
XP
69
Country
Austria
I posted 3 images, I didn't see anything breaking when desoldering the points. I used flux too. I simply desoldered them quickly. I also didn't forcefully pull on the wires on anything.
The Metal shield for the game cartrages is what I used for ground.

--------------------- MERGED ---------------------------

This is how the micro sd card to SD Adapter with wires looks like
I know that my wires might be a bit too long but thag surely wasnt the problem
 

Attachments

  • IMG_20171223_190154.jpg
    IMG_20171223_190154.jpg
    1.1 MB · Views: 480
  • IMG_20171223_190132.jpg
    IMG_20171223_190132.jpg
    776.7 KB · Views: 462
  • IMG_20171223_190113.jpg
    IMG_20171223_190113.jpg
    878.1 KB · Views: 435
  • IMG_20171223_191931.jpg
    IMG_20171223_191931.jpg
    806 KB · Views: 457
  • IMG_20171223_191946.jpg
    IMG_20171223_191946.jpg
    1.5 MB · Views: 400

urherenow

Well-Known Member
Member
Joined
Mar 8, 2009
Messages
4,778
Trophies
2
Age
48
Location
Japan
XP
3,674
Country
United States
Where do I start? I guess I'll just make comments as I look at the pics

1) Wires are WAY too long... and while soldered to the adapter, it would blue screen anyway. You need a)shorter wires, and b) connectors so you can plug/unplug the adapter at will.

2) Looks like you tried soldering to 2 clk points? Why? And there is a MUCH better and larger single point on the other side of the PCB to use instead.

3) img_20171223_190132... what is that? Your ground point? On top of the shield? The recommended ground point is directly ON the PCB, and also on the other side of the board.

4) You're showing your adapter backwards from every other pic in any tutorial I've looked at... hard to trace with my eyes if it was done right. But the reader you're using is also unknown to me and the nand is super finicky. I need 2 separate readers for my O3DS and N3DS, so it does matter.


With all wires removed, the blue screen might also be caused by a ribbon cable installed wrong

one last pic you need to post so someone may be able to spot what is wrong: the blue screen. It has an error code on it...

Better clk point: http://www.maxconsole.com/maxcon_forums/attachment.php?attachmentid=37627&d=1425951593

did you use the guide here and look at the pics when doing this? https://gbatemp.net/threads/tutorial-noob-friendly-nand-dumping-2ds-3ds-3ds-xl-n3ds-n3ds-xl.414498/
 
Last edited by urherenow,

Medschidow

New Member
OP
Newbie
Joined
Dec 23, 2017
Messages
4
Trophies
0
Age
27
XP
69
Country
Austria
Turns out one of the ribbon cabels that go to the upper display were backwards installed, I didnt see that when I opened end checked it like 5 times...oh what a dumbass I am.
No, the clk points bridged when trying to unsolder the wires. So I simply umbridged them.
Yes, I followed that tutorial you referr to, as stated in the 5th step under new 3ds xl
"We will only be soldering to DAT0, CMD, CLK and also ground (GND) You can simply use the metal game card shielding for GND. Just solder to a corner of the game card shielding."
That's what I did.
I bought the anker reader off of amazon, on friday I will try to mod it.
I know that the wires are too long, I will trimm them when trying to mod it a second time.

and do I NEED the connectors to plug and unplug them? what do I use for those?
I dont want to cut the housing of the 3ds, do I really need to do that? I want a stock looking 3ds and a hacked firmware
I know the 3ds is easier to unbrick when I can access the nand right away but Im not comfortable with cutting the 3ds.
I saw a tutorial where he didnt use connectors and just wired them like I did.
Thank you for your help so far!
 
D

Deleted User

Guest
Turns out one of the ribbon cabels that go to the upper display were backwards installed, I didnt see that when I opened end checked it like 5 times...oh what a dumbass I am.
No, the clk points bridged when trying to unsolder the wires. So I simply umbridged them.
Yes, I followed that tutorial you referr to, as stated in the 5th step under new 3ds xl
"We will only be soldering to DAT0, CMD, CLK and also ground (GND) You can simply use the metal game card shielding for GND. Just solder to a corner of the game card shielding."
That's what I did.
I bought the anker reader off of amazon, on friday I will try to mod it.
I know that the wires are too long, I will trimm them when trying to mod it a second time.

and do I NEED the connectors to plug and unplug them? what do I use for those?
I dont want to cut the housing of the 3ds, do I really need to do that? I want a stock looking 3ds and a hacked firmware
I know the 3ds is easier to unbrick when I can access the nand right away but Im not comfortable with cutting the 3ds.
I saw a tutorial where he didnt use connectors and just wired them like I did.
Thank you for your help so far!


You don't have to cut anything if you don't want to. Install, CFW, uninstall card reader when done.
 
  • Like
Reactions: Medschidow

mitroux

Well-Known Member
Member
Joined
Sep 12, 2007
Messages
266
Trophies
0
XP
343
Country
Macau
sorry if this may look different , but why not go the easy way and hack your n3ds using an R4?
that's easier , no openning or solderibg to the N3DS , and also no need to spend money on a usb card reader?
 

Jordan Wessley

Well-Known Member
Newcomer
Joined
Aug 22, 2016
Messages
81
Trophies
0
XP
117
Country
Canada
So it's okay the way I have it done? I don't need one of those "butt" (that name tho) connectors that they mention in the tutorial?
Not at all. Those are just mere suggestions for those who want to keep it permanent. I would recommend as the guy above me to just invest in a cheap R4 or TTDS (which is compatible) and use NTRBootHax
 

Site & Scene News

Popular threads in this forum

General chit-chat
Help Users
    I @ idonthave: :)