Tutorial
Updated
The Ultimate Wii Hacking Guide for Beginners
WARNING! When you come to 'STEP X' and you have to download the files, don't use that link, it's dead. Use this link instead:
*link removed*
Welcome to the 'Ultimate Wii Hacking Guide for Beginners'. In this tutorial you're gonna hack your Wii so you can play backups from DVD's or an external HDD.
Let's get started
First you need to choose from several methods. You can choose to install HBC (Homebrew Channel) via a Game Exploit to launch HackMii or you can use LetterBomb via SD. Next you need to choose if you want to load back ups from DVD's or from a HDD. Note: If you have an older system menu then 4.3, you have yo use either Method E or F.
If you want to load HackMii via a game exploit you need to have one of the following games and at least played them once:
- Super Smash Brothers Brawl
- LEGO Indiana Jones
- LEGO Batman
- LEGO Star Wars
- Yu-Gi-Oh! 5D's
- Tales of Symphonia: Dawn of the New World
Method B - I want to Hack my Wii with a Game Exploit and load back ups from a HDD.
Method C - I want to Hack my Wii and load LetterBomb from my SD and load back ups from DVD's. (Easiest).
Method D - I want to Hack my Wii and load LetterBomb from my SD and load back ups from a HDD.
Method E - I want to Hack my Wii (Only System Menu 3.2 - 4.2) and load BannerBomb from my SD and load back ups from DVD's.
Method F - I want to Hack my Wii (Only System Menu 3.2 - 4.2) and load BannerBomb from my SD and load back ups from a HDD.
Method A
Requirements
Step 1: ModMii
For this hack we're gonna use ModMii, a very simple program made by XFlak. Download here:
Download ModMii Installer for Windows (English)
Download ModMii Installer for Windows (Italian)
Download ModMii Installer for Windows (French)
Download ModMii Installer for Windows (Dutch)
Install ModMii and open the program. Type in 'I Agree' when asked so you can reach the home menu. In the home menu type W and press enter to start.
The first question is 'Is your Wii a virgin?' Answer yes, even if your Wii is not a virgin, in order to re-hack your Wii and update all your Wii's softmod. Type Y and press enter.
Next question is your Wii Menu Version. Type your menu version and hit enter.
Next question is your region. Type your region (U/E/J/K/RC) and hit enter.
Next question is which game you want to use. Choose the game you have and hit enter.
Next question is if you want the latest IOSs. Read the options carefully!
Next question is which system menu version you want to upgrade/downgrade. Choose your system version and hit enter.
Next question is if you want to download any of the channels listed. Make your choise (all, some, none) and hit enter.
Next question is if you want extra brick protection. You want this so type Y and hit enter.
Next question is if you want a custom theme on your Wii menu. Choose your option and hit enter.
Next question is if you want to setup a USB loader. Type N and hit enter.
Check if everythings ok.
Type the path you want the files to download to, or open a folder and drag it on the window. Hit enter.
Now you can start downloading. Type Y and hit enter once more.
A guide will be created while using ModMii. We'll be using it so don't delete it!
Now copy everything to the root of your SD and op it in the Wii.
Next step is very important: You need to use the guide created with ModMii to hack the Wii.
Come back to this tutorial after you did everything in the ModMii guide. After the ModMii guide we're going to install a BackUp Loader (NeoGamma) and burn Wii ISOS!
Step 2: Install a Backup Loader (NeoGamma)
First of all we're gonna download NeoGamma:
NeoGamma R9b50
Now get the SD card out of your Wii and put it in your computer. In the root of your SD should be a folder called 'apps'. Open it. Now extract NeoGamma. If you extract NeoGamma, there should be some files inside. Go into the 'apps' folder inside and copy the 'NeoGamma' folder into the 'apps' folder on your SD card.
Copy all the other files to the root of your SD card.
NeoGamma is now installed and can be launched in the Homebrew Channel.
Step 3: Burning Wii ISOS.
Now we need Wii ISOS. I won't tell your where to get them (Google is your best friend.). Make sure the Wii ISO you download has a *.iso extension.
Next we're gonna download and install ImgBurn. You can download it here. Install the program and open it.
Now choose 'Write image file to disc'. Select your ISO file. The next step is important: in the under right corner you see the settings. Set the Write Speed to 1x. Always burn Wii ISOs on the slowest speed! The slower the better.
Now wait for it to finish. After it's done writing, don't get the DVD out yet! It has to verify first! After you here the tune and see the message that it's done you can get the DVD out.
Note: If your DVD is done writing and your DVD ejects, no worries! Just pop it back in and hit OK.
Now pop your DVD in your Wii and go to the Homebrew Channel to start NeoGamma. Choose to load game from disc and enjoy!
- SD Card
- One of the above listed games.
- DVD's (DVD-R)
Step 1: ModMii
For this hack we're gonna use ModMii, a very simple program made by XFlak. Download here:
Download ModMii Installer for Windows (English)
Download ModMii Installer for Windows (Italian)
Download ModMii Installer for Windows (French)
Download ModMii Installer for Windows (Dutch)
Install ModMii and open the program. Type in 'I Agree' when asked so you can reach the home menu. In the home menu type W and press enter to start.
The first question is 'Is your Wii a virgin?' Answer yes, even if your Wii is not a virgin, in order to re-hack your Wii and update all your Wii's softmod. Type Y and press enter.
Next question is your Wii Menu Version. Type your menu version and hit enter.
Next question is your region. Type your region (U/E/J/K/RC) and hit enter.
Next question is which game you want to use. Choose the game you have and hit enter.
Next question is if you want the latest IOSs. Read the options carefully!
Next question is which system menu version you want to upgrade/downgrade. Choose your system version and hit enter.
Next question is if you want to download any of the channels listed. Make your choise (all, some, none) and hit enter.
Next question is if you want extra brick protection. You want this so type Y and hit enter.
Next question is if you want a custom theme on your Wii menu. Choose your option and hit enter.
Next question is if you want to setup a USB loader. Type N and hit enter.
Check if everythings ok.
Type the path you want the files to download to, or open a folder and drag it on the window. Hit enter.
Now you can start downloading. Type Y and hit enter once more.
A guide will be created while using ModMii. We'll be using it so don't delete it!
Now copy everything to the root of your SD and op it in the Wii.
Next step is very important: You need to use the guide created with ModMii to hack the Wii.
Come back to this tutorial after you did everything in the ModMii guide. After the ModMii guide we're going to install a BackUp Loader (NeoGamma) and burn Wii ISOS!
Step 2: Install a Backup Loader (NeoGamma)
First of all we're gonna download NeoGamma:
NeoGamma R9b50
Now get the SD card out of your Wii and put it in your computer. In the root of your SD should be a folder called 'apps'. Open it. Now extract NeoGamma. If you extract NeoGamma, there should be some files inside. Go into the 'apps' folder inside and copy the 'NeoGamma' folder into the 'apps' folder on your SD card.
Copy all the other files to the root of your SD card.
NeoGamma is now installed and can be launched in the Homebrew Channel.
Step 3: Burning Wii ISOS.
Now we need Wii ISOS. I won't tell your where to get them (Google is your best friend.). Make sure the Wii ISO you download has a *.iso extension.
Next we're gonna download and install ImgBurn. You can download it here. Install the program and open it.
Now choose 'Write image file to disc'. Select your ISO file. The next step is important: in the under right corner you see the settings. Set the Write Speed to 1x. Always burn Wii ISOs on the slowest speed! The slower the better.
Now wait for it to finish. After it's done writing, don't get the DVD out yet! It has to verify first! After you here the tune and see the message that it's done you can get the DVD out.
Note: If your DVD is done writing and your DVD ejects, no worries! Just pop it back in and hit OK.
Now pop your DVD in your Wii and go to the Homebrew Channel to start NeoGamma. Choose to load game from disc and enjoy!
Method B
Requirements
Step 1: ModMii
For this hack we're gonna use ModMii, a very simple program made by XFlak. Download here:
Download ModMii Installer for Windows (English)
Download ModMii Installer for Windows (Italian)
Download ModMii Installer for Windows (French)
Download ModMii Installer for Windows (Dutch)
Install ModMii and open the program. Type in 'I Agree' when asked so you can reach the home menu. In the home menu type W and press enter to start.
The first question is 'Is your Wii a virgin?' Answer yes, even if your Wii is not a virgin, in order to re-hack your Wii and update all your Wii's softmod. Type Y and press enter.
Next question is your Wii Menu Version. Type your menu version and hit enter.
Next question is your region. Type your region (U/E/J/K/RC) and hit enter.
Next question is which game you want to use. Choose the game you have and hit enter.
Next question is if you want the latest IOSs. Read the options carefully!
Next question is which system menu version you want to upgrade/downgrade. Choose your system version and hit enter.
Next question is if you want to download any of the channels listed. Make your choise (all, some, none) and hit enter.
Next question is if you want extra brick protection. You want this so type Y and hit enter.
Next question is if you want a custom theme on your Wii menu. Choose your option and hit enter.
Next question is if you want to setup a USB loader. Type N and hit enter. (We're using a different USB loader after this mod!)
Check if everythings ok.
Type the path you want the files to download to, or open a folder and drag it on the window. Hit enter.
Now you can start downloading. Type Y and hit enter once more.
A guide will be created while using ModMii. We'll be using it so don't delete it!
Now copy everything to the root of your SD and op it in the Wii.
Next step is very important: You need to use the guide created with ModMii to hack the Wii.
VERY IMPORTANT: ONLY DO STEP 1 AND 2! WE ONLY WANT THE HOMEBREW CHANNEL AND BOOTMII INSTALLED.
Come back to this tutorial after you did step 1 and 2 in the ModMii guide. After the ModMii guide we're going to install CFG.
Step 2: Install Configurable USB Loader (written by blastermak)
First, download the USB Loader package with all the files you need:
USB Loader Package
The first thing we do is install IOS236. IOS236 is basically the gateway to installing cIOSes in the stubbed slots when on firmware 4.0+.
Now unzip the installer onto your SD card and you should have a x:/apps/IOS236/boot.dol and a x:/apps/IOS236/meta.xml where x refers to your SD card letter. Eject the SD card from your computer and put it into your Wii.
Boot up the homebrew channel and you should see a banner with IOS236 on your screen.
Point or select it, press A and press Start.
Read the messages that pass by and press 1.
If you have a working internet connection on your Wii select 'Download IOS from NUS' otherwise select 'Load IOS from SD card'. Confirm with A and when asked press A again.
You should now be faced with a question, choose your answer wisely and press the correct button.
The installation will now continue and finish.
Congratulations, you have now installed a modified IOS36 into slot 236.
Next step is d2x.
Things to download:
d2x is really versatile as it can be installed in many slots.
For this tutorial we are going to install into the following slots: IOS248 with base 56 and IOS247 with base 57, these slots have been selected for the best compatibility.
To begin unrar the package onto your SD card so that you get: x:/apps/d2x installer v2.2/boot.dol and a x:/apps/d2x installer v2.2/meta.xml.
When you have no internet connection copy IOS56-64-v5661.wad and IOS57-64-v5918.wad to the root of the SD card.
Boot up the homebrew channel and select d2x installer v2.2. Press the A button at the start screen.
Choose IOS236 when asked, it should be selected by default. To install d2x into slot 248 you should do the following:
Things to download:
WBFS
WBFS was the first format supported by the USB loaders. This filesystem is quite outdated and has some instabilities when deleting games. When you format your HDD this way you can only use it for storing Wii games, nothing else. I don't recommend this filesystem.
FAT
This is the most flexible format. You can store Wii games and other files on it and it is supported by every OS. Minor drawback is the 4GB filesize limit. You won't encounter problems when installing games as the loader automatically splits and/or scrubs them. When formatting your drive in FAT you should use an external tool like GParted because Windows won't create a large enough drive.
NTFS
NTFS is mostly used when having large drives. Not every OS supports this format and CFG has some case sensitivity problems on NTFS. When using one you need to add several lines to config.txt or meta.xml or use the tool supplied. More info on how to do this on the end.
ext
Ext covers ext2, ext3 and ext4. Ext support is quite new and therefore can have bugs. Currently ext is read-only, so you can't install games via USB loaders.
My recommended choice is NTFS but it all depends on what you like.
To start unzip the package to your SD card so you end up with x:/usb-loader and x:/apps/USBLoader/boot.dol
If you get the IOS249 is a stub message do the steps shown below.
config.txt/meta.xml/configurator
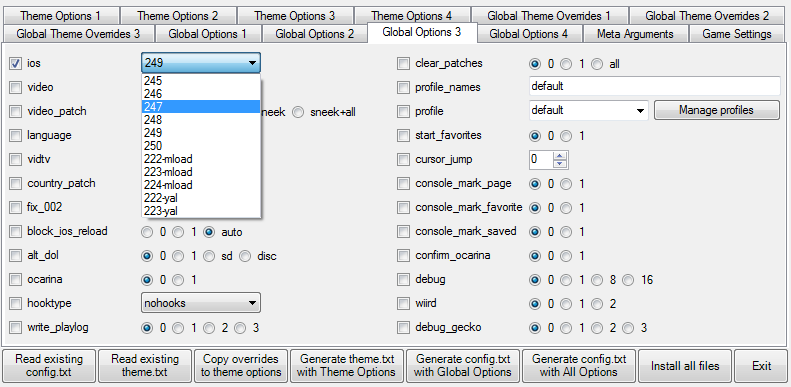 The best way to get rid of the 'IOS249 is a stub' error is to use the configurator to select a different IOS to boot.
The settings for this can be found under Global Settings 3.
- SD Card
- One of the above listed games.
- HDD
Step 1: ModMii
For this hack we're gonna use ModMii, a very simple program made by XFlak. Download here:
Download ModMii Installer for Windows (English)
Download ModMii Installer for Windows (Italian)
Download ModMii Installer for Windows (French)
Download ModMii Installer for Windows (Dutch)
Install ModMii and open the program. Type in 'I Agree' when asked so you can reach the home menu. In the home menu type W and press enter to start.
The first question is 'Is your Wii a virgin?' Answer yes, even if your Wii is not a virgin, in order to re-hack your Wii and update all your Wii's softmod. Type Y and press enter.
Next question is your Wii Menu Version. Type your menu version and hit enter.
Next question is your region. Type your region (U/E/J/K/RC) and hit enter.
Next question is which game you want to use. Choose the game you have and hit enter.
Next question is if you want the latest IOSs. Read the options carefully!
Next question is which system menu version you want to upgrade/downgrade. Choose your system version and hit enter.
Next question is if you want to download any of the channels listed. Make your choise (all, some, none) and hit enter.
Next question is if you want extra brick protection. You want this so type Y and hit enter.
Next question is if you want a custom theme on your Wii menu. Choose your option and hit enter.
Next question is if you want to setup a USB loader. Type N and hit enter. (We're using a different USB loader after this mod!)
Check if everythings ok.
Type the path you want the files to download to, or open a folder and drag it on the window. Hit enter.
Now you can start downloading. Type Y and hit enter once more.
A guide will be created while using ModMii. We'll be using it so don't delete it!
Now copy everything to the root of your SD and op it in the Wii.
Next step is very important: You need to use the guide created with ModMii to hack the Wii.
VERY IMPORTANT: ONLY DO STEP 1 AND 2! WE ONLY WANT THE HOMEBREW CHANNEL AND BOOTMII INSTALLED.
Come back to this tutorial after you did step 1 and 2 in the ModMii guide. After the ModMii guide we're going to install CFG.
Step 2: Install Configurable USB Loader (written by blastermak)
First, download the USB Loader package with all the files you need:
USB Loader Package
The first thing we do is install IOS236. IOS236 is basically the gateway to installing cIOSes in the stubbed slots when on firmware 4.0+.
Now unzip the installer onto your SD card and you should have a x:/apps/IOS236/boot.dol and a x:/apps/IOS236/meta.xml where x refers to your SD card letter. Eject the SD card from your computer and put it into your Wii.
Boot up the homebrew channel and you should see a banner with IOS236 on your screen.
Point or select it, press A and press Start.
Read the messages that pass by and press 1.
If you have a working internet connection on your Wii select 'Download IOS from NUS' otherwise select 'Load IOS from SD card'. Confirm with A and when asked press A again.
You should now be faced with a question, choose your answer wisely and press the correct button.
The installation will now continue and finish.
Congratulations, you have now installed a modified IOS36 into slot 236.
Next step is d2x.
Things to download:
- d2x cIOS Installer v2.2 (Included in the package)
- IOS56-64-v5661.wad and IOS57-64-v5918.wad when you don't have internet access on you Wii. (Not included in the package)
d2x is really versatile as it can be installed in many slots.
For this tutorial we are going to install into the following slots: IOS248 with base 56 and IOS247 with base 57, these slots have been selected for the best compatibility.
To begin unrar the package onto your SD card so that you get: x:/apps/d2x installer v2.2/boot.dol and a x:/apps/d2x installer v2.2/meta.xml.
When you have no internet connection copy IOS56-64-v5661.wad and IOS57-64-v5918.wad to the root of the SD card.
Boot up the homebrew channel and select d2x installer v2.2. Press the A button at the start screen.
Choose IOS236 when asked, it should be selected by default. To install d2x into slot 248 you should do the following:
- Select the latest version of d2x, selected by default.
- Select IOS56 for the base.
- Select IOS248 for the install slot.
- Push A to accept and run the installer.
- When the installer is done press A to return to the menu.
- Select the latest version of d2x, selected by default.
- Select IOS57 for the base.
- Select IOS247 for the install slot.
- Push A to accept and run the installer.
- When the installer is done press A to return to the homebrew channel.
Things to download:
- The latest version of CFG loader (Included in the package)
WBFS
WBFS was the first format supported by the USB loaders. This filesystem is quite outdated and has some instabilities when deleting games. When you format your HDD this way you can only use it for storing Wii games, nothing else. I don't recommend this filesystem.
FAT
This is the most flexible format. You can store Wii games and other files on it and it is supported by every OS. Minor drawback is the 4GB filesize limit. You won't encounter problems when installing games as the loader automatically splits and/or scrubs them. When formatting your drive in FAT you should use an external tool like GParted because Windows won't create a large enough drive.
NTFS
NTFS is mostly used when having large drives. Not every OS supports this format and CFG has some case sensitivity problems on NTFS. When using one you need to add several lines to config.txt or meta.xml or use the tool supplied. More info on how to do this on the end.
ext
Ext covers ext2, ext3 and ext4. Ext support is quite new and therefore can have bugs. Currently ext is read-only, so you can't install games via USB loaders.
My recommended choice is NTFS but it all depends on what you like.
To start unzip the package to your SD card so you end up with x:/usb-loader and x:/apps/USBLoader/boot.dol
If you get the IOS249 is a stub message do the steps shown below.
config.txt/meta.xml/configurator
The settings for this can be found under Global Settings 3.
- From here select IOS248 and check the box.
- After that select the Meta Arguments tab and check Global Options 3 there. Click write meta.xml and choose x:/apps/USBLoader/meta.xml
- You can also edit the meta.xml directly. Open the file in notepad and search for </app> near the end of the file.
- Add this <arguments><arg>ios=248</arg></arguments> before </apps>.
- Save meta.xml and you're done.
Method C (Easiest)
Requirements
Step 1: LetterBomb
First of all we're gonna download LetterBomb. Go to this page. He're we need to fill in some information. Start out by choosing your system menu version. After that fill in your Wii's MAC address. You can find your MAC address by booting up your Wii, go to settings (the big round button with Wii on it), select 'Internet' and then 'Console Settings'. The MAC address is displayed on the first line.
Make sure that 'Bundle the HackMii installer for me!' is selected, enter the captcha words and click either the blue or the red button. Extract the files to the root of your SD and pop it in your Wii.
Once you're in the Wii menu, go to the 'messageboard' menu. From this view you will be presented with a small envelope (that should obviously stand out against the rest of your plain old boring ones), click it, kick back, cross your fingers and hope it worked.
Note: You might need to browse trought today, yesterday, two days ago etc. to find the envelope.
After Letterbomb do this:
Step X: Download these files
Download
Copy them to your MicroSD. (NOTE: Ignore the ModMii Guide, just delete it. It's Dutch and I accidentally uploaded it.)
Step 2: Installing a Patched IOS
Open up the Homebrew channel, start 'Simple IOS Patcher'. Choose 'IOS36' and press A. Choose 'Install IOS to slot' and choose 236. Choose 'Install patched IOS36' with the 4 patched turned on 'yes' and press A. Choose 'Load IOS from SD card'. Press A. Press A to continue to the installation (if asked). If the installation is complete, press B to exit.
NOTE: If there are any errors, just keep trying.
Step 3: Installing PriiLoader
Start 'PriiLoader 236 Mod' in the Homebrew Channel. After PriiLoader is fully loaded, press + to install. Ignore any 'loader.ini' and/or 'password.txt' errors. After PriiLoader is succesfully installed, you can acces to it by turning the Wii on and off while holding the reset button until the PriiLoader menu appears. Now you need to install some hacks. Go to 'System Menu Hacks'. Install these hacks:
Start Multi-Mod Manager (MMM) in the HBC. If IOS236 isn't loaded yet, choose 'Load another IOS' and then choos IOS236. In MMM's main menu, choose 'WAD Manager'. Now install some WADs. To install all the WADs, hold + for 2 seconds to select all of them and then press A twice to install all of them.
Step 5: Install a Backup Loader (NeoGamma)
First of all we're gonna download NeoGamma:
NeoGamma R9b50
Now get the SD card out of your Wii and put it in your computer. In the root of your SD should be a folder called 'apps'. Open it. Now extract NeoGamma. If you extract NeoGamma, there should be some files inside. Go into the 'apps' folder inside and copy the 'NeoGamma' folder into the 'apps' folder on your SD card.
Copy all the other files to the root of your SD card.
NeoGamma is now installed and can be launched in the Homebrew Channel.
Step 6: Burning Wii ISOS.
Now we need Wii ISOS. I won't tell your where to get them (Google is your best friend.). Make sure the Wii ISO you download has a *.iso extension.
Next we're gonna download and install ImgBurn. You can download it here. Install the program and open it.
Now choose 'Write image file to disc'. Select your ISO file. The next step is important: in the under right corner you see the settings. Set the Write Speed to 1x. Always burn Wii ISOs on the slowest speed! The slower the better.
Now wait for it to finish. After it's done writing, don't get the DVD out yet! It has to verify first! After you here the tune and see the message that it's done you can get the DVD out.
Note: If your DVD is done writing and your DVD ejects, no worries! Just pop it back in and hit OK.
Now pop your DVD in your Wii and go to the Homebrew Channel to start NeoGamma. Choose to load game from disc and enjoy!
- SD Card
- DVD's (DVD-R)
Step 1: LetterBomb
First of all we're gonna download LetterBomb. Go to this page. He're we need to fill in some information. Start out by choosing your system menu version. After that fill in your Wii's MAC address. You can find your MAC address by booting up your Wii, go to settings (the big round button with Wii on it), select 'Internet' and then 'Console Settings'. The MAC address is displayed on the first line.
Make sure that 'Bundle the HackMii installer for me!' is selected, enter the captcha words and click either the blue or the red button. Extract the files to the root of your SD and pop it in your Wii.
Once you're in the Wii menu, go to the 'messageboard' menu. From this view you will be presented with a small envelope (that should obviously stand out against the rest of your plain old boring ones), click it, kick back, cross your fingers and hope it worked.
Note: You might need to browse trought today, yesterday, two days ago etc. to find the envelope.
After Letterbomb do this:
Step X: Download these files
Download
Copy them to your MicroSD. (NOTE: Ignore the ModMii Guide, just delete it. It's Dutch and I accidentally uploaded it.)
Step 2: Installing a Patched IOS
Open up the Homebrew channel, start 'Simple IOS Patcher'. Choose 'IOS36' and press A. Choose 'Install IOS to slot' and choose 236. Choose 'Install patched IOS36' with the 4 patched turned on 'yes' and press A. Choose 'Load IOS from SD card'. Press A. Press A to continue to the installation (if asked). If the installation is complete, press B to exit.
NOTE: If there are any errors, just keep trying.
Step 3: Installing PriiLoader
Start 'PriiLoader 236 Mod' in the Homebrew Channel. After PriiLoader is fully loaded, press + to install. Ignore any 'loader.ini' and/or 'password.txt' errors. After PriiLoader is succesfully installed, you can acces to it by turning the Wii on and off while holding the reset button until the PriiLoader menu appears. Now you need to install some hacks. Go to 'System Menu Hacks'. Install these hacks:
- Block Disc Updates
- Block Online Updates
- Replace Health Screen
- Auto-Press A at Health Screen
- Region-Free Everything
- Remove no copy save file protection
- Move Disc Channel
Start Multi-Mod Manager (MMM) in the HBC. If IOS236 isn't loaded yet, choose 'Load another IOS' and then choos IOS236. In MMM's main menu, choose 'WAD Manager'. Now install some WADs. To install all the WADs, hold + for 2 seconds to select all of them and then press A twice to install all of them.
Step 5: Install a Backup Loader (NeoGamma)
First of all we're gonna download NeoGamma:
NeoGamma R9b50
Now get the SD card out of your Wii and put it in your computer. In the root of your SD should be a folder called 'apps'. Open it. Now extract NeoGamma. If you extract NeoGamma, there should be some files inside. Go into the 'apps' folder inside and copy the 'NeoGamma' folder into the 'apps' folder on your SD card.
Copy all the other files to the root of your SD card.
NeoGamma is now installed and can be launched in the Homebrew Channel.
Step 6: Burning Wii ISOS.
Now we need Wii ISOS. I won't tell your where to get them (Google is your best friend.). Make sure the Wii ISO you download has a *.iso extension.
Next we're gonna download and install ImgBurn. You can download it here. Install the program and open it.
Now choose 'Write image file to disc'. Select your ISO file. The next step is important: in the under right corner you see the settings. Set the Write Speed to 1x. Always burn Wii ISOs on the slowest speed! The slower the better.
Now wait for it to finish. After it's done writing, don't get the DVD out yet! It has to verify first! After you here the tune and see the message that it's done you can get the DVD out.
Note: If your DVD is done writing and your DVD ejects, no worries! Just pop it back in and hit OK.
Now pop your DVD in your Wii and go to the Homebrew Channel to start NeoGamma. Choose to load game from disc and enjoy!
Method D
Requirements
First of all we're gonna download LetterBomb. Go to this page. He're we need to fill in some information. Start out by choosing your system menu version. After that fill in your Wii's MAC address. You can find your MAC address by booting up your Wii, go to settings (the big round button with Wii on it), select 'Internet' and then 'Console Settings'. The MAC address is displayed on the first line.
Make sure that 'Bundle the HackMii installer for me!' is selected, enter the captcha words and click either the blue or the red button. Extract the files to the root of your SD and pop it in your Wii.
Once you're in the Wii menu, go to the 'messageboard' menu. From this view you will be presented with a small envelope (that should obviously stand out against the rest of your plain old boring ones), click it, kick back, cross your fingers and hope it worked.
Note: You might need to browse trought today, yesterday, two days ago etc. to find the envelope.
After Letterbomb do this:
Step X: Download these files
Download
Copy them to your MicroSD. (NOTE: Ignore the ModMii Guide, just delete it. It's Dutch and I accidentally uploaded it.)
Step 2: Installing a Patched IOS
Open up the Homebrew channel, start 'Simple IOS Patcher'. Choose 'IOS36' and press A. Choose 'Install IOS to slot' and choose 236. Choose 'Install patched IOS36' with the 4 patched turned on 'yes' and press A. Choose 'Load IOS from SD card'. Press A. Press A to continue to the installation (if asked). If the installation is complete, press B to exit.
NOTE: If there are any errors, just keep trying.
Step 3: Installing PriiLoader
Start 'PriiLoader 236 Mod' in the Homebrew Channel. After PriiLoader is fully loaded, press + to install. Ignore any 'loader.ini' and/or 'password.txt' errors. After PriiLoader is succesfully installed, you can acces to it by turning the Wii on and off while holding the reset button until the PriiLoader menu appears. Now you need to install some hacks. Go to 'System Menu Hacks'. Install these hacks:
Start Multi-Mod Manager (MMM) in the HBC. If IOS236 isn't loaded yet, choose 'Load another IOS' and then choos IOS236. In MMM's main menu, choose 'WAD Manager'. Now install some WADs. To install all the WADs, hold + for 2 seconds to select all of them and then press A twice to install all of them.
Step 5: Install
Configurable USB Loader (written by blastermak)
First, download the USB Loader package with all the files you need:
USB Loader Package
The first thing we do is install IOS236. IOS236 is basically the gateway to installing cIOSes in the stubbed slots when on firmware 4.0+.
Now unzip the installer onto your SD card and you should have a x:/apps/IOS236/boot.dol and a x:/apps/IOS236/meta.xml where x refers to your SD card letter. Eject the SD card from your computer and put it into your Wii.
Boot up the homebrew channel and you should see a banner with IOS236 on your screen.
Point or select it, press A and press Start.
Read the messages that pass by and press 1.
If you have a working internet connection on your Wii select 'Download IOS from NUS' otherwise select 'Load IOS from SD card'. Confirm with A and when asked press A again.
You should now be faced with a question, choose your answer wisely and press the correct button.
The installation will now continue and finish.
Congratulations, you have now installed a modified IOS36 into slot 236.
Next tep is d2x.
Things to download:
d2x is really versatile as it can be installed in many slots.
For this tutorial we are going to install into the following slots: IOS248 with base 56 and IOS247 with base 57, these slots have been selected for the best compatibility.
To begin unrar the package onto your SD card so that you get: x:/apps/d2x installer v2.2/boot.dol and a x:/apps/d2x installer v2.2/meta.xml.
When you have no internet connection copy IOS56-64-v5661.wad and IOS57-64-v5918.wad to the root of the SD card.
Boot up the homebrew channel and select d2x installer v2.2. Press the A button at the start screen.
Choose IOS236 when asked, it should be selected by default. To install d2x into slot 248 you should do the following:
Things to download:
WBFS
WBFS was the first format supported by the USB loaders. This filesystem is quite outdated and has some instabilities when deleting games. When you format your HDD this way you can only use it for storing Wii games, nothing else. I don't recommend this filesystem.
FAT
This is the most flexible format. You can store Wii games and other files on it and it is supported by every OS. Minor drawback is the 4GB filesize limit. You won't encounter problems when installing games as the loader automatically splits and/or scrubs them. When formatting your drive in FAT you should use an external tool like GParted because Windows won't create a large enough drive.
NTFS
NTFS is mostly used when having large drives. Not every OS supports this format and CFG has some case sensitivity problems on NTFS. When using one you need to add several lines to config.txt or meta.xml or use the tool supplied. More info on how to do this on the end.
ext
Ext covers ext2, ext3 and ext4. Ext support is quite new and therefore can have bugs. Currently ext is read-only, so you can't install games via USB loaders.
My recommended choice is NTFS but it all depends on what you like.
To start unzip the package to your SD card so you end up with x:/usb-loader and x:/apps/USBLoader/boot.dol
If you get the IOS249 is a stub message do the steps shown below.
config.txt/meta.xml/configurator
The best way to get rid of the 'IOS249 is a stub' error is to use the configurator to select a different IOS to boot.
The settings for this can be found under Global Settings 3.
- SD Card
- HDD
First of all we're gonna download LetterBomb. Go to this page. He're we need to fill in some information. Start out by choosing your system menu version. After that fill in your Wii's MAC address. You can find your MAC address by booting up your Wii, go to settings (the big round button with Wii on it), select 'Internet' and then 'Console Settings'. The MAC address is displayed on the first line.
Make sure that 'Bundle the HackMii installer for me!' is selected, enter the captcha words and click either the blue or the red button. Extract the files to the root of your SD and pop it in your Wii.
Once you're in the Wii menu, go to the 'messageboard' menu. From this view you will be presented with a small envelope (that should obviously stand out against the rest of your plain old boring ones), click it, kick back, cross your fingers and hope it worked.
Note: You might need to browse trought today, yesterday, two days ago etc. to find the envelope.
After Letterbomb do this:
Step X: Download these files
Download
Copy them to your MicroSD. (NOTE: Ignore the ModMii Guide, just delete it. It's Dutch and I accidentally uploaded it.)
Step 2: Installing a Patched IOS
Open up the Homebrew channel, start 'Simple IOS Patcher'. Choose 'IOS36' and press A. Choose 'Install IOS to slot' and choose 236. Choose 'Install patched IOS36' with the 4 patched turned on 'yes' and press A. Choose 'Load IOS from SD card'. Press A. Press A to continue to the installation (if asked). If the installation is complete, press B to exit.
NOTE: If there are any errors, just keep trying.
Step 3: Installing PriiLoader
Start 'PriiLoader 236 Mod' in the Homebrew Channel. After PriiLoader is fully loaded, press + to install. Ignore any 'loader.ini' and/or 'password.txt' errors. After PriiLoader is succesfully installed, you can acces to it by turning the Wii on and off while holding the reset button until the PriiLoader menu appears. Now you need to install some hacks. Go to 'System Menu Hacks'. Install these hacks:
- Block Disc Updates
- Block Online Updates
- Replace Health Screen
- Auto-Press A at Health Screen
- Region-Free Everything
- Remove no copy save file protection
- Move Disc Channel
Start Multi-Mod Manager (MMM) in the HBC. If IOS236 isn't loaded yet, choose 'Load another IOS' and then choos IOS236. In MMM's main menu, choose 'WAD Manager'. Now install some WADs. To install all the WADs, hold + for 2 seconds to select all of them and then press A twice to install all of them.
Step 5: Install
Configurable USB Loader (written by blastermak)
First, download the USB Loader package with all the files you need:
USB Loader Package
The first thing we do is install IOS236. IOS236 is basically the gateway to installing cIOSes in the stubbed slots when on firmware 4.0+.
Now unzip the installer onto your SD card and you should have a x:/apps/IOS236/boot.dol and a x:/apps/IOS236/meta.xml where x refers to your SD card letter. Eject the SD card from your computer and put it into your Wii.
Boot up the homebrew channel and you should see a banner with IOS236 on your screen.
Point or select it, press A and press Start.
Read the messages that pass by and press 1.
If you have a working internet connection on your Wii select 'Download IOS from NUS' otherwise select 'Load IOS from SD card'. Confirm with A and when asked press A again.
You should now be faced with a question, choose your answer wisely and press the correct button.
The installation will now continue and finish.
Congratulations, you have now installed a modified IOS36 into slot 236.
Next tep is d2x.
Things to download:
- d2x cIOS Installer v2.2 (Included in the package)
- IOS56-64-v5661.wad and IOS57-64-v5918.wad when you don't have internet access on you Wii. (Not included in the package)
d2x is really versatile as it can be installed in many slots.
For this tutorial we are going to install into the following slots: IOS248 with base 56 and IOS247 with base 57, these slots have been selected for the best compatibility.
To begin unrar the package onto your SD card so that you get: x:/apps/d2x installer v2.2/boot.dol and a x:/apps/d2x installer v2.2/meta.xml.
When you have no internet connection copy IOS56-64-v5661.wad and IOS57-64-v5918.wad to the root of the SD card.
Boot up the homebrew channel and select d2x installer v2.2. Press the A button at the start screen.
Choose IOS236 when asked, it should be selected by default. To install d2x into slot 248 you should do the following:
- Select the latest version of d2x, selected by default.
- Select IOS56 for the base.
- Select IOS248 for the install slot.
- Push A to accept and run the installer.
- When the installer is done press A to return to the menu.
- Select the latest version of d2x, selected by default.
- Select IOS57 for the base.
- Select IOS247 for the install slot.
- Push A to accept and run the installer.
- When the installer is done press A to return to the homebrew channel.
Things to download:
- The latest version of CFG loader (Included in the package)
WBFS
WBFS was the first format supported by the USB loaders. This filesystem is quite outdated and has some instabilities when deleting games. When you format your HDD this way you can only use it for storing Wii games, nothing else. I don't recommend this filesystem.
FAT
This is the most flexible format. You can store Wii games and other files on it and it is supported by every OS. Minor drawback is the 4GB filesize limit. You won't encounter problems when installing games as the loader automatically splits and/or scrubs them. When formatting your drive in FAT you should use an external tool like GParted because Windows won't create a large enough drive.
NTFS
NTFS is mostly used when having large drives. Not every OS supports this format and CFG has some case sensitivity problems on NTFS. When using one you need to add several lines to config.txt or meta.xml or use the tool supplied. More info on how to do this on the end.
ext
Ext covers ext2, ext3 and ext4. Ext support is quite new and therefore can have bugs. Currently ext is read-only, so you can't install games via USB loaders.
My recommended choice is NTFS but it all depends on what you like.
To start unzip the package to your SD card so you end up with x:/usb-loader and x:/apps/USBLoader/boot.dol
If you get the IOS249 is a stub message do the steps shown below.
config.txt/meta.xml/configurator
The settings for this can be found under Global Settings 3.
- From here select IOS248 and check the box.
- After that select the Meta Arguments tab and check Global Options 3 there. Click write meta.xml and choose x:/apps/USBLoader/meta.xml
- You can also edit the meta.xml directly. Open the file in notepad and search for </app> near the end of the file.
- Add this <arguments><arg>ios=248</arg></arguments> before </apps>.
- Save meta.xml and you're done.
Method E
Requirements
We start this by download LetterBomb. If you have system menu 3.1 - 4.1 download LetterBomb v1. If you have system menu 4.2 download LetterBomb v2.
BannerBomb v1 (Download aad1f_v108.zip)
BannerBomb v2 (Download abd6a_v200.zip)
Step 1a: BannerBomb v1
Put your SD card into your computer. If there's a folder called 'private' in the root of the SD card, rename it to 'privateold'. Extract BannerBomb and copy everything to the root of your SD. Now we need to download HackMii. Download HackMii installer 0.8 from this page. Extract the HackMii file and copy only the installer.elf file to the root of your SD card. Now rename installer.elf to boot.elf. Turn on your Wii (Don't put the SD back in yet!) and go to the Wii Button, Data Management, Channels, SD. Put your SD card in the Wii. It should either pop up Load boot.dol/elf? or freeze. If that happens, download another version of BannerBomb and try again. If it works, say yes when asked to load boot.dol/elf. This will launch HackMii. Use HackMii to install the Homebrew Channel and BootMii as boot2 (if possible). If you can't install BootMii as boot2, click on 'prepare and SD card' and try again. Exit HackMii after installing HBC and BootMii and the Homebrew Channel will be launched.
Step 1b: BannerBomb v2
Put your SD card into your computer. If there's a folder called 'private' in the root of the SD card, rename it to 'privateold'. Extract BannerBomb and copy everything to the root of your SD. Now we need to download HackMii. Download HackMii installer 0.8 from this page. Extract the HackMii file and copy only the installer.elf file to the root of your SD card. Now rename installer.elf to boot.elf. Turn on your Wii (Don't put the SD back in yet!) and press the SD card icon to go into the SD card menu. Put your SD card in the Wii. It should either pop up Load boot.dol/elf? or freeze. If that happens, download another version of BannerBomb and try again. If it works, say yes when asked to load boot.dol/elf. This will launch HackMii. Use HackMii to install the Homebrew Channel and BootMii as boot2 (if possible). If you can't install BootMii as boot2, click on 'prepare and SD card' and try again. Exit HackMii after installing HBC and BootMii and the Homebrew Channel will be launched.
After Letterbomb do this:
Step X: Download these files
Download
Copy them to your MicroSD. (NOTE: Ignore the ModMii Guide, just delete it. It's Dutch and I accidentally uploaded it.)
Step 2: Installing a Patched IOS
Open up the Homebrew channel, start 'Simple IOS Patcher'. Choose 'IOS36' and press A. Choose 'Install IOS to slot' and choose 236. Choose 'Install patched IOS36' with the 4 patched turned on 'yes' and press A. Choose 'Load IOS from SD card'. Press A. Press A to continue to the installation (if asked). If the installation is complete, press B to exit.
NOTE: If there are any errors, just keep trying.
Step 3: Installing PriiLoader
Start 'PriiLoader 236 Mod' in the Homebrew Channel. After PriiLoader is fully loaded, press + to install. Ignore any 'loader.ini' and/or 'password.txt' errors. After PriiLoader is succesfully installed, you can acces to it by turning the Wii on and off while holding the reset button until the PriiLoader menu appears. Now you need to install some hacks. Go to 'System Menu Hacks'. Install these hacks:
Start Multi-Mod Manager (MMM) in the HBC. If IOS236 isn't loaded yet, choose 'Load another IOS' and then choos IOS236. In MMM's main menu, choose 'WAD Manager'. Now install some WADs. To install all the WADs, hold + for 2 seconds to select all of them and then press A twice to install all of them.
Step 5: Install a Backup Loader (NeoGamma)
First of all we're gonna download NeoGamma:
NeoGamma R9b50
Now get the SD card out of your Wii and put it in your computer. In the root of your SD should be a folder called 'apps'. Open it. Now extract NeoGamma. If you extract NeoGamma, there should be some files inside. Go into the 'apps' folder inside and copy the 'NeoGamma' folder into the 'apps' folder on your SD card.
Copy all the other files to the root of your SD card.
NeoGamma is now installed and can be launched in the Homebrew Channel.
Step 6: Burning Wii ISOS.
Now we need Wii ISOS. I won't tell your where to get them (Google is your best friend.). Make sure the Wii ISO you download has a *.iso extension.
Next we're gonna download and install ImgBurn. You can download it here. Install the program and open it.
Now choose 'Write image file to disc'. Select your ISO file. The next step is important: in the under right corner you see the settings. Set the Write Speed to 1x. Always burn Wii ISOs on the slowest speed! The slower the better.
Now wait for it to finish. After it's done writing, don't get the DVD out yet! It has to verify first! After you here the tune and see the message that it's done you can get the DVD out.
Note: If your DVD is done writing and your DVD ejects, no worries! Just pop it back in and hit OK.
Now pop your DVD in your Wii and go to the Homebrew Channel to start NeoGamma. Choose to load game from disc and enjoy!
- SD Card
- DVD's (DVD-R)
We start this by download LetterBomb. If you have system menu 3.1 - 4.1 download LetterBomb v1. If you have system menu 4.2 download LetterBomb v2.
BannerBomb v1 (Download aad1f_v108.zip)
BannerBomb v2 (Download abd6a_v200.zip)
Step 1a: BannerBomb v1
Put your SD card into your computer. If there's a folder called 'private' in the root of the SD card, rename it to 'privateold'. Extract BannerBomb and copy everything to the root of your SD. Now we need to download HackMii. Download HackMii installer 0.8 from this page. Extract the HackMii file and copy only the installer.elf file to the root of your SD card. Now rename installer.elf to boot.elf. Turn on your Wii (Don't put the SD back in yet!) and go to the Wii Button, Data Management, Channels, SD. Put your SD card in the Wii. It should either pop up Load boot.dol/elf? or freeze. If that happens, download another version of BannerBomb and try again. If it works, say yes when asked to load boot.dol/elf. This will launch HackMii. Use HackMii to install the Homebrew Channel and BootMii as boot2 (if possible). If you can't install BootMii as boot2, click on 'prepare and SD card' and try again. Exit HackMii after installing HBC and BootMii and the Homebrew Channel will be launched.
Step 1b: BannerBomb v2
Put your SD card into your computer. If there's a folder called 'private' in the root of the SD card, rename it to 'privateold'. Extract BannerBomb and copy everything to the root of your SD. Now we need to download HackMii. Download HackMii installer 0.8 from this page. Extract the HackMii file and copy only the installer.elf file to the root of your SD card. Now rename installer.elf to boot.elf. Turn on your Wii (Don't put the SD back in yet!) and press the SD card icon to go into the SD card menu. Put your SD card in the Wii. It should either pop up Load boot.dol/elf? or freeze. If that happens, download another version of BannerBomb and try again. If it works, say yes when asked to load boot.dol/elf. This will launch HackMii. Use HackMii to install the Homebrew Channel and BootMii as boot2 (if possible). If you can't install BootMii as boot2, click on 'prepare and SD card' and try again. Exit HackMii after installing HBC and BootMii and the Homebrew Channel will be launched.
After Letterbomb do this:
Step X: Download these files
Download
Copy them to your MicroSD. (NOTE: Ignore the ModMii Guide, just delete it. It's Dutch and I accidentally uploaded it.)
Step 2: Installing a Patched IOS
Open up the Homebrew channel, start 'Simple IOS Patcher'. Choose 'IOS36' and press A. Choose 'Install IOS to slot' and choose 236. Choose 'Install patched IOS36' with the 4 patched turned on 'yes' and press A. Choose 'Load IOS from SD card'. Press A. Press A to continue to the installation (if asked). If the installation is complete, press B to exit.
NOTE: If there are any errors, just keep trying.
Step 3: Installing PriiLoader
Start 'PriiLoader 236 Mod' in the Homebrew Channel. After PriiLoader is fully loaded, press + to install. Ignore any 'loader.ini' and/or 'password.txt' errors. After PriiLoader is succesfully installed, you can acces to it by turning the Wii on and off while holding the reset button until the PriiLoader menu appears. Now you need to install some hacks. Go to 'System Menu Hacks'. Install these hacks:
- Block Disc Updates
- Block Online Updates
- Replace Health Screen
- Auto-Press A at Health Screen
- Region-Free Everything
- Remove no copy save file protection
- Move Disc Channel
Start Multi-Mod Manager (MMM) in the HBC. If IOS236 isn't loaded yet, choose 'Load another IOS' and then choos IOS236. In MMM's main menu, choose 'WAD Manager'. Now install some WADs. To install all the WADs, hold + for 2 seconds to select all of them and then press A twice to install all of them.
Step 5: Install a Backup Loader (NeoGamma)
First of all we're gonna download NeoGamma:
NeoGamma R9b50
Now get the SD card out of your Wii and put it in your computer. In the root of your SD should be a folder called 'apps'. Open it. Now extract NeoGamma. If you extract NeoGamma, there should be some files inside. Go into the 'apps' folder inside and copy the 'NeoGamma' folder into the 'apps' folder on your SD card.
Copy all the other files to the root of your SD card.
NeoGamma is now installed and can be launched in the Homebrew Channel.
Step 6: Burning Wii ISOS.
Now we need Wii ISOS. I won't tell your where to get them (Google is your best friend.). Make sure the Wii ISO you download has a *.iso extension.
Next we're gonna download and install ImgBurn. You can download it here. Install the program and open it.
Now choose 'Write image file to disc'. Select your ISO file. The next step is important: in the under right corner you see the settings. Set the Write Speed to 1x. Always burn Wii ISOs on the slowest speed! The slower the better.
Now wait for it to finish. After it's done writing, don't get the DVD out yet! It has to verify first! After you here the tune and see the message that it's done you can get the DVD out.
Note: If your DVD is done writing and your DVD ejects, no worries! Just pop it back in and hit OK.
Now pop your DVD in your Wii and go to the Homebrew Channel to start NeoGamma. Choose to load game from disc and enjoy!
Method F
Requirements
We start this by download LetterBomb. If you have system menu 3.1 - 4.1 download LetterBomb v1. If you have system menu 4.2 download LetterBomb v2.
BannerBomb v1 (Download aad1f_v108.zip)
BannerBomb v2 (Download abd6a_v200.zip)
Step 1a: BannerBomb v1
Put your SD card into your computer. If there's a folder called 'private' in the root of the SD card, rename it to 'privateold'. Extract BannerBomb and copy everything to the root of your SD. Now we need to download HackMii. Download HackMii installer 0.8 from this page. Extract the HackMii file and copy only the installer.elf file to the root of your SD card. Now rename installer.elf to boot.elf. Turn on your Wii (Don't put the SD back in yet!) and go to the Wii Button, Data Management, Channels, SD. Put your SD card in the Wii. It should either pop up Load boot.dol/elf? or freeze. If that happens, download another version of BannerBomb and try again. If it works, say yes when asked to load boot.dol/elf. This will launch HackMii. Use HackMii to install the Homebrew Channel and BootMii as boot2 (if possible). If you can't install BootMii as boot2, click on 'prepare and SD card' and try again. Exit HackMii after installing HBC and BootMii and the Homebrew Channel will be launched.
Step 1b: BannerBomb v2
Put your SD card into your computer. If there's a folder called 'private' in the root of the SD card, rename it to 'privateold'. Extract BannerBomb and copy everything to the root of your SD. Now we need to download HackMii. Download HackMii installer 0.8 from this page. Extract the HackMii file and copy only the installer.elf file to the root of your SD card. Now rename installer.elf to boot.elf. Turn on your Wii (Don't put the SD back in yet!) and press the SD card icon to go into the SD card menu. Put your SD card in the Wii. It should either pop up Load boot.dol/elf? or freeze. If that happens, download another version of BannerBomb and try again. If it works, say yes when asked to load boot.dol/elf. This will launch HackMii. Use HackMii to install the Homebrew Channel and BootMii as boot2 (if possible). If you can't install BootMii as boot2, click on 'prepare and SD card' and try again. Exit HackMii after installing HBC and BootMii and the Homebrew Channel will be launched.
After Letterbomb do this:
Step X: Download these files
Download
Copy them to your MicroSD. (NOTE: Ignore the ModMii Guide, just delete it. It's Dutch and I accidentally uploaded it.)
Step 2: Installing a Patched IOS
Open up the Homebrew channel, start 'Simple IOS Patcher'. Choose 'IOS36' and press A. Choose 'Install IOS to slot' and choose 236. Choose 'Install patched IOS36' with the 4 patched turned on 'yes' and press A. Choose 'Load IOS from SD card'. Press A. Press A to continue to the installation (if asked). If the installation is complete, press B to exit.
NOTE: If there are any errors, just keep trying.
Step 3: Installing PriiLoader
Start 'PriiLoader 236 Mod' in the Homebrew Channel. After PriiLoader is fully loaded, press + to install. Ignore any 'loader.ini' and/or 'password.txt' errors. After PriiLoader is succesfully installed, you can acces to it by turning the Wii on and off while holding the reset button until the PriiLoader menu appears. Now you need to install some hacks. Go to 'System Menu Hacks'. Install these hacks:
Start Multi-Mod Manager (MMM) in the HBC. If IOS236 isn't loaded yet, choose 'Load another IOS' and then choos IOS236. In MMM's main menu, choose 'WAD Manager'. Now install some WADs. To install all the WADs, hold + for 2 seconds to select all of them and then press A twice to install all of them.
Step 5: Install
Configurable USB Loader (written by blastermak)
First, download these files:
USB Loader Package
The first thing we do is install IOS236. IOS236 is basically the gateway to installing cIOSes in the stubbed slots when on firmware 4.0+.
Now unzip the installer onto your SD card and you should have a x:/apps/IOS236/boot.dol and a x:/apps/IOS236/meta.xml where x refers to your SD card letter. Eject the SD card from your computer and put it into your Wii.
Boot up the homebrew channel and you should see a banner with IOS236 on your screen.
Point or select it, press A and press Start.
Read the messages that pass by and press 1.
If you have a working internet connection on your Wii select 'Download IOS from NUS' otherwise select 'Load IOS from SD card'. Confirm with A and when asked press A again.
You should now be faced with a question, choose your answer wisely and press the correct button.
The installation will now continue and finish.
Congratulations, you have now installed a modified IOS36 into slot 236.
Next tep is d2x.
Things to download:
d2x is really versatile as it can be installed in many slots.
For this tutorial we are going to install into the following slots: IOS248 with base 56 and IOS247 with base 57, these slots have been selected for the best compatibility.
To begin unrar the package onto your SD card so that you get: x:/apps/d2x installer v2.2/boot.dol and a x:/apps/d2x installer v2.2/meta.xml.
When you have no internet connection copy IOS56-64-v5661.wad and IOS57-64-v5918.wad to the root of the SD card.
Boot up the homebrew channel and select d2x installer v2.2. Press the A button at the start screen.
Choose IOS236 when asked, it should be selected by default. To install d2x into slot 248 you should do the following:
Things to download:
WBFS
WBFS was the first format supported by the USB loaders. This filesystem is quite outdated and has some instabilities when deleting games. When you format your HDD this way you can only use it for storing Wii games, nothing else. I don't recommend this filesystem.
FAT
This is the most flexible format. You can store Wii games and other files on it and it is supported by every OS. Minor drawback is the 4GB filesize limit. You won't encounter problems when installing games as the loader automatically splits and/or scrubs them. When formatting your drive in FAT you should use an external tool like GParted because Windows won't create a large enough drive.
NTFS
NTFS is mostly used when having large drives. Not every OS supports this format and CFG has some case sensitivity problems on NTFS. When using one you need to add several lines to config.txt or meta.xml or use the tool supplied. More info on how to do this on the end.
ext
Ext covers ext2, ext3 and ext4. Ext support is quite new and therefore can have bugs. Currently ext is read-only, so you can't install games via USB loaders.
My recommended choice is NTFS but it all depends on what you like.
To start unzip the package to your SD card so you end up with x:/usb-loader and x:/apps/USBLoader/boot.dol
If you get the IOS249 is a stub message do the steps shown below.
config.txt/meta.xml/configurator
The best way to get rid of the 'IOS249 is a stub' error is to use the configurator to select a different IOS to boot.
The settings for this can be found under Global Settings 3.
- SD Card
- HDD
We start this by download LetterBomb. If you have system menu 3.1 - 4.1 download LetterBomb v1. If you have system menu 4.2 download LetterBomb v2.
BannerBomb v1 (Download aad1f_v108.zip)
BannerBomb v2 (Download abd6a_v200.zip)
Step 1a: BannerBomb v1
Put your SD card into your computer. If there's a folder called 'private' in the root of the SD card, rename it to 'privateold'. Extract BannerBomb and copy everything to the root of your SD. Now we need to download HackMii. Download HackMii installer 0.8 from this page. Extract the HackMii file and copy only the installer.elf file to the root of your SD card. Now rename installer.elf to boot.elf. Turn on your Wii (Don't put the SD back in yet!) and go to the Wii Button, Data Management, Channels, SD. Put your SD card in the Wii. It should either pop up Load boot.dol/elf? or freeze. If that happens, download another version of BannerBomb and try again. If it works, say yes when asked to load boot.dol/elf. This will launch HackMii. Use HackMii to install the Homebrew Channel and BootMii as boot2 (if possible). If you can't install BootMii as boot2, click on 'prepare and SD card' and try again. Exit HackMii after installing HBC and BootMii and the Homebrew Channel will be launched.
Step 1b: BannerBomb v2
Put your SD card into your computer. If there's a folder called 'private' in the root of the SD card, rename it to 'privateold'. Extract BannerBomb and copy everything to the root of your SD. Now we need to download HackMii. Download HackMii installer 0.8 from this page. Extract the HackMii file and copy only the installer.elf file to the root of your SD card. Now rename installer.elf to boot.elf. Turn on your Wii (Don't put the SD back in yet!) and press the SD card icon to go into the SD card menu. Put your SD card in the Wii. It should either pop up Load boot.dol/elf? or freeze. If that happens, download another version of BannerBomb and try again. If it works, say yes when asked to load boot.dol/elf. This will launch HackMii. Use HackMii to install the Homebrew Channel and BootMii as boot2 (if possible). If you can't install BootMii as boot2, click on 'prepare and SD card' and try again. Exit HackMii after installing HBC and BootMii and the Homebrew Channel will be launched.
After Letterbomb do this:
Step X: Download these files
Download
Copy them to your MicroSD. (NOTE: Ignore the ModMii Guide, just delete it. It's Dutch and I accidentally uploaded it.)
Step 2: Installing a Patched IOS
Open up the Homebrew channel, start 'Simple IOS Patcher'. Choose 'IOS36' and press A. Choose 'Install IOS to slot' and choose 236. Choose 'Install patched IOS36' with the 4 patched turned on 'yes' and press A. Choose 'Load IOS from SD card'. Press A. Press A to continue to the installation (if asked). If the installation is complete, press B to exit.
NOTE: If there are any errors, just keep trying.
Step 3: Installing PriiLoader
Start 'PriiLoader 236 Mod' in the Homebrew Channel. After PriiLoader is fully loaded, press + to install. Ignore any 'loader.ini' and/or 'password.txt' errors. After PriiLoader is succesfully installed, you can acces to it by turning the Wii on and off while holding the reset button until the PriiLoader menu appears. Now you need to install some hacks. Go to 'System Menu Hacks'. Install these hacks:
- Block Disc Updates
- Block Online Updates
- Replace Health Screen
- Auto-Press A at Health Screen
- Region-Free Everything
- Remove no copy save file protection
- Move Disc Channel
Start Multi-Mod Manager (MMM) in the HBC. If IOS236 isn't loaded yet, choose 'Load another IOS' and then choos IOS236. In MMM's main menu, choose 'WAD Manager'. Now install some WADs. To install all the WADs, hold + for 2 seconds to select all of them and then press A twice to install all of them.
Step 5: Install
Configurable USB Loader (written by blastermak)
First, download these files:
USB Loader Package
The first thing we do is install IOS236. IOS236 is basically the gateway to installing cIOSes in the stubbed slots when on firmware 4.0+.
Now unzip the installer onto your SD card and you should have a x:/apps/IOS236/boot.dol and a x:/apps/IOS236/meta.xml where x refers to your SD card letter. Eject the SD card from your computer and put it into your Wii.
Boot up the homebrew channel and you should see a banner with IOS236 on your screen.
Point or select it, press A and press Start.
Read the messages that pass by and press 1.
If you have a working internet connection on your Wii select 'Download IOS from NUS' otherwise select 'Load IOS from SD card'. Confirm with A and when asked press A again.
You should now be faced with a question, choose your answer wisely and press the correct button.
The installation will now continue and finish.
Congratulations, you have now installed a modified IOS36 into slot 236.
Next tep is d2x.
Things to download:
- d2x cIOS Installer v2.2 (Included in the package)
- IOS56-64-v5661.wad and IOS57-64-v5918.wad when you don't have internet access on you Wii. (Not included in the package)
d2x is really versatile as it can be installed in many slots.
For this tutorial we are going to install into the following slots: IOS248 with base 56 and IOS247 with base 57, these slots have been selected for the best compatibility.
To begin unrar the package onto your SD card so that you get: x:/apps/d2x installer v2.2/boot.dol and a x:/apps/d2x installer v2.2/meta.xml.
When you have no internet connection copy IOS56-64-v5661.wad and IOS57-64-v5918.wad to the root of the SD card.
Boot up the homebrew channel and select d2x installer v2.2. Press the A button at the start screen.
Choose IOS236 when asked, it should be selected by default. To install d2x into slot 248 you should do the following:
- Select the latest version of d2x, selected by default.
- Select IOS56 for the base.
- Select IOS248 for the install slot.
- Push A to accept and run the installer.
- When the installer is done press A to return to the menu.
- Select the latest version of d2x, selected by default.
- Select IOS57 for the base.
- Select IOS247 for the install slot.
- Push A to accept and run the installer.
- When the installer is done press A to return to the homebrew channel.
Things to download:
- The latest version of CFG loader (Included in the package)
WBFS
WBFS was the first format supported by the USB loaders. This filesystem is quite outdated and has some instabilities when deleting games. When you format your HDD this way you can only use it for storing Wii games, nothing else. I don't recommend this filesystem.
FAT
This is the most flexible format. You can store Wii games and other files on it and it is supported by every OS. Minor drawback is the 4GB filesize limit. You won't encounter problems when installing games as the loader automatically splits and/or scrubs them. When formatting your drive in FAT you should use an external tool like GParted because Windows won't create a large enough drive.
NTFS
NTFS is mostly used when having large drives. Not every OS supports this format and CFG has some case sensitivity problems on NTFS. When using one you need to add several lines to config.txt or meta.xml or use the tool supplied. More info on how to do this on the end.
ext
Ext covers ext2, ext3 and ext4. Ext support is quite new and therefore can have bugs. Currently ext is read-only, so you can't install games via USB loaders.
My recommended choice is NTFS but it all depends on what you like.
To start unzip the package to your SD card so you end up with x:/usb-loader and x:/apps/USBLoader/boot.dol
If you get the IOS249 is a stub message do the steps shown below.
config.txt/meta.xml/configurator
The settings for this can be found under Global Settings 3.
- From here select IOS248 and check the box.
- After that select the Meta Arguments tab and check Global Options 3 there. Click write meta.xml and choose x:/apps/USBLoader/meta.xml
- You can also edit the meta.xml directly. Open the file in notepad and search for </app> near the end of the file.
- Add this <arguments><arg>ios=248</arg></arguments> before </apps>.
- Save meta.xml and you're done.
Credits
- XFlak for ModMii.
- blastermak for his HDD tutorial.
- Team Twiizers for LetterBomb.
- Comex for BannerBomb
Last edited by Kiekoes,
, Reason: There were some random Dutch words in there.